Get to know Ordering
Using the Ordering module you can manage everything in the ordering process from your Order Pad to Restrictions, including Wholesalers, Goods In, logs, history and more.
To access the Ordering module, select Ordering from the left-nav.
Ordering settings
| Setting | Value/Description |
|---|---|
| Ordering Method |
|
| Enable Order Basket |
|
| Add Zero Qty to Order Pad |
|
| Hide Zero Qty from Order Basket |
|
| Lock Rejected Items |
|
| Allow Edit Restrictions |
|
Order Pad
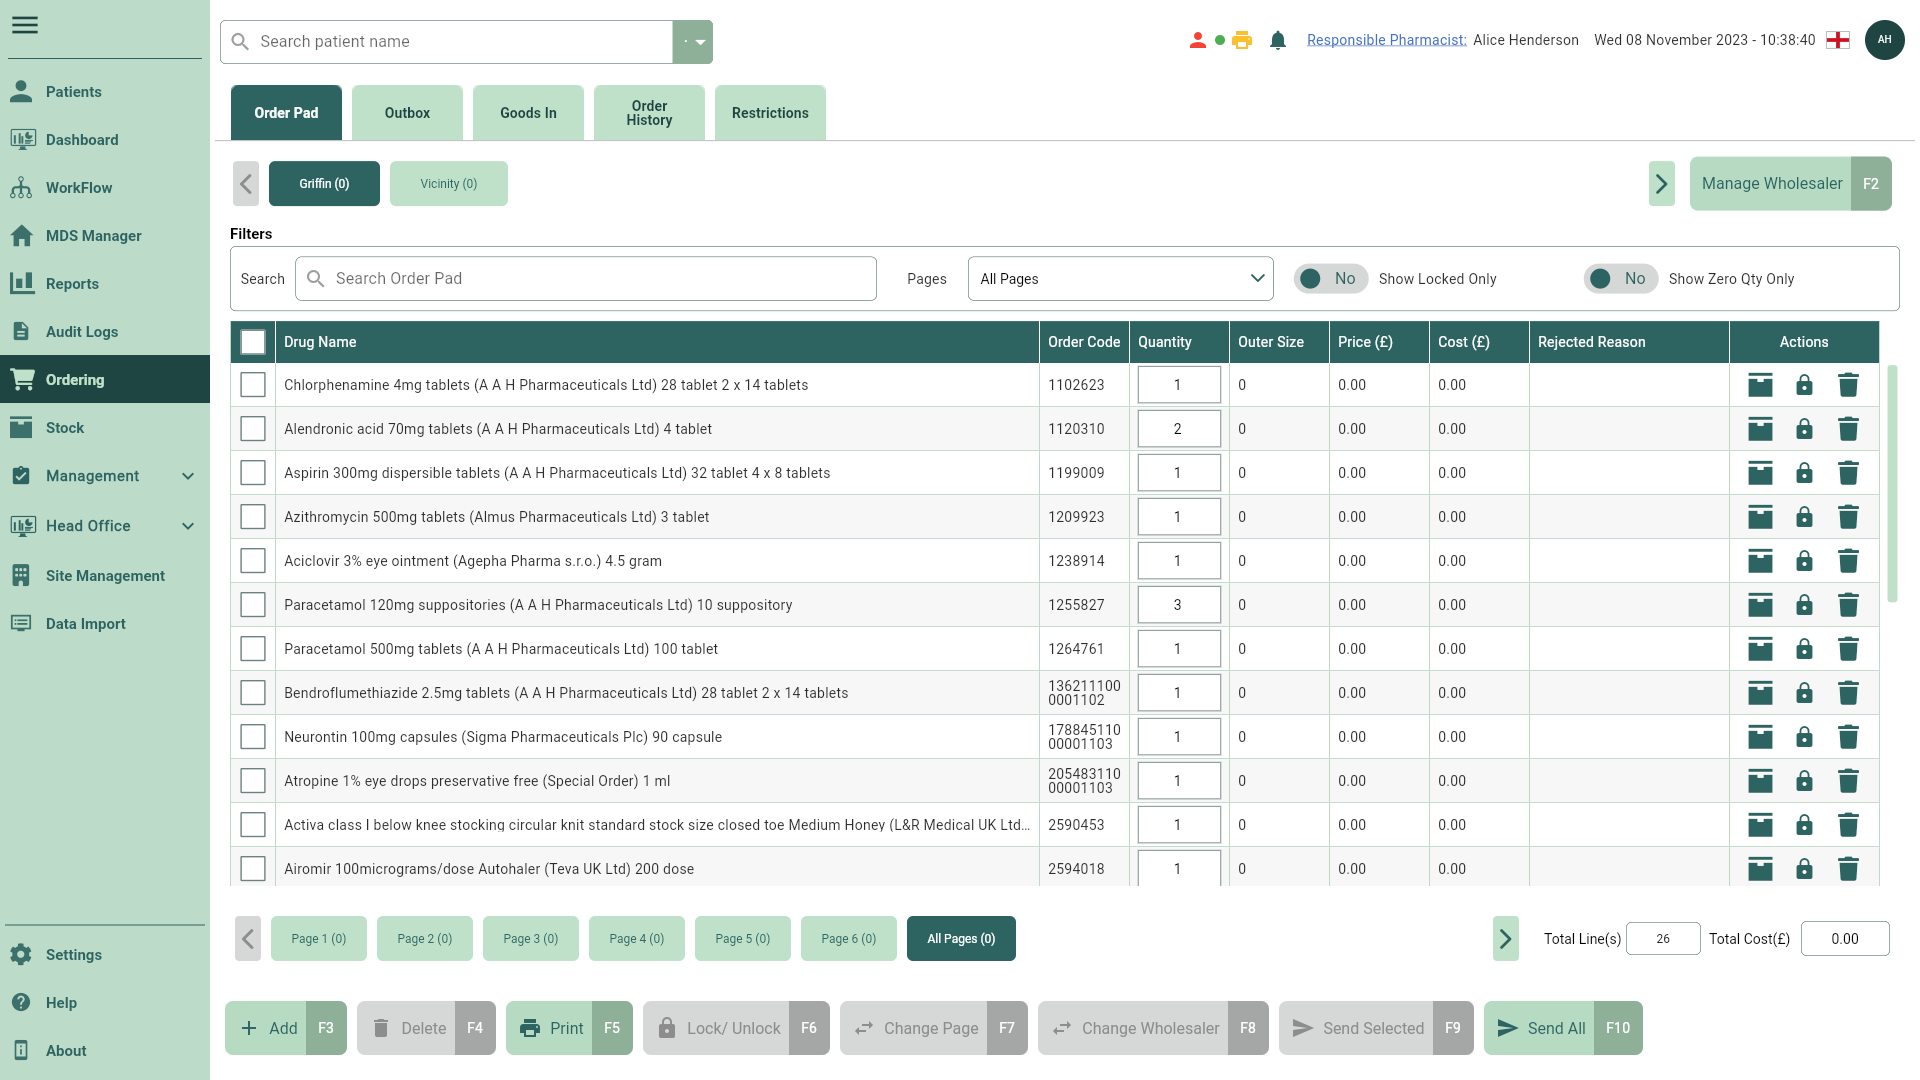
Build and manage your orders on the Order Pad. Create wholesalers, add items to order across multiple pages, and transmit your orders once they're ready to send.
| Field | Description |
|---|---|
| Wholesalers | Sitting directly above the Order Pad Filters are all your wholesalers. Selecting a wholesaler tab will display any items you have added to the wholesaler's Order Pad. |
| [Manage Wholesalers – F2] | Use the [Manage Wholesalers - F2] button to open the Manage Wholesalers window. In this window you can create, edit and delete wholesalers, and set their priority on the Order Pad. |
| Filters | Use the Filters to refine the items displayed on the selected page and wholesaler's Order Pad. |
| Grid | The Order Pad grid is populated based on your chosen filters. Within the grid, you’ll see all the items you have added to order on your selected page from your selected wholesaler. Using the icons in the Actions column, you can lock/unlock items, delete items from the Order Pad and access the item’s stock card. To edit the order quantity, you can update the value within the Quantity column. |
| Pages | You can create up to six (6) pages when creating your wholesaler. You can add items to each page and view them separately or altogether using the All Pages tab. A total of the item(s) on each page displays on each page tab, alongside the page name, which you can update by double-clicking the page tab. If a page is renamed as Urgent, it will be transmitted as urgent, provided the wholesaler supports this functionality. You can view the transmission details via the Transmission Log on the Order History tab. |
| Total Line(s) | A count of all items on the selected page and wholesaler tab. This field cannot be edited. |
| Total Cost (£) | The total cost for all items on the selected page and wholesaler tab. This field cannot be edited. |
| [Add – F3] | Open the Add Item(s) window to add item(s) on the selected page and wholesaler tab. |
| [Delete – F4] | Select one or more items in the grid and use the [Delete – F4] button to remove them from the Order Pad. |
| [Print – F5] | Print the item(s) and order details (wholesaler and page) as displayed on the selected page and wholesaler tab. |
| [Lock/Unlock – F6] | Select one or more items in the grid and use the [Lock/Unlock – F6] button to mark them as locked or unlocked. You’ll be prompted to provide a Lock Reason if you are marking items as Locked. This reason can be viewed once the item is locked by hovering over the Locked badge. Locked items will be excluded when transmitting orders. |
| [Change Page – F7] | Select one or more items in the grid and use the [Change Page – F7] button to move the item(s) to another page. |
| [Change Wholesaler – F8] | Select one or more items in the grid and use the [Change Wholesaler – F8] button to move the item(s) to another wholesaler. |
| [Send Selected – F9] | Transmit an order for the selected lines only. This will exclude locked items and any items with zero quantity. The selected items will move to the Outbox tab to transmit. |
| [Send All – F10] | Transmit an order for all items on the Order Pad, excluding locked items and any items with zero quantity. All items will move to the Outbox tab to transmit. |
Outbox
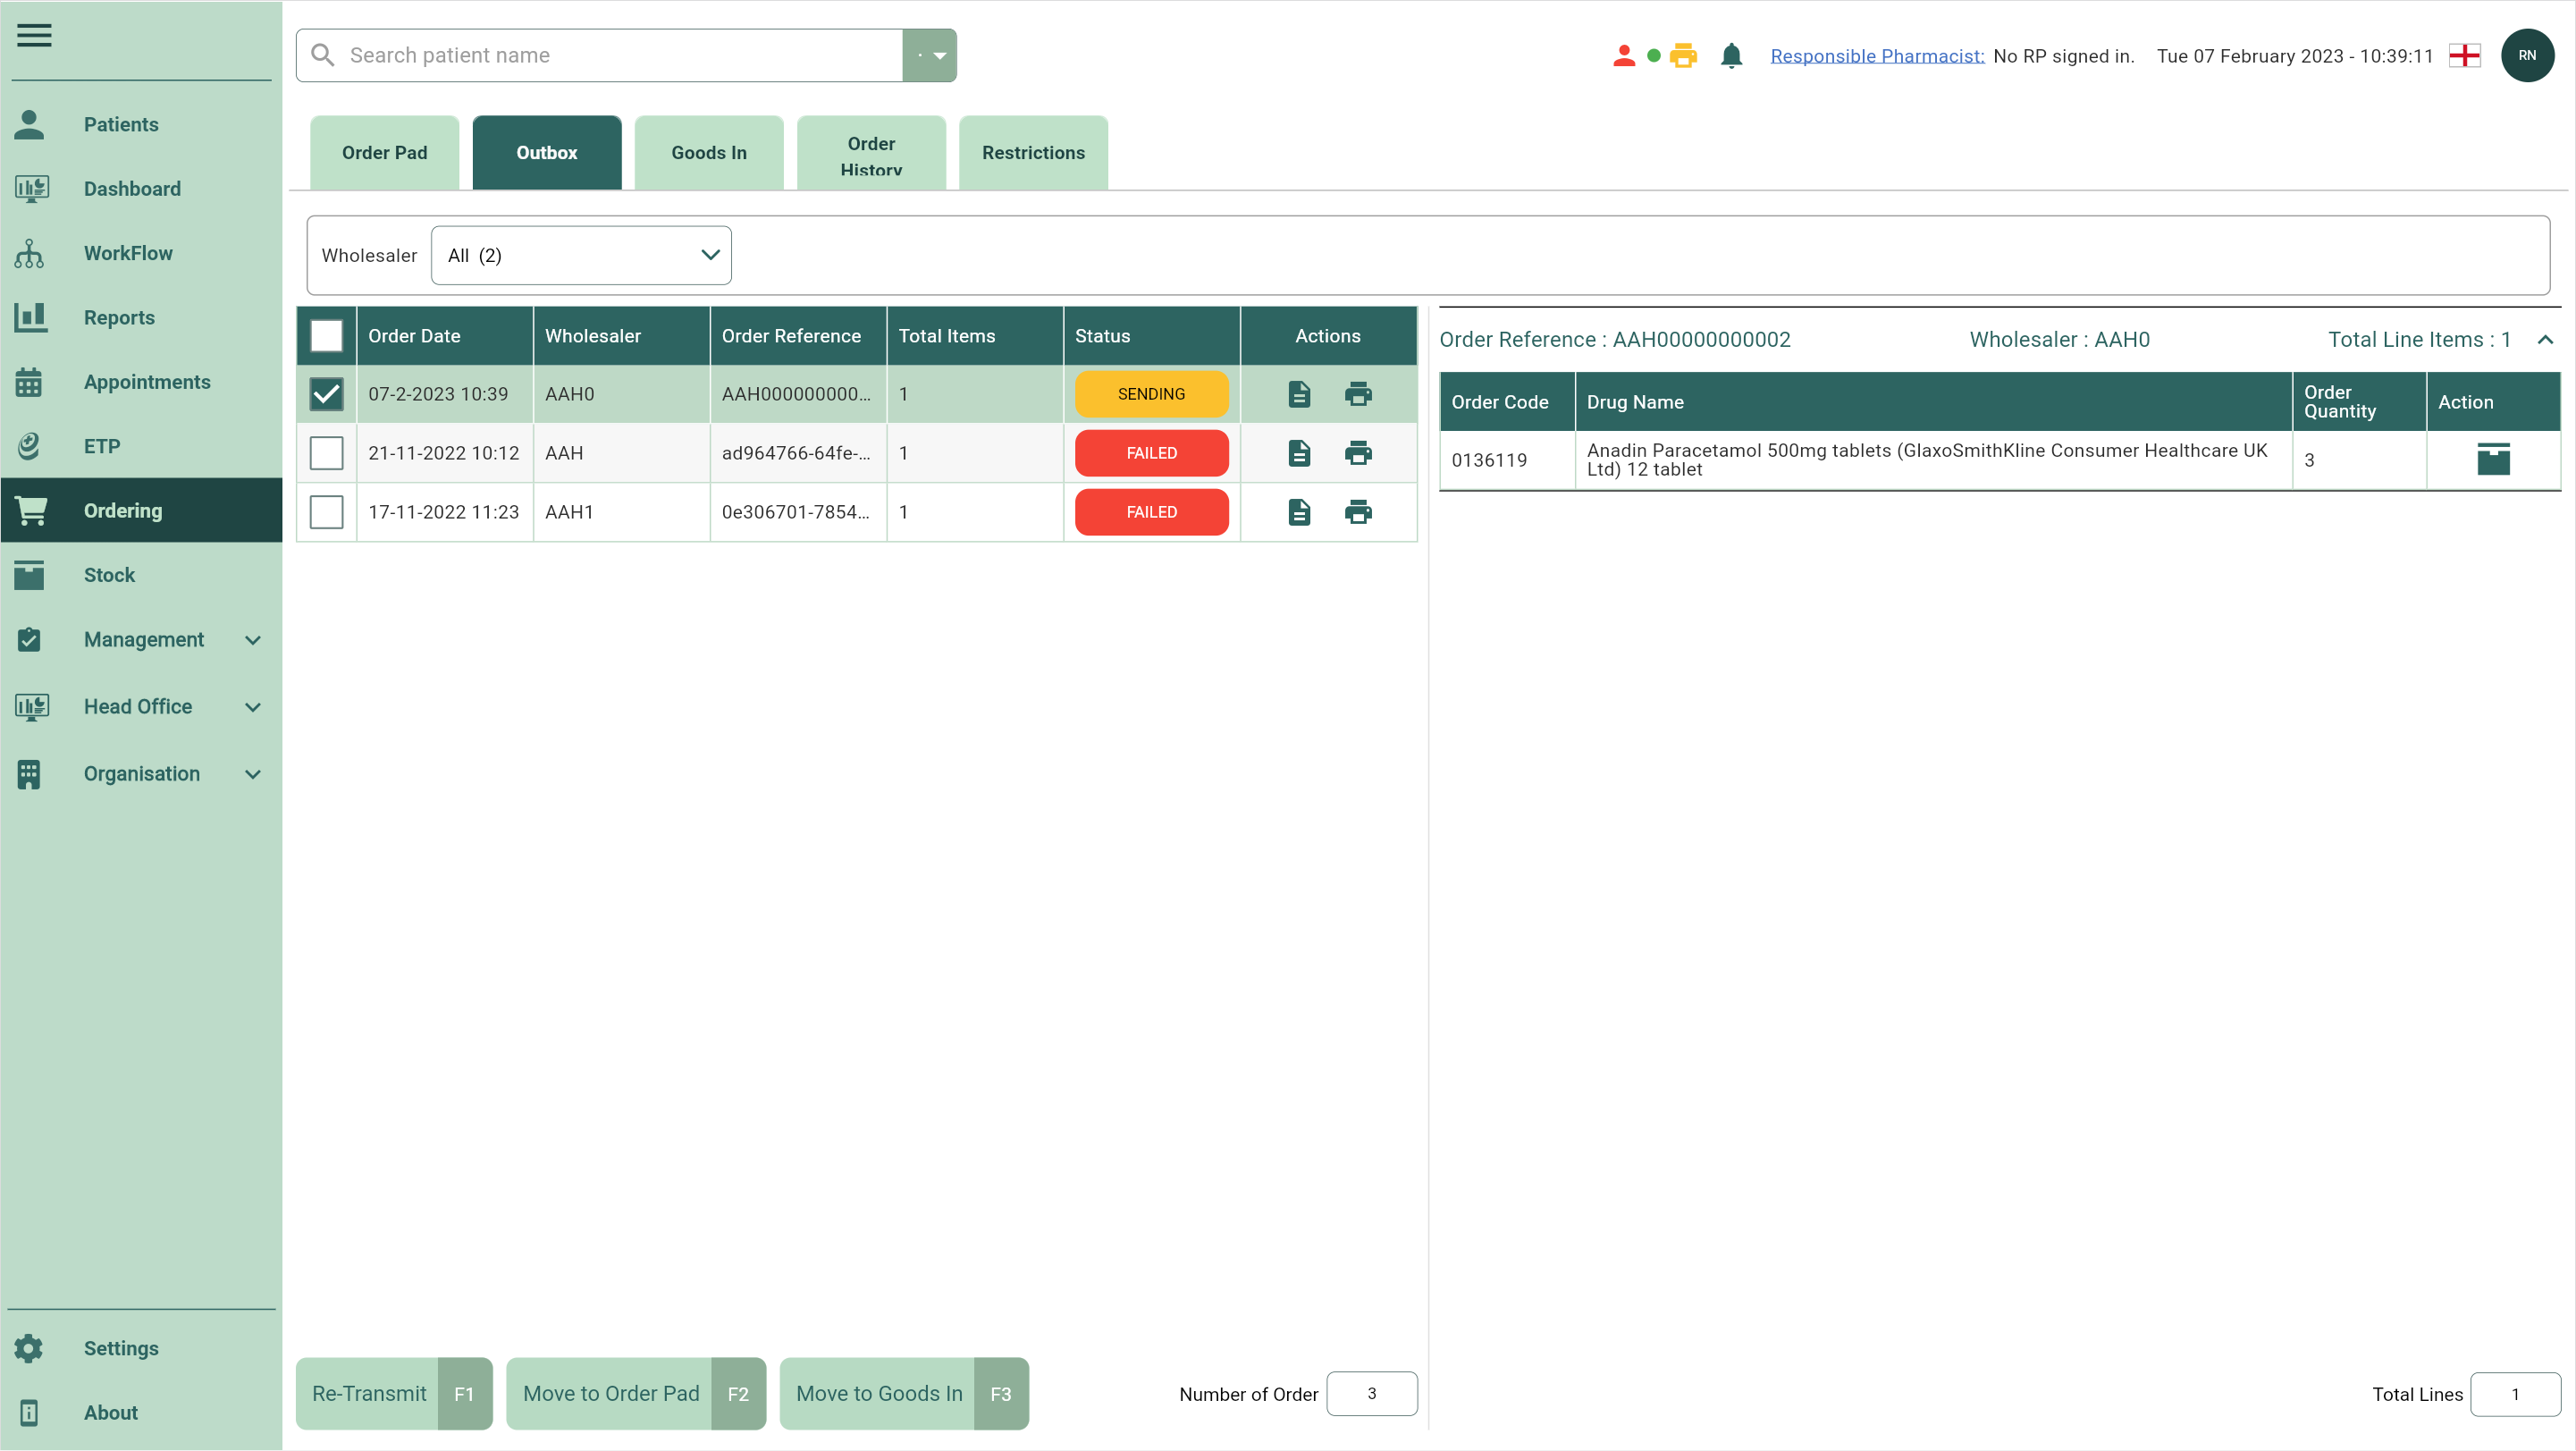
Monitor the transmission status of your sent orders in the Outbox.
You may occasionally see a Failed order on the Outbox tab. In these instances, we recommend contacting the wholesaler to confirm if they have received your order, and then using the available function keys to attempt to re-transmit the order, or move the order back to the Order Pad or to Goods In.
| Field | Description |
|---|---|
| Filters | Use the Filters to refine the orders displayed in the Outbox. |
| Grid | The Outbox grid is split into two sections. On the left panel, you’ll see individual orders in either the Sending or Failed Status. Selecting an order on the left panel will display the items associated with that order on the right panel. The left panel is populated based on your chosen filters, and is where you can view the order’s transmission log or print the order using the icons in the Actions column. On the right panel, you can access the stock card for each individual item on the order using the  Stock Card icon in the Action column. Stock Card icon in the Action column. |
| [Re-Transmit – F1] | You are able to re-transmit Failed orders. Using the [Re-Transmit – F1] button, an attempt will be made to resend the order using the same order reference number. |
| [Move to Order Pad – F2] | In instances where your order has failed to send, and your wholesaler has confirmed it has not been received, you can move the entire Failed order back to the Order Pad where you can send it again with a new order reference number. |
| [Move to Goods In – F3] | Move orders in the Failed status to Goods In to await delivery once your wholesaler has confirmed it has been received. |
| Number of Orders | A count of all orders on the left panel. This field cannot be edited. |
| Total Line(s) | A count of all items on the selected page and wholesaler tab. This field cannot be edited. |
Goods In
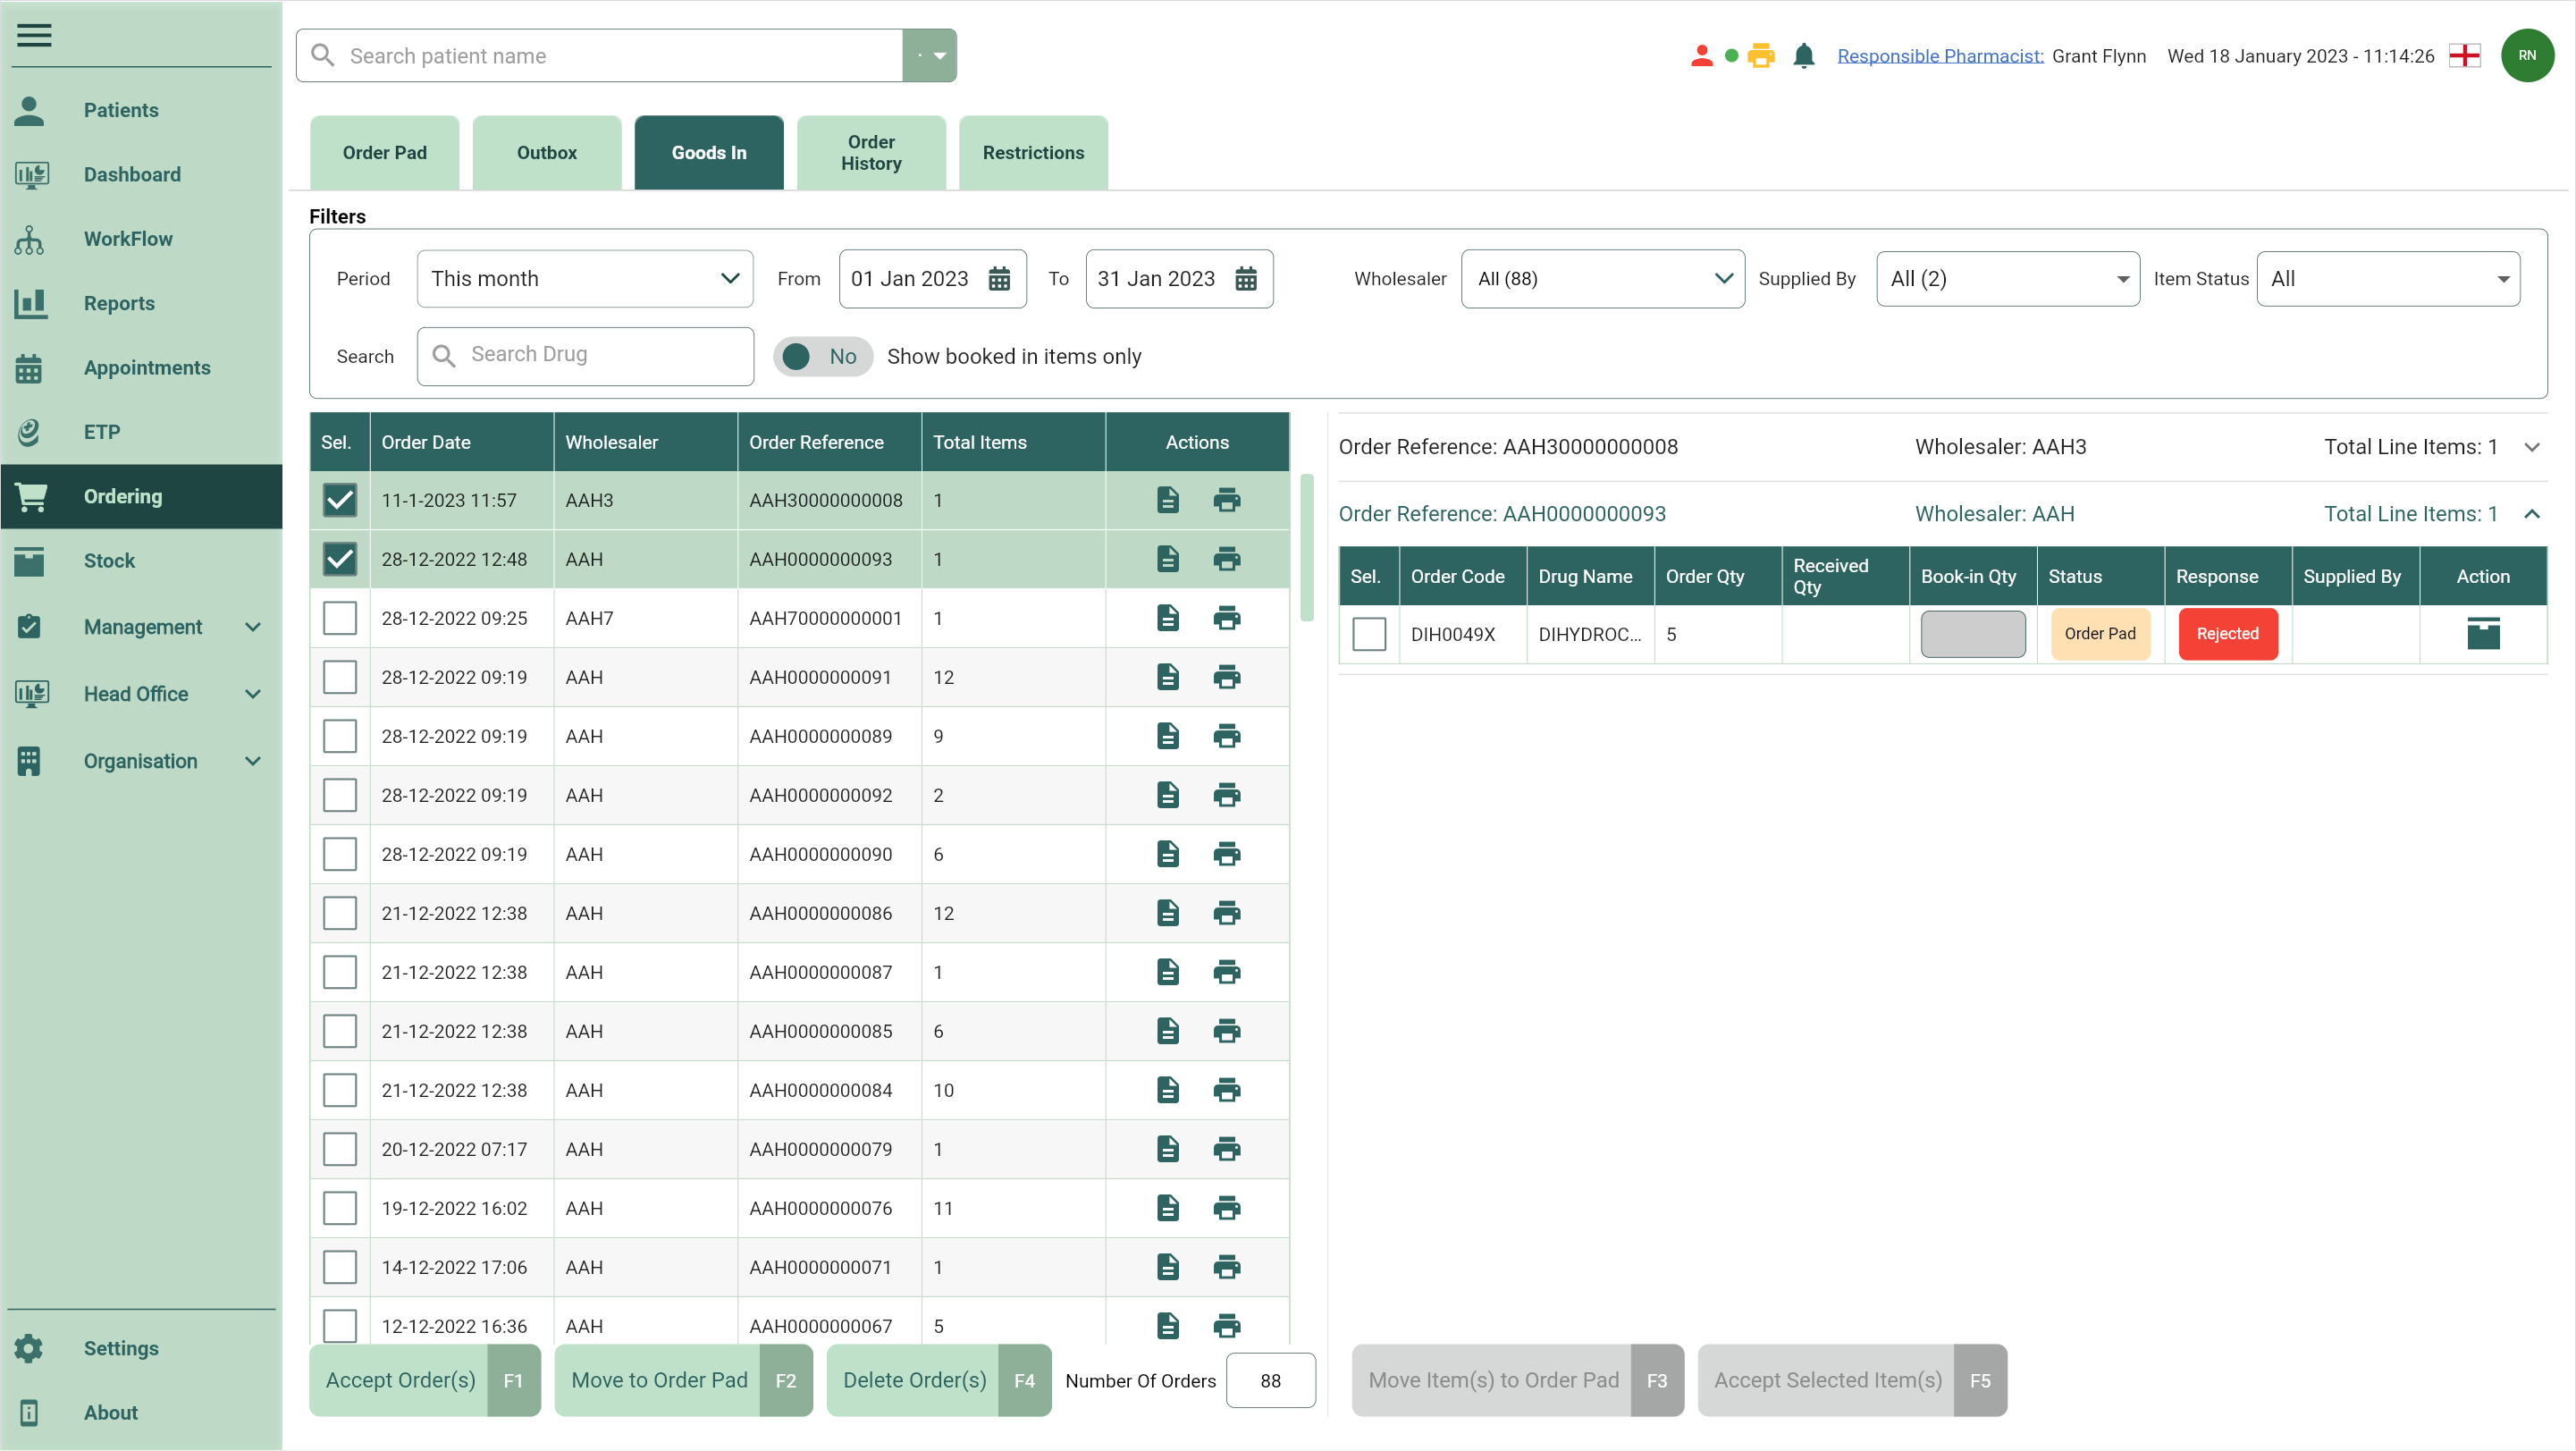
Book in your received items as accepted, or move orders/items back to the Order Pad.
| Field | Description |
|---|---|
| Filters | Use the Filters to refine the orders displayed in Goods In. |
| Grid | The Goods In grid is split into two sections. On the left panel, you’ll see all your individual orders awaiting delivery. Selecting an order on the left panel will display the items associated with that order on the right panel. The left panel is populated based on your chosen filters, and is where you can view the order’s transmission log or print the delivery note using the icons in the Actions column. On the right panel, you can access the stock card for each individual item on the order using the Stock Card icon in the Action column, and update the item’s Book-in Qty once the item has been received/booked in. |
| Number of Orders | A count of all orders on the left panel. This field cannot be edited. |
| [Accept Order(s) – F1] | Use this button to accept the entire order and move it from Goods In to Order History. Any items without a Book-in Qty populated will automatically be accepted using the received quantity. |
| [Move to Order Pad – F2] | Move the entire order back to the Order Pad. |
| [Delete Order(s) – F4] | Delete entire orders and move them from Goods In to Order History with a Deleted badge. You’ll be able to view deleted orders on the Order History tab by toggling the Show Deleted switch to Yes. |
| [Move Item(s) to Order Pad – F3] | Select items within an order to move back to the Order Pad. |
| [Accept Selected Item(s) – F5] | Book in selected items within an order. Any items without a Book-in Qty populated will automatically be accepted using the received quantity. |
Order History
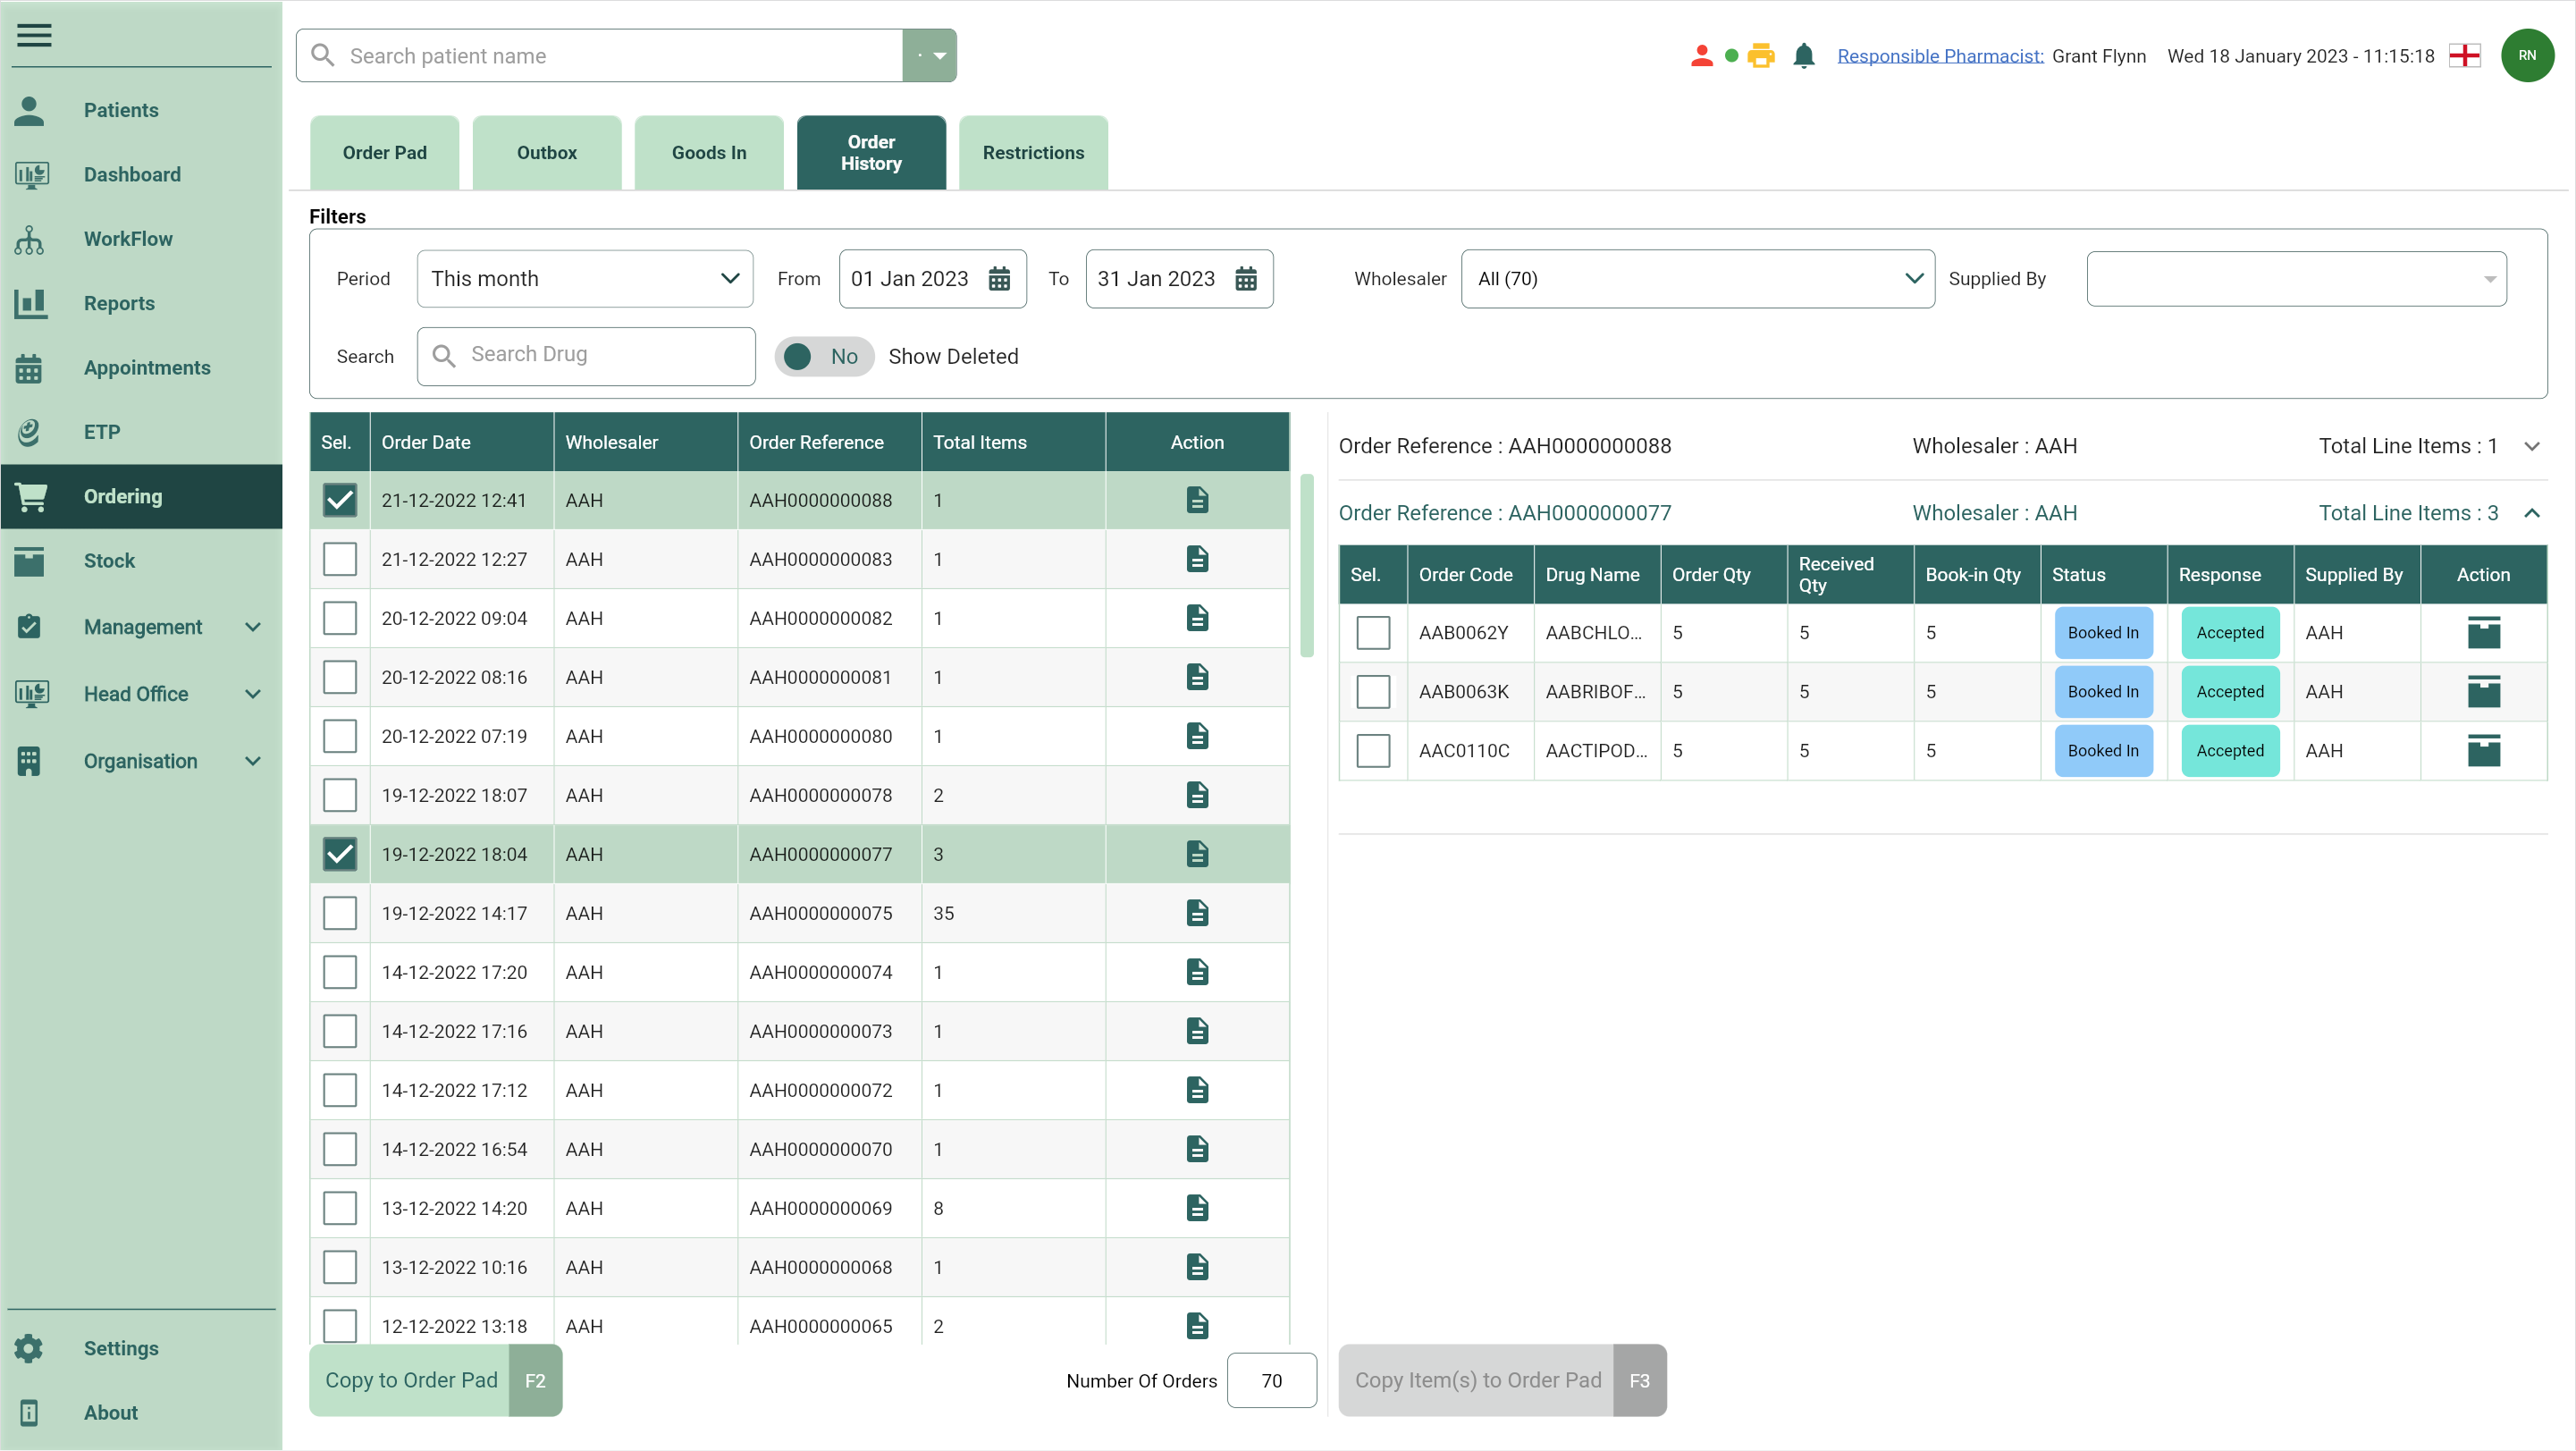
View your order history, and copy orders/items back to the Order Pad.
| Field | Description |
|---|---|
| Filters | Use the Filters to refine the orders displayed on the Order History tab. |
| Grid | The Order History grid is split into two sections. On the left panel, you’ll see all your individual past orders based on your chosen filters. Selecting an order on the left panel will display the items associated with that order and their Status and Response on the right panel. In the Actions column in the left panel, you can view the order’s transmission log or print the order, and on the right panel you can access the stock card for each individual item. |
| Number of Orders | A count of all orders on the left panel. This field cannot be edited. |
| [Copy to Order Pad – F2] | Use this button to copy the entire order to the Order Pad. |
| [Copy Item(s) to Order Pad – F3] | Select items within an order to copy to the Order Pad. |
Restrictions
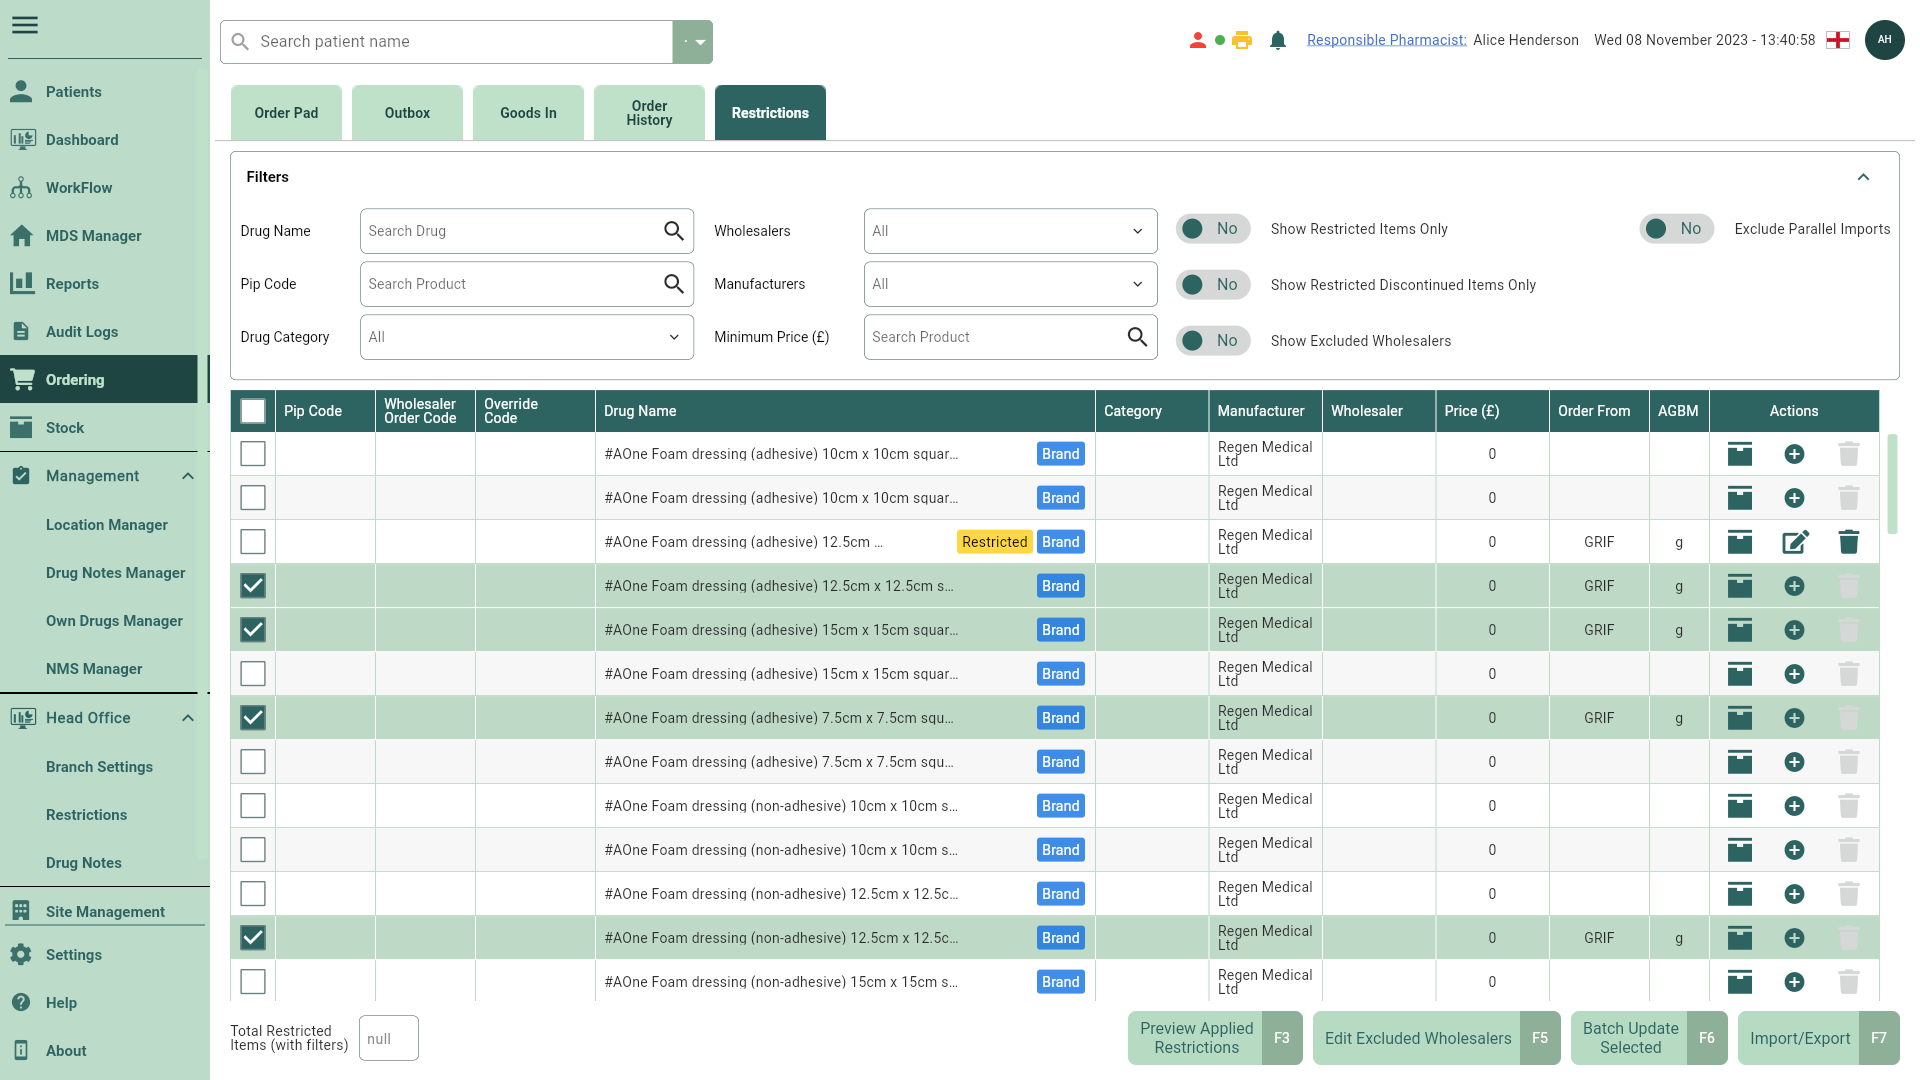
Restrictions determine which products - generics and/or brands - display during dispensing.
| Field | Description |
|---|---|
| Filters | Use the Filters to show/hide Restricted Items to begin adding your restrictions. Apply additional filters on Drug Name, Wholesalers and more to help locate the specific items you need. |
| Grid | The grid is populated based on your chosen filters. Within the grid, you'll be able to select multiple items for batch updates, use icons in the Actions column to add, edit and/or delete restrictions on individual lines, and access the item's stock card. Badges will be displayed on Restricted items, Brands and Discontinued lines. |
| Total Restricted Items (with filters) | This field will display a sum of all the restricted items you have displayed in your grid based on your selected filters. |
| [Preview Applied Restrictions – F3] | Using this button you can simulate the Add Item(s) window that appears during dispensing within a Preview Applied Restrictions window, allowing you to preview what you will see during dispensing. |
| [Edit Excluded Wholesalers – F5] | Selecting this button will open the Edit Excluded Wholesalers window where you can mark Available Wholesalers as excluded. |
| [Batch Update Selected – F6] | Selecting one or more items in the grid will enable the [Batch Update Selected – F6] button. This button will open the Batch Update window, where you can select the Restriction type, Wholesaler and Priority to update across all your selected items. |
| [Import/Export – F7] | Use the [Import/Export] button to import or export restrictions. |