Dispensing EPS prescriptions
EPS prescriptions are processed via the Dispensing Wizard. The patient specific Dispensing Wizard is separated into easy to follow steps designed to support your dispensing flow.
Accessing the Dispensing Wizard
- To begin, access the Dispensing Wizard using one of the methods below:
| Module/Area | Access |
|---|---|
| Patient CRM |
|
| Workflow (New Rx / To Pick) |
|
| Patient preview |
|
| MDS Manager |
|
 Dispense button to open the Dispensing Wizard.
- Process your prescription(s) using the Dispensing Wizard.
Dispensing EPS prescriptions using the Dispensing Wizard
Learn more about each step of the Dispensing Wizard below.
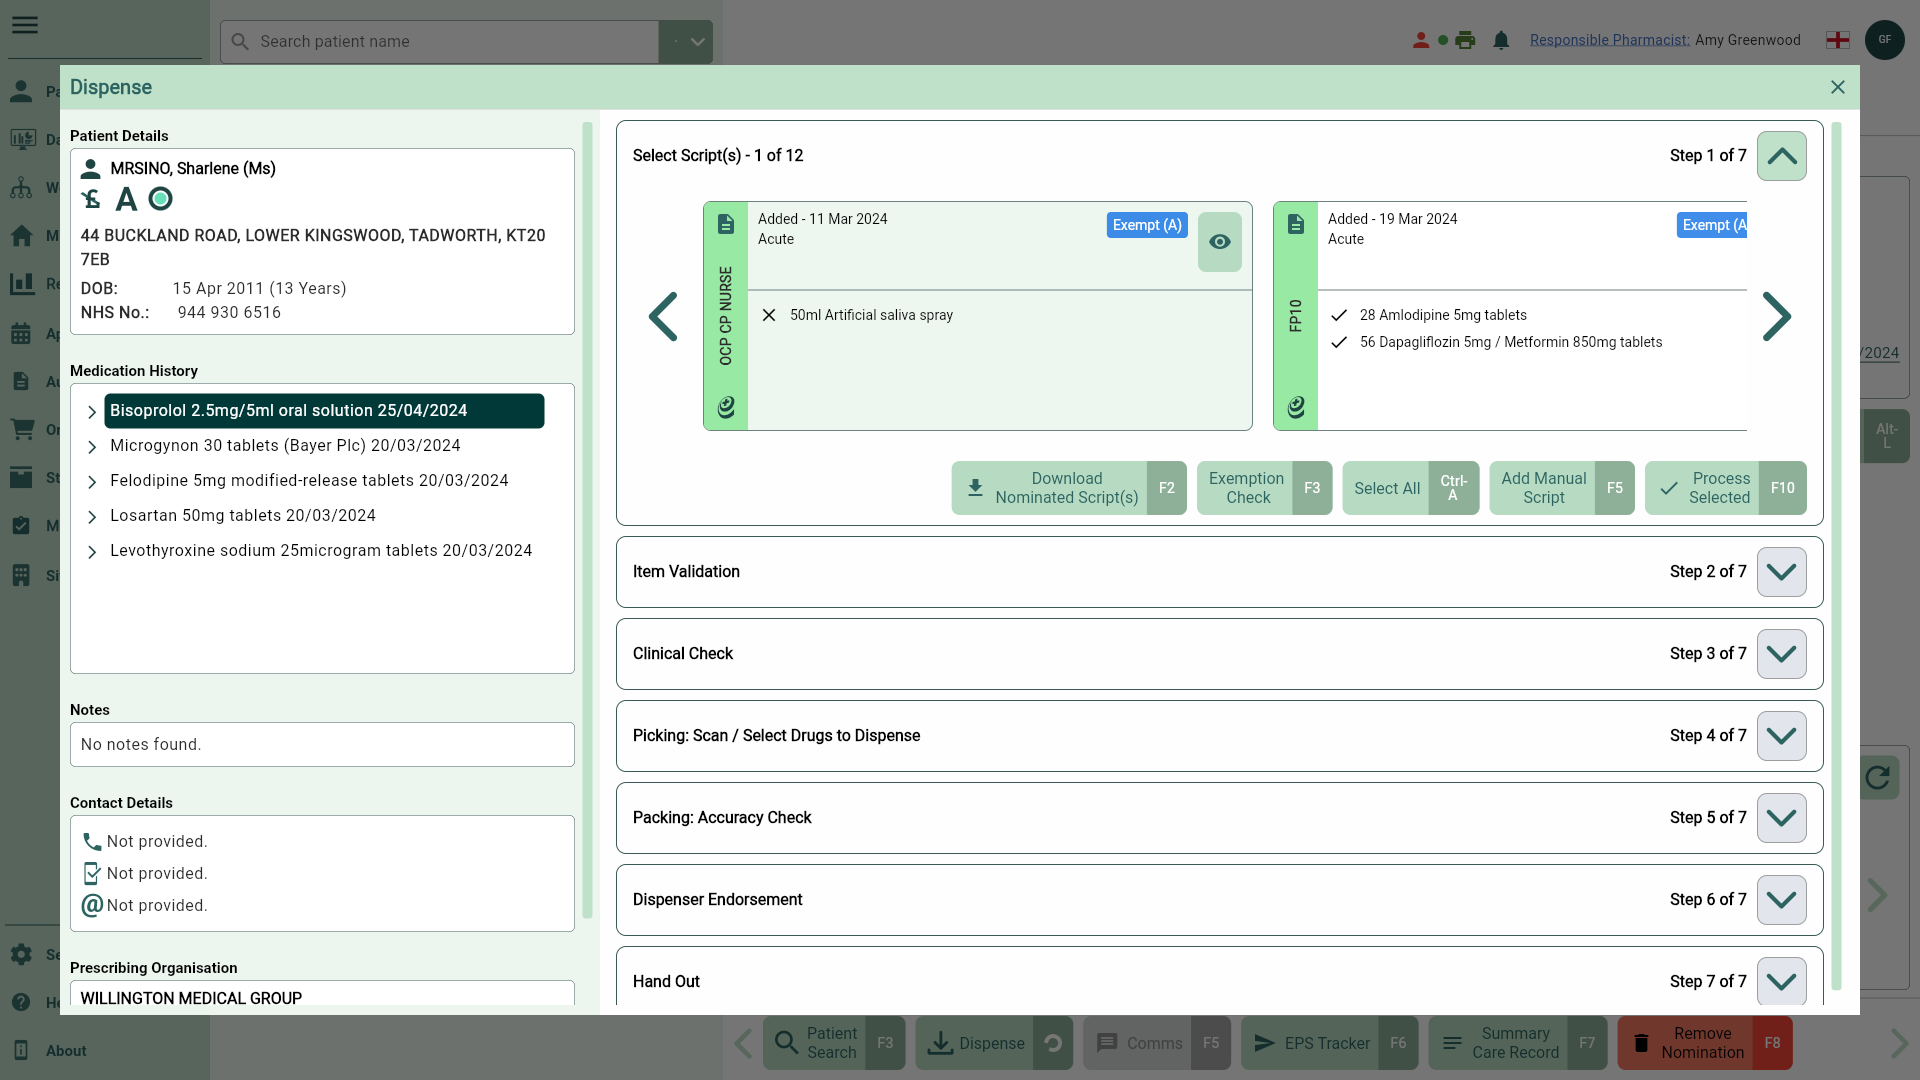
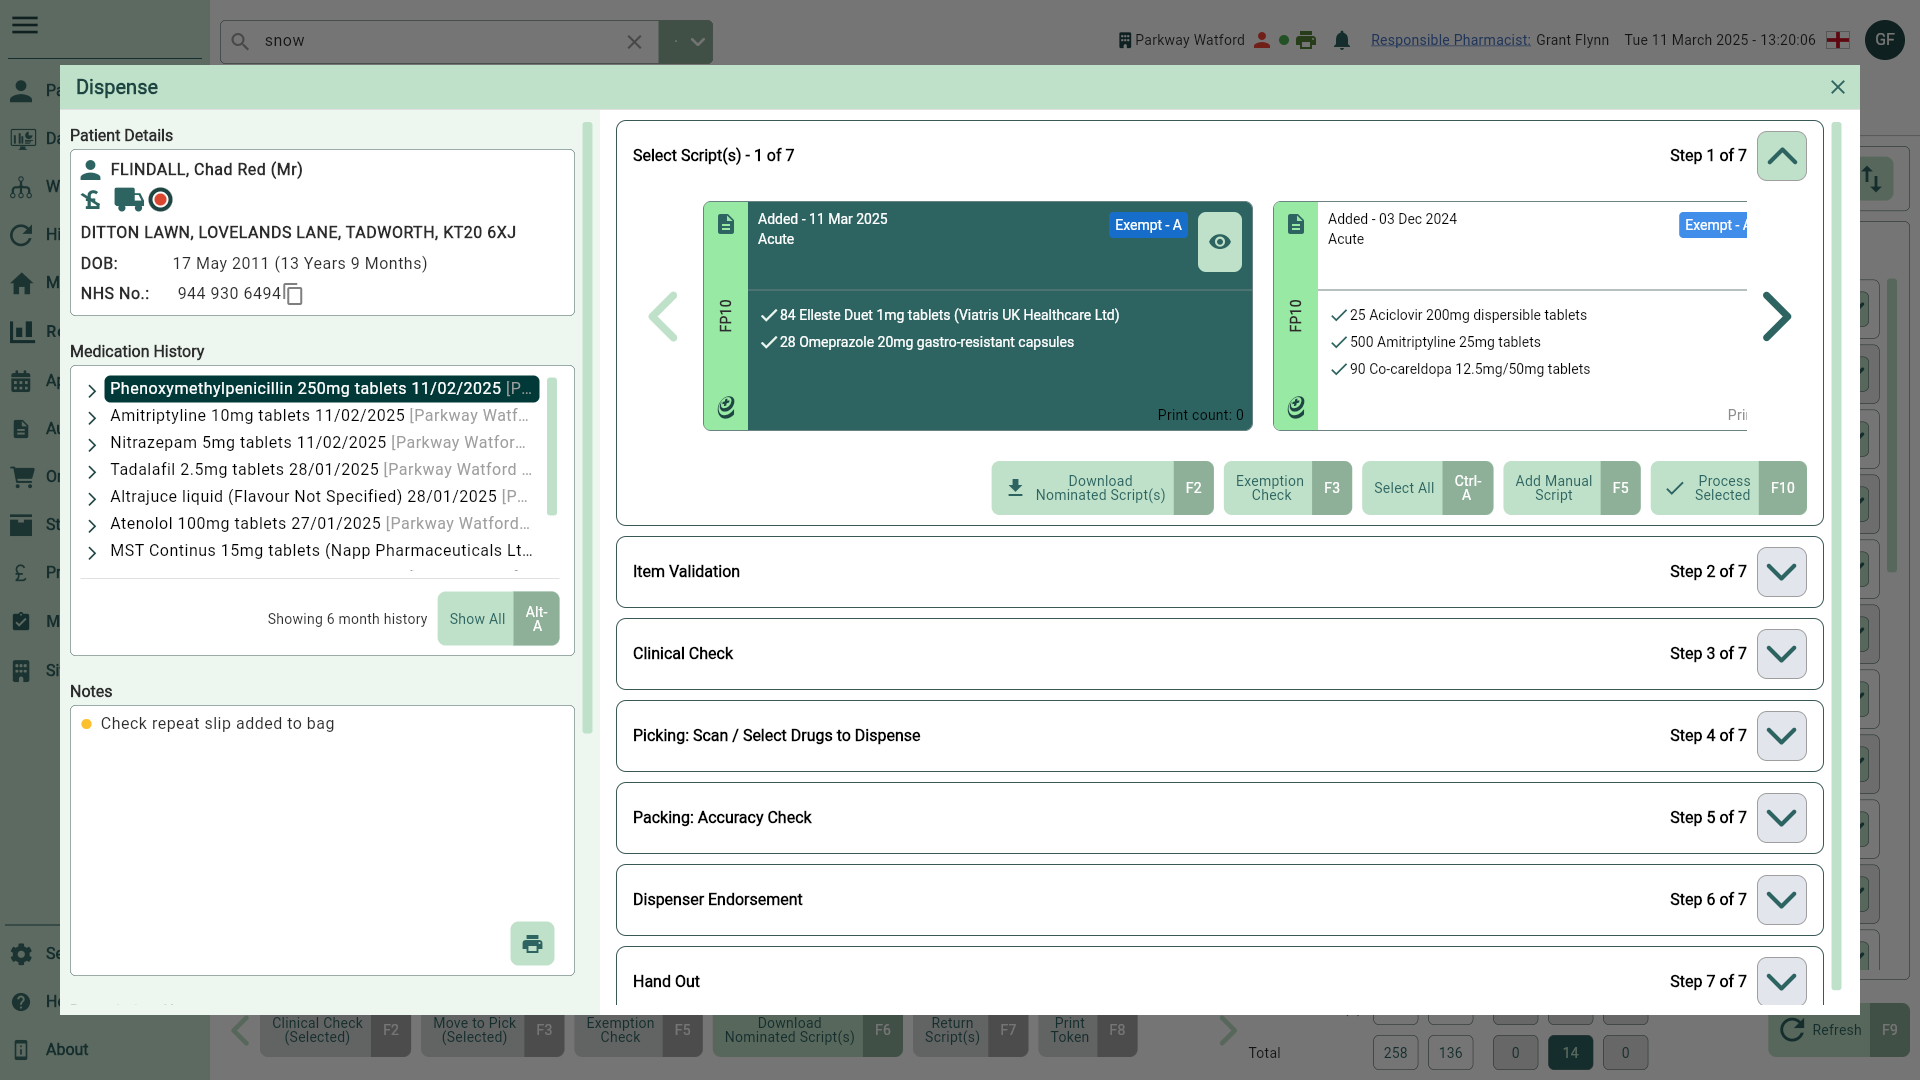
Select Script(s)
The Select Script(s) step is about selecting the prescriptions you want to dispense. You’ll need to locate the required prescriptions by selecting the prescription widget(s) in the carousel.
- Select the prescription(s) you want to dispense in the carousel.
- Once you have selected your prescriptions, select the [Process Selected - F10] button.
A prompt will display when tokens have not been printed for selected prescriptions, if a duplicate token has been printed, or when there's a mix of printed and unprinted tokens selected for processing.
Learn how to match unmatched items
Most prescribed items on the incoming prescription will display with a  Tick icon to indicate they have been matched to a dispensable item in our database. If we've been unable to match the item(s) they will display alongside a
  Cross icon and will need to be matched manually when the prescription is processed at the Select Script(s) step.
- Select the prescription(s) with unmatched items that you want to dispense in the carousel.
- Select the [Process Selected - F10] button. The Drugs Matching window displays. Your unmatched item is automatically used as the search term and any results are displayed. You can adjust the search term if required.
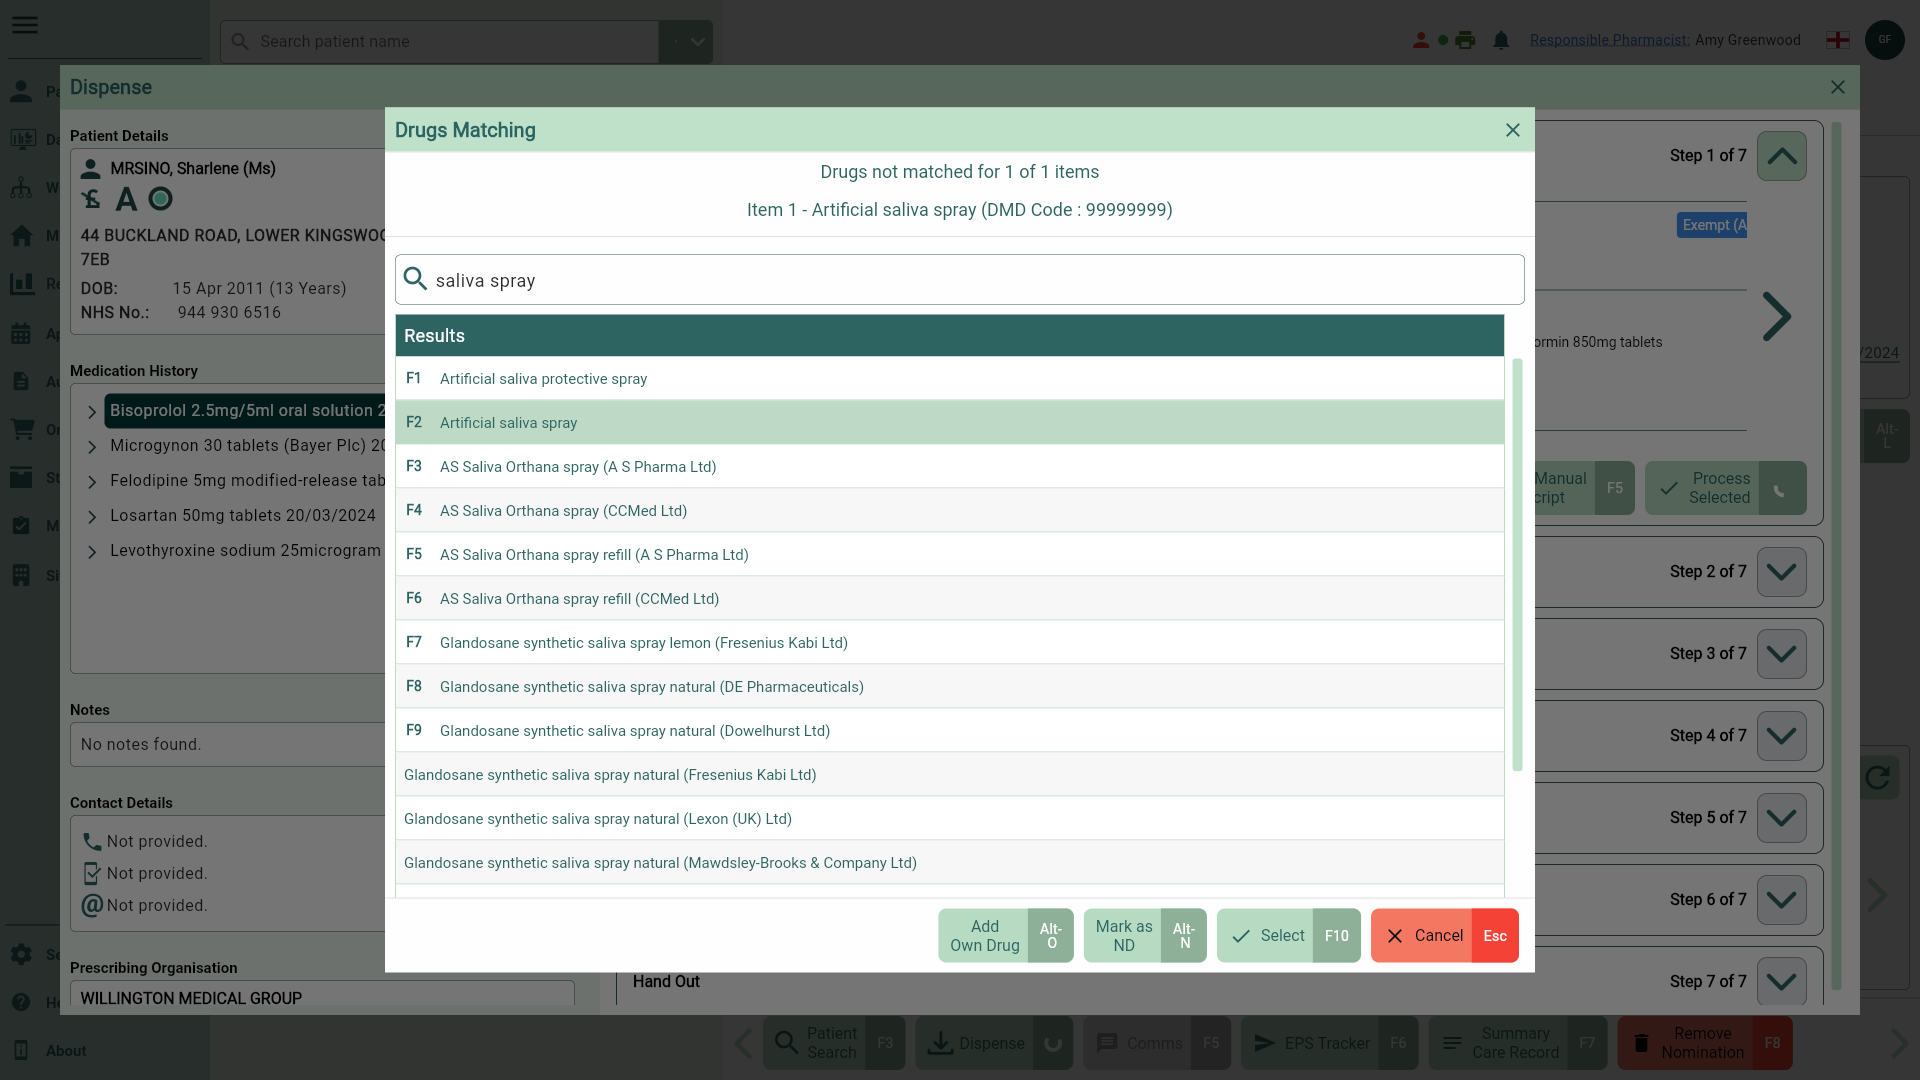
- Select the correct item from the results and select the [Select - F10] button. Complete this window for all unmatched items. You will automatically progress to the Item Validation step once all items have been matched.
- You can use the [Download Nominated Scripts - F2] button to ensure all prescriptions have been pulled from the NHS Spine.
- If configured in your application settings, an RTEC check will automatically be performed on your EPS prescriptions when they're downloaded to ascertain the patient's exemption status where possible. A manual exemption check can be performed by selecting the [Exemption Check - F3] button. This is only applicable for EPS scripts and will require an authenticated smartcard.
- Use the left and right arrows in the carousel to scroll through all available prescriptions.
- To process all items for your patient select the [Select All - Ctrl-A] button.
Item Validation
At the Item Validation step you'll be able to review everything incoming from the EPS prescription(s) and make amendments to each item if necessary, including marking items as Stopped.
- Validate the prescribed item(s), quantities and dosages. You can make amendments to the quantity and dosage if required.
- When you've completed this stage you can move onto the Clinical Check step by selecting the [Next Step - F10] button.
Learn how to mark items as Stopped
Marking items as Stopped will mark the item as Not Dispensed and prompt you to provide a Not Dispensed reason. Stopped items will display with a STOPPED badge in the patient's Medication History. If you need mark an item as Stopped in the Dispensing Wizard, follow the steps below.
- Select the adjacent
 Stopped icon found in the Preview Label column at the Item Validation step.
 - A Stopped Item prompt displays asking you to confirm if you want to mark the item as Stopped in the patient record. Select the [Yes - F10] button.
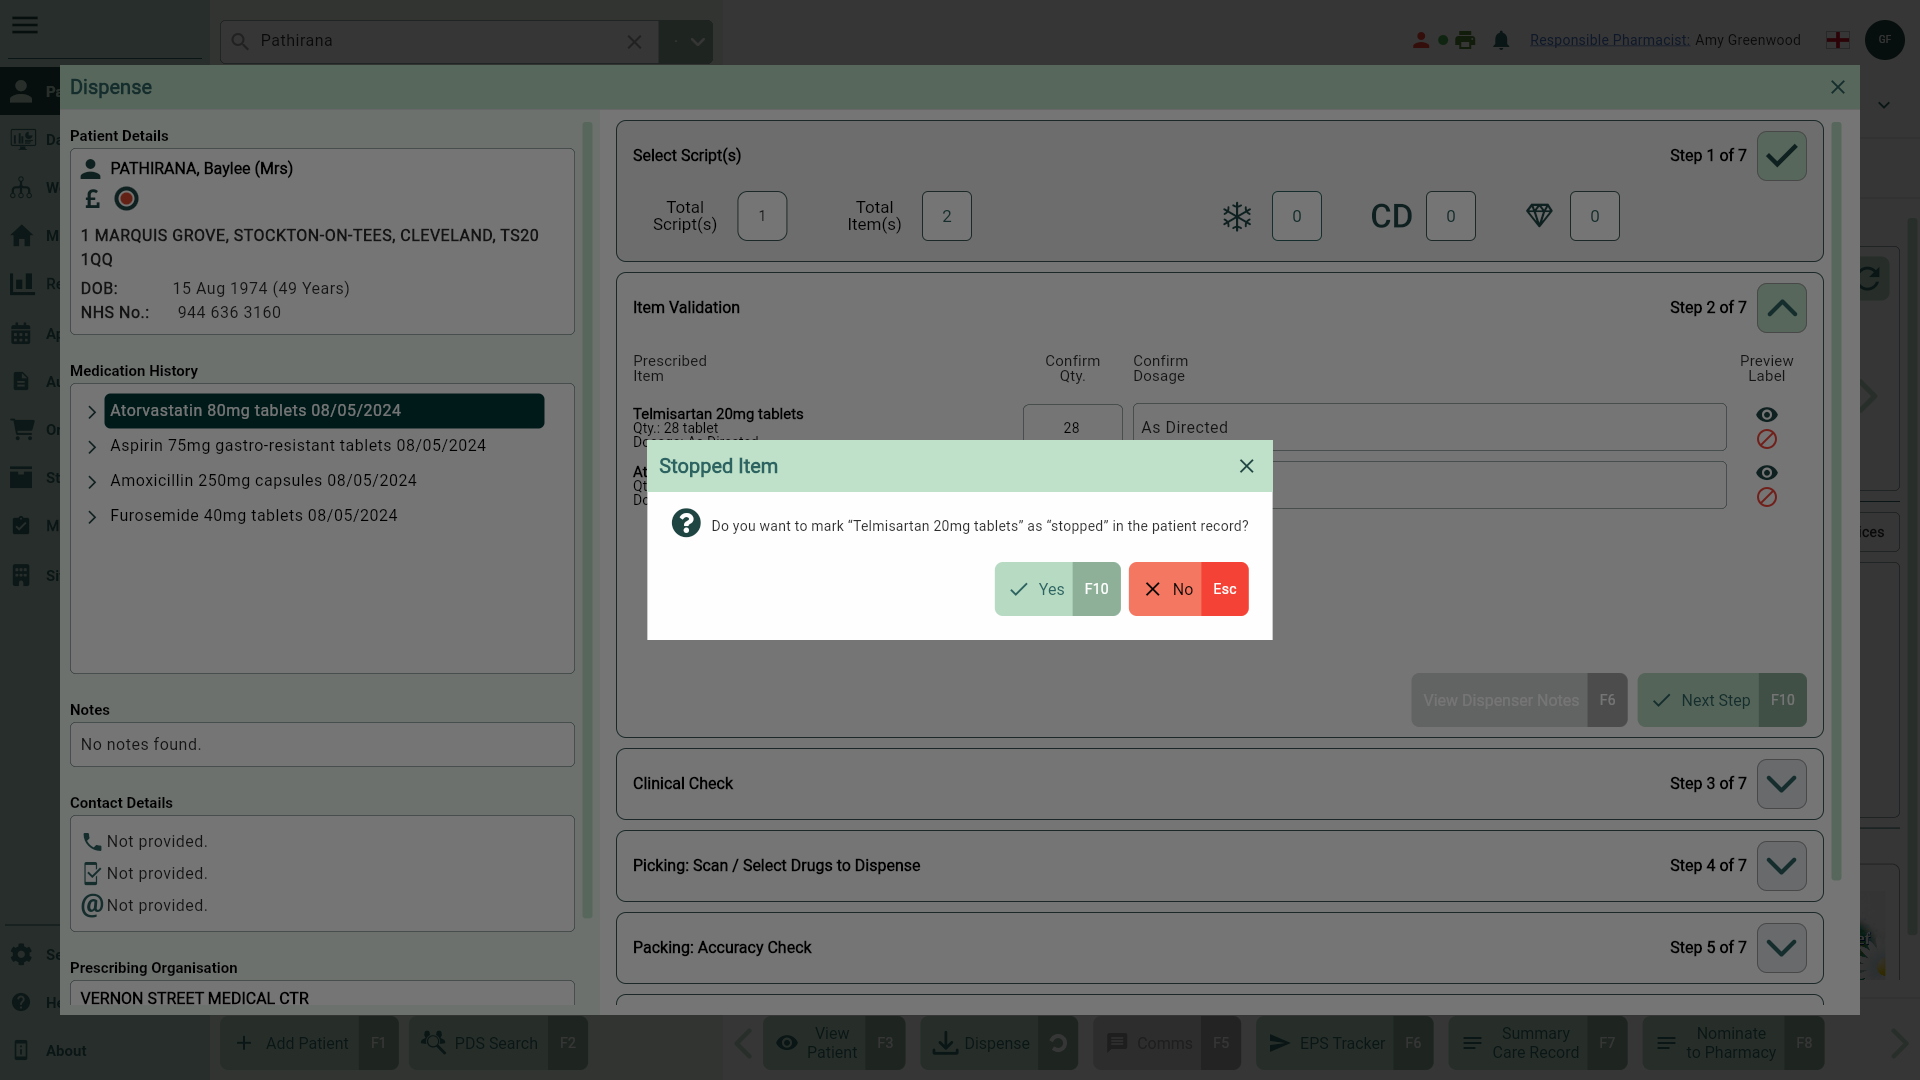
- The Mark as ND window displays. Select a not dispensed reason from the ND Reason dropdown menu.
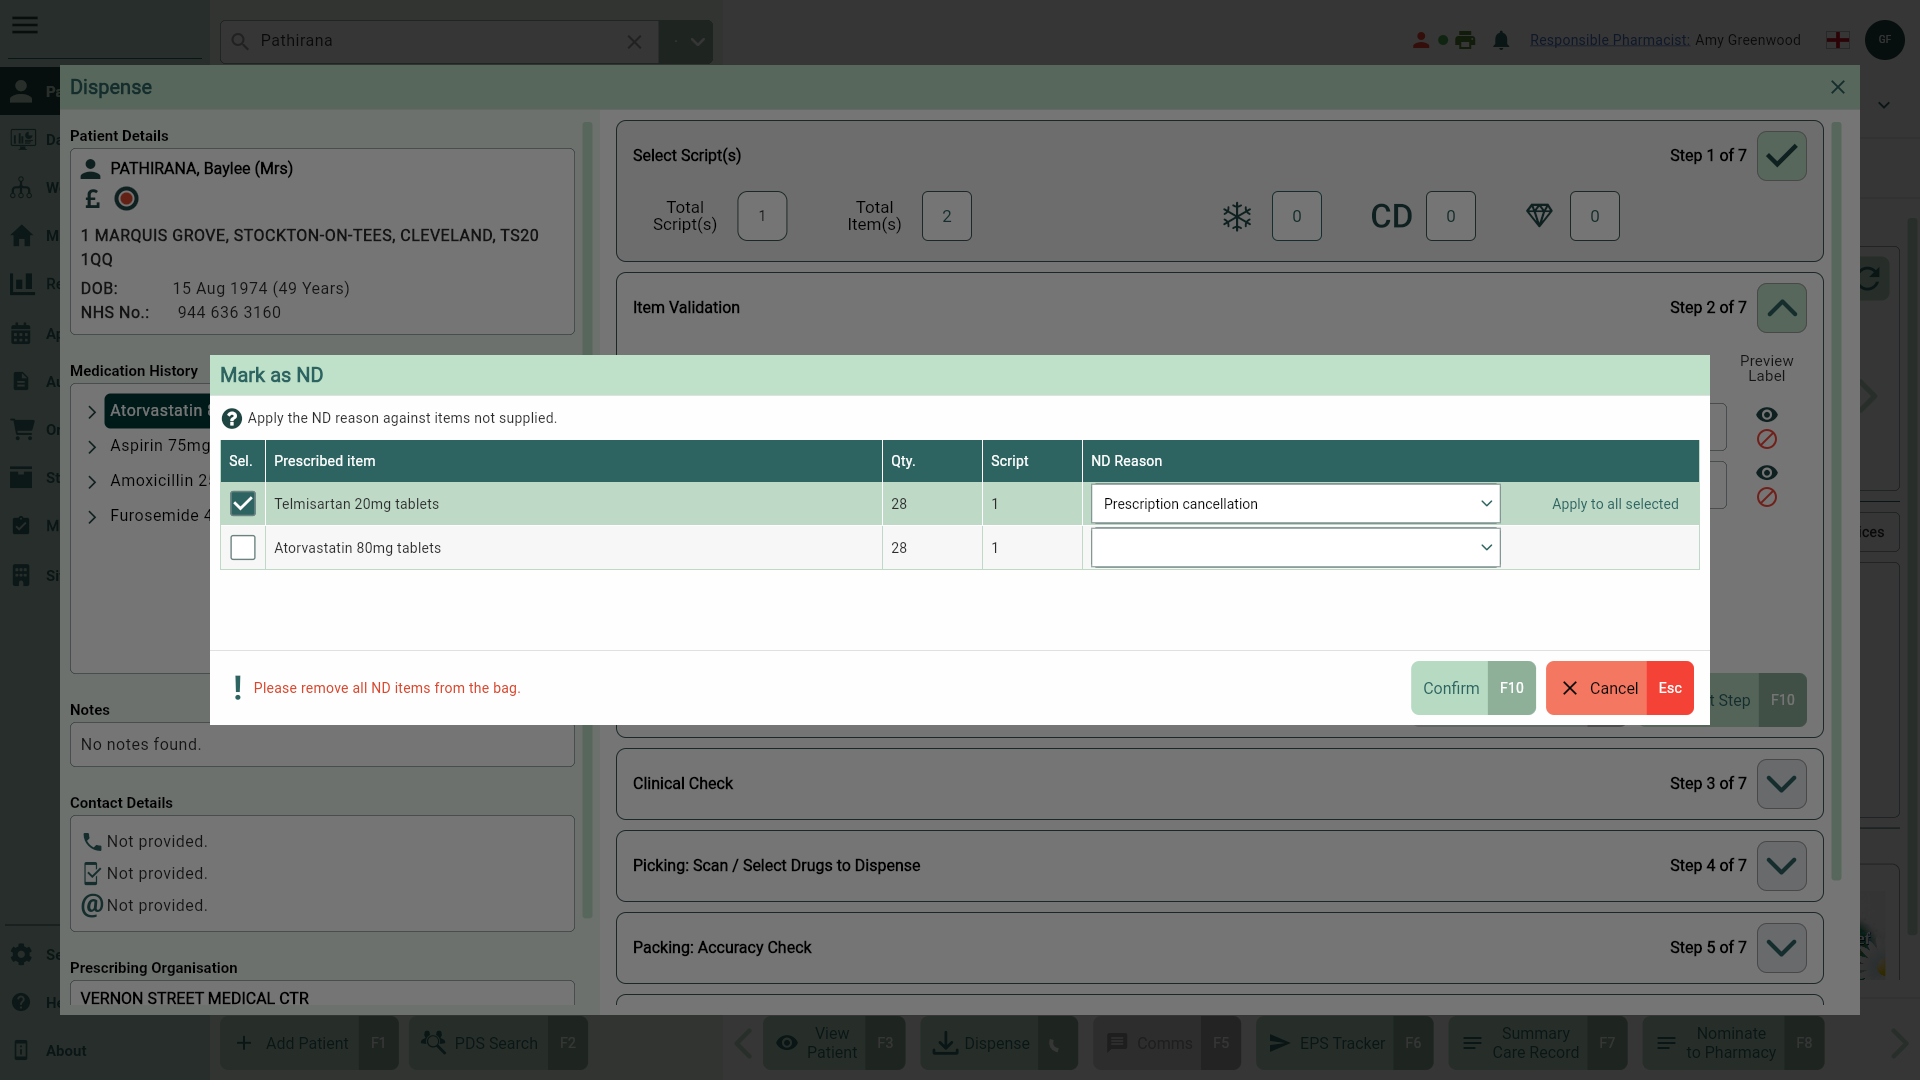
- Select the [Confirm - F10] button. Your Stopped item is struckthrough and a snackbar will display to confirm the item has been marked as Stopped.
- Select the [Next Step - F10] button to continue to the next step.
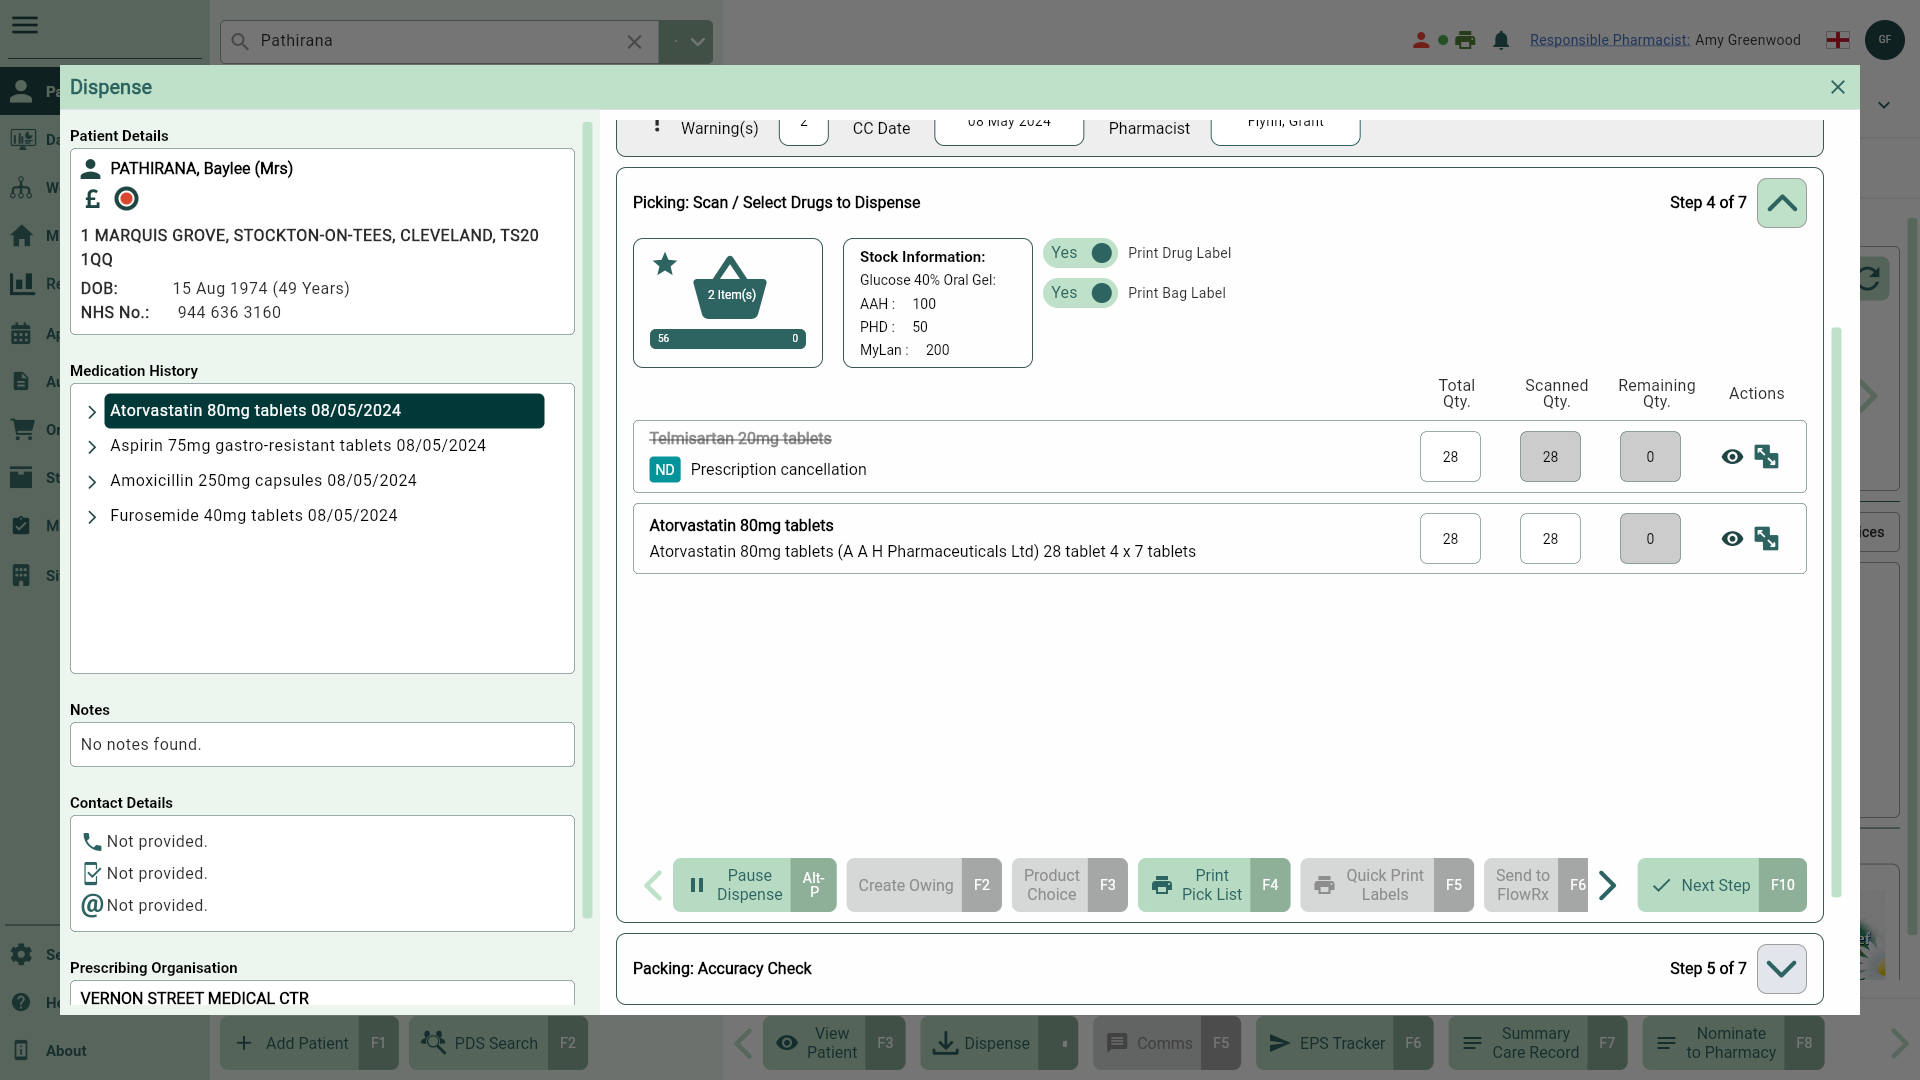
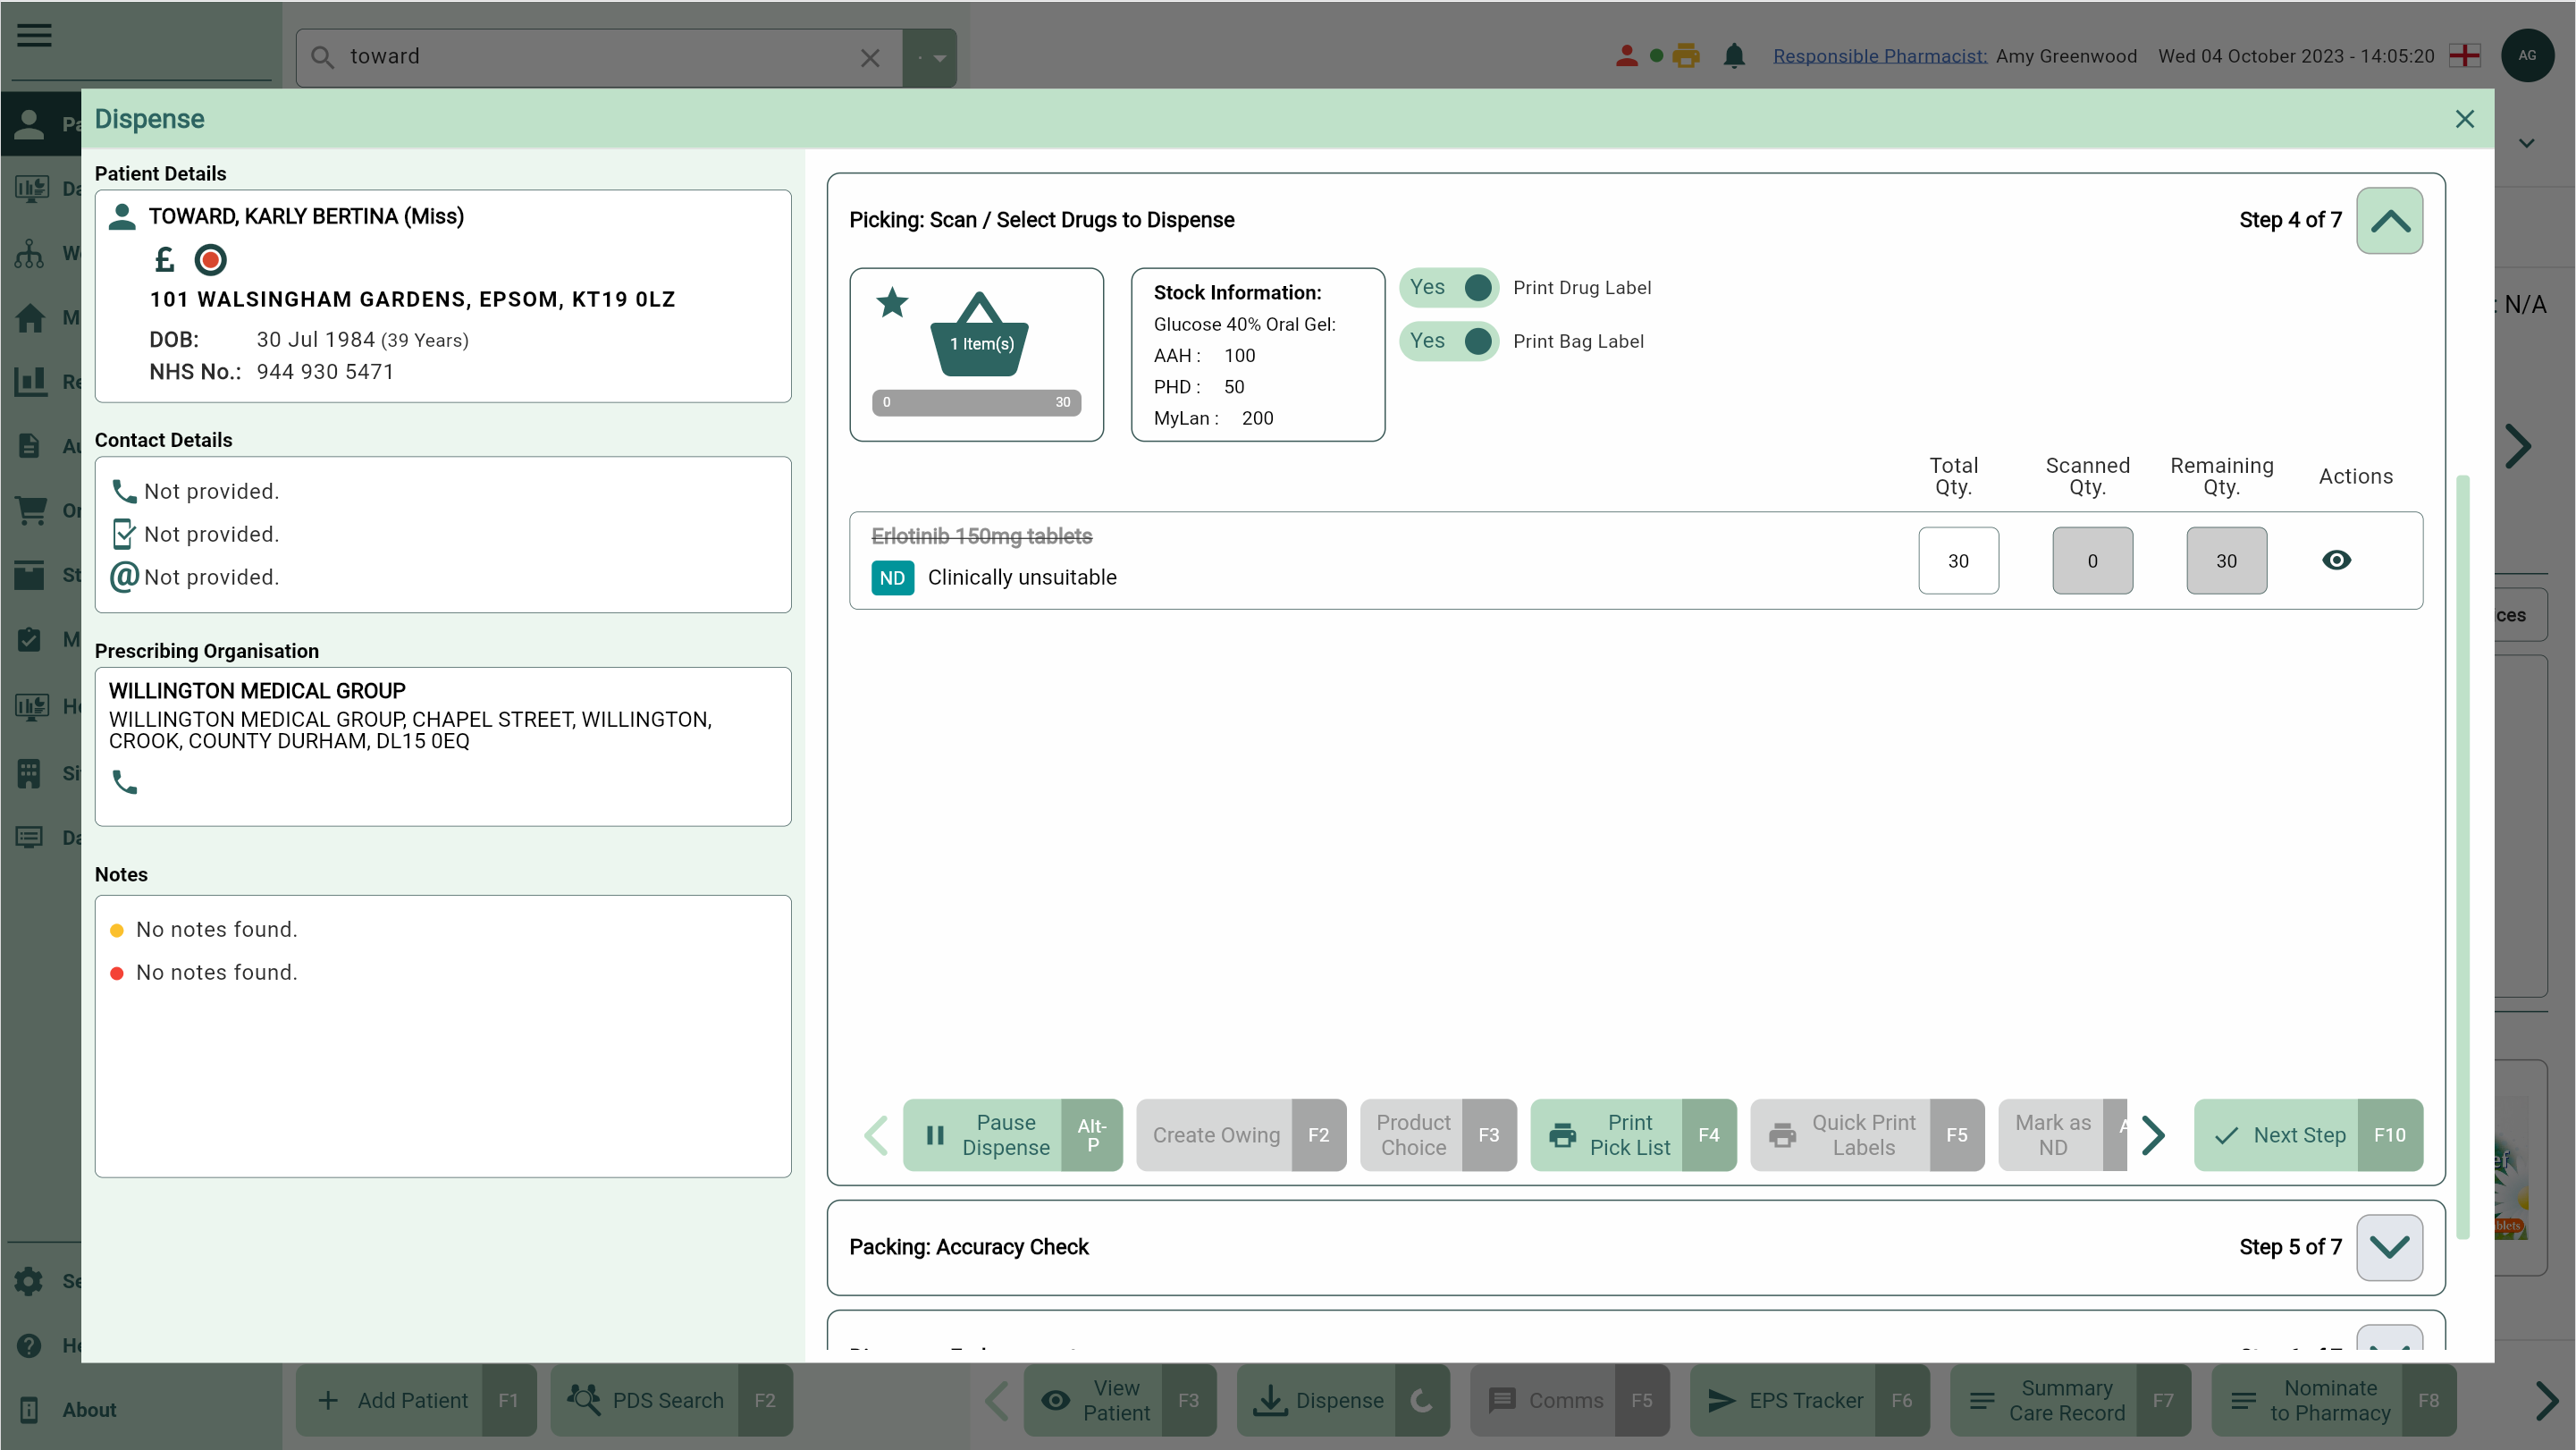
- Complete any required actions on the proceeding steps such as the clinical check, noting that once you reach the Picking step, your Stopped item(s) will display with an ND badge.
- Once you have completed the Dispensing Wizard, the item will display with a STOPPED badge in the patient's Medication History.
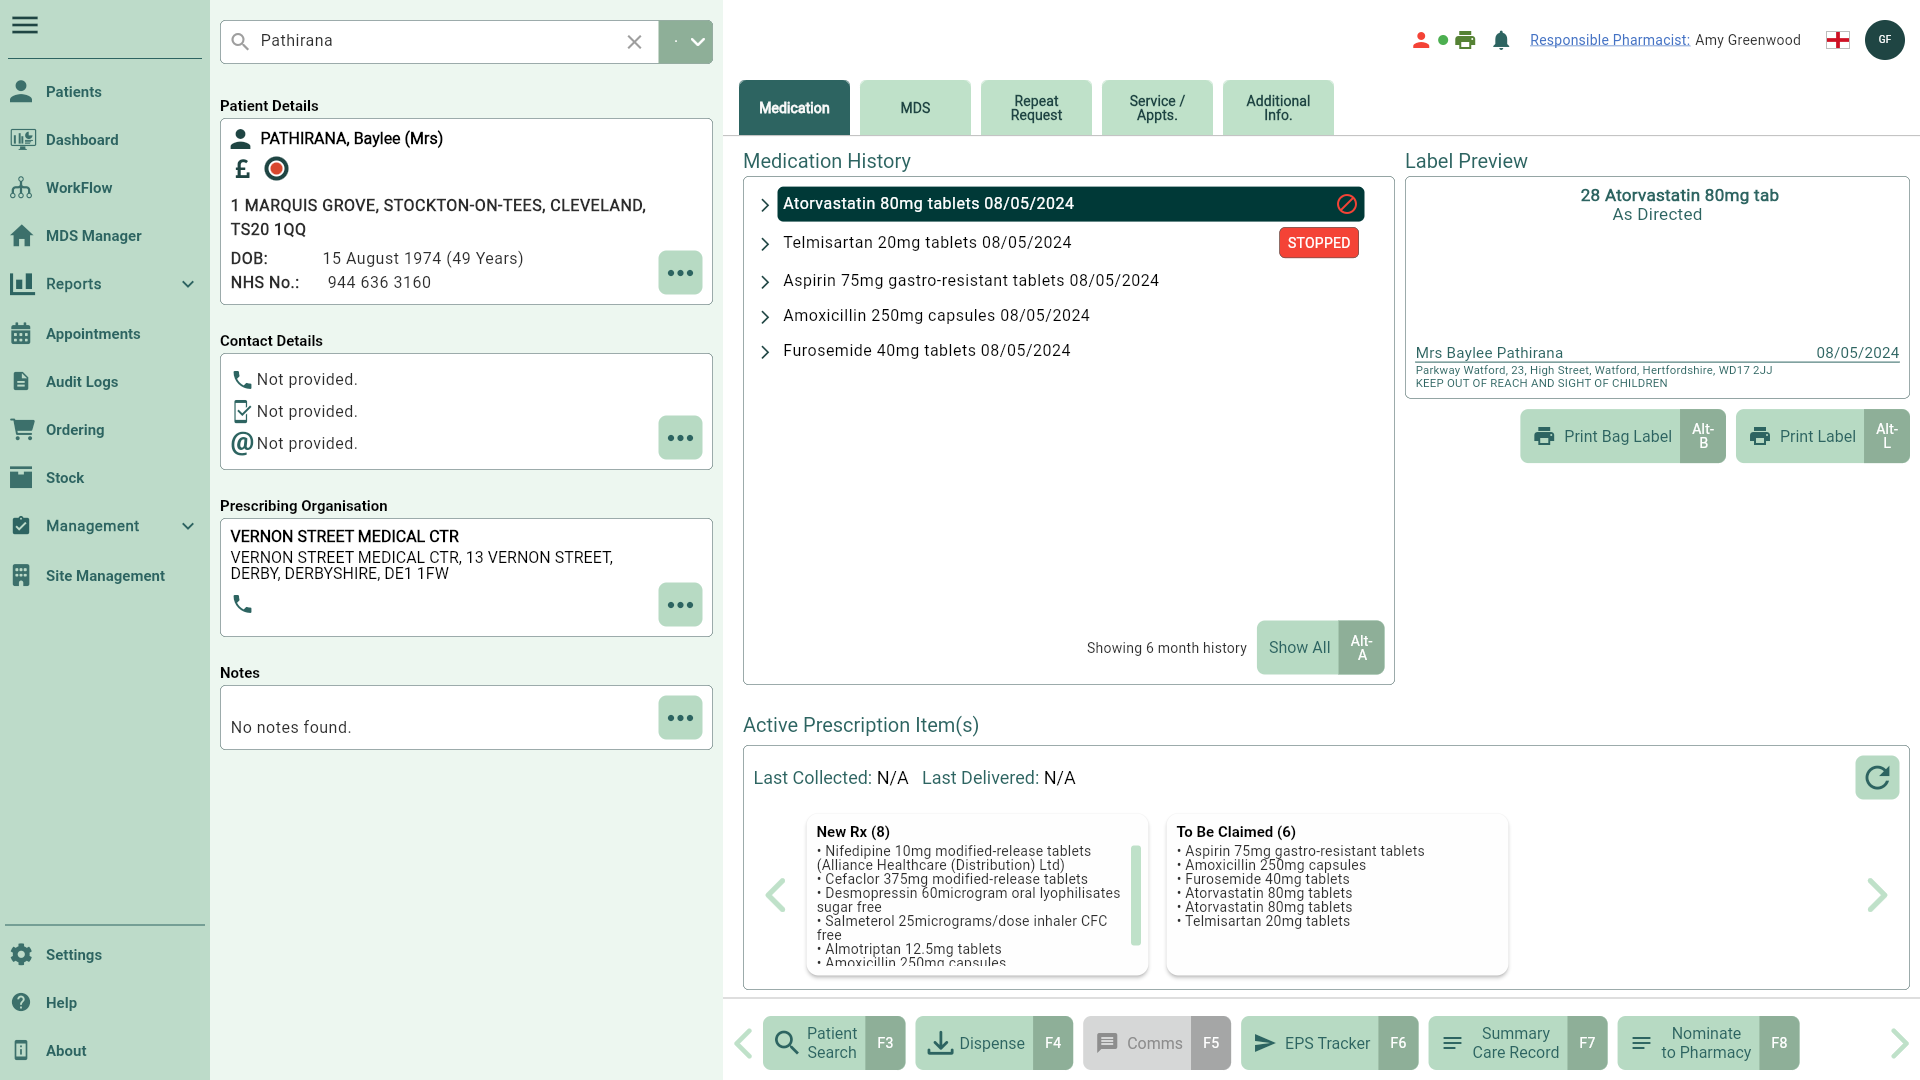

- Hovering your cursor over the item(s) will display the prescribed item and dosage in full.
- Hovering your cursor over items marked as not dispensed will display the ND Reason in a tooltip.
- See a preview of your labels by selecting the
 View icon in the Preview Label column.
 - Mark the item(s) as Stopped using the Stopped icon found in the Preview Label column.
- Items marked as item expired, item cancelled or discontinued will be highlighted. You will need to address these prior to moving to the next step of the Dispensing Wizard.
- If there are any notes from the prescriber, you can review these by selecting the [View Dispenser Notes - F6] button.
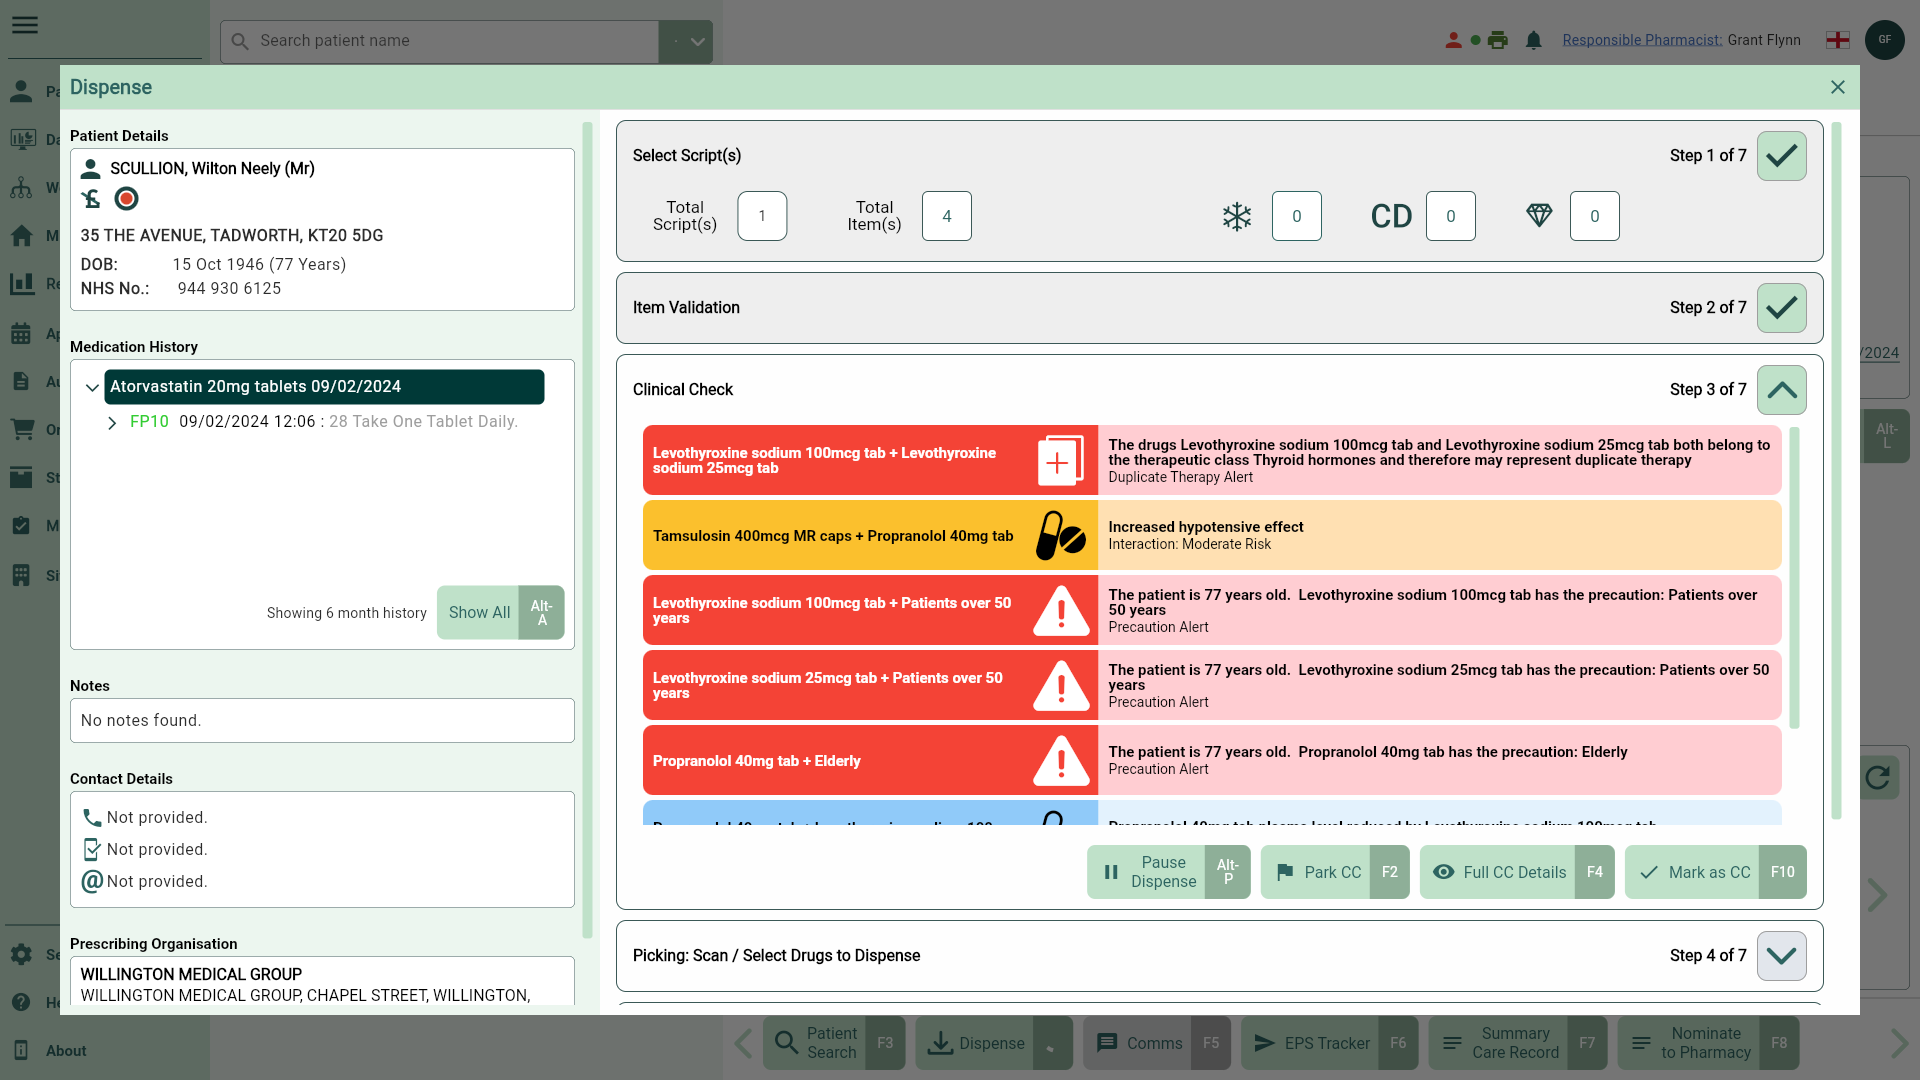
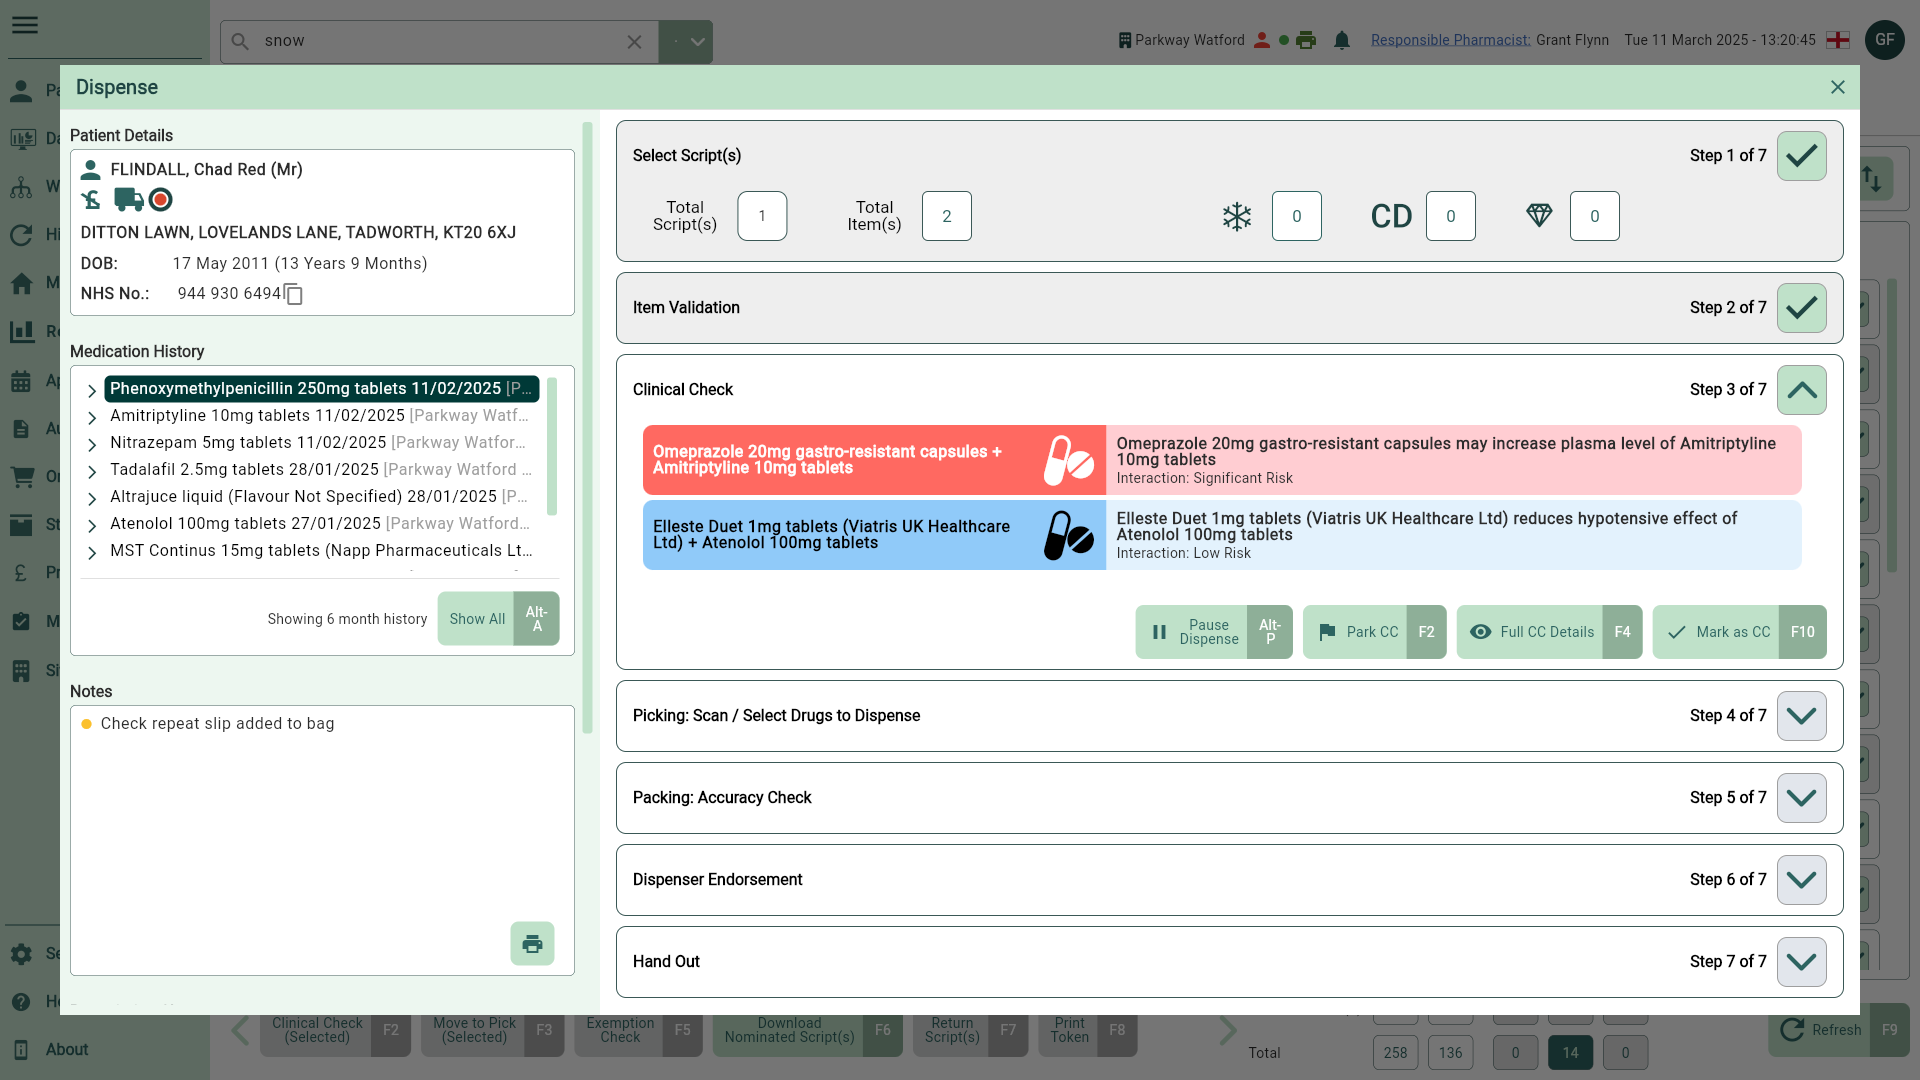
Clinical Check
The clinical check will identify any alerts that are pertinent to the patient, including drug interactions and contraindications based on factors such as age and allergies. It will also display information on the patient's past medical history and the current prescriptions being dispensed. Within this step you are also able to update the record with new conditions or clinical observations.
- Perform the clinical check. If you're satisfied all checks are complete, or no alerts have been displayed, select the [Mark as CC - F10] button to move on to the Picking step.
Learn how to perform a full clinical check
Our full Clinical Check details window has been designed to give you all the information you need to make an informed clinical decision during dispensing. The overview displayed allows you to take a deeper look at the patient's details, Medication History, Conditions and Allergies, Clinical Alerts and Clinical Check Actions. To complete a full clinical check from the Dispensing Wizard, follow the steps below.
Note: Hover your cursor over the CC Reset action to see the action details in full as a tooltip.
- Select the [Full CC Details - F4] button. The Clinical Check window displays.
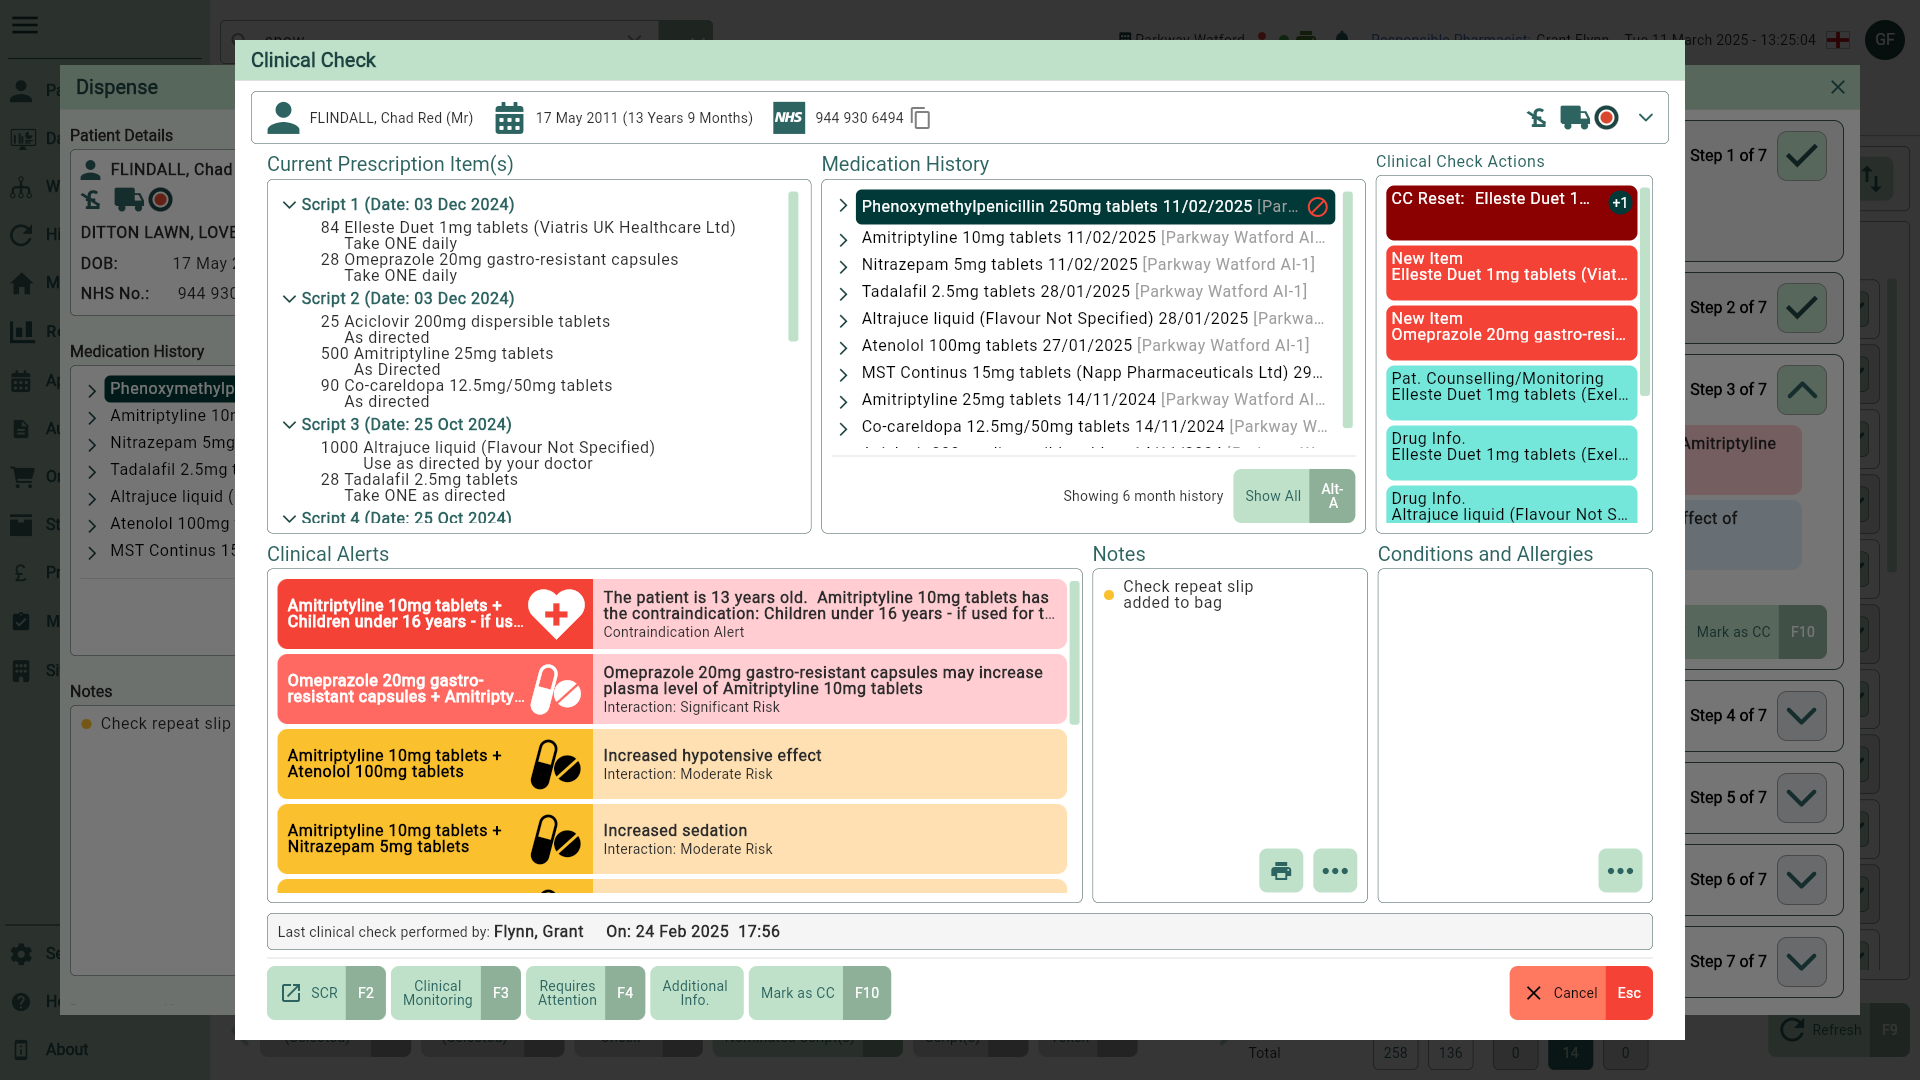
- Complete the clinical check. Further information is available to support your clinical checks found by selecting the [Additional Info] button.
- Once the check is complete, select the [Mark as CC - F10] button to move on to the Picking step.
Learn how to park a clinical check
If required, you can park the clinical check which will flag the script as Clinical check not complete, and then return to it later. You can also park scripts as a batch from the New Rx tab on Workflow. To park a clinical check from the Dispensing Wizard, follow the steps below.
- Select the [Park CC - F2] button. A snackbar displays confirming your clinical check has been parked successfully.
- Complete the Dispensing Wizard up to the Hand Out stage.
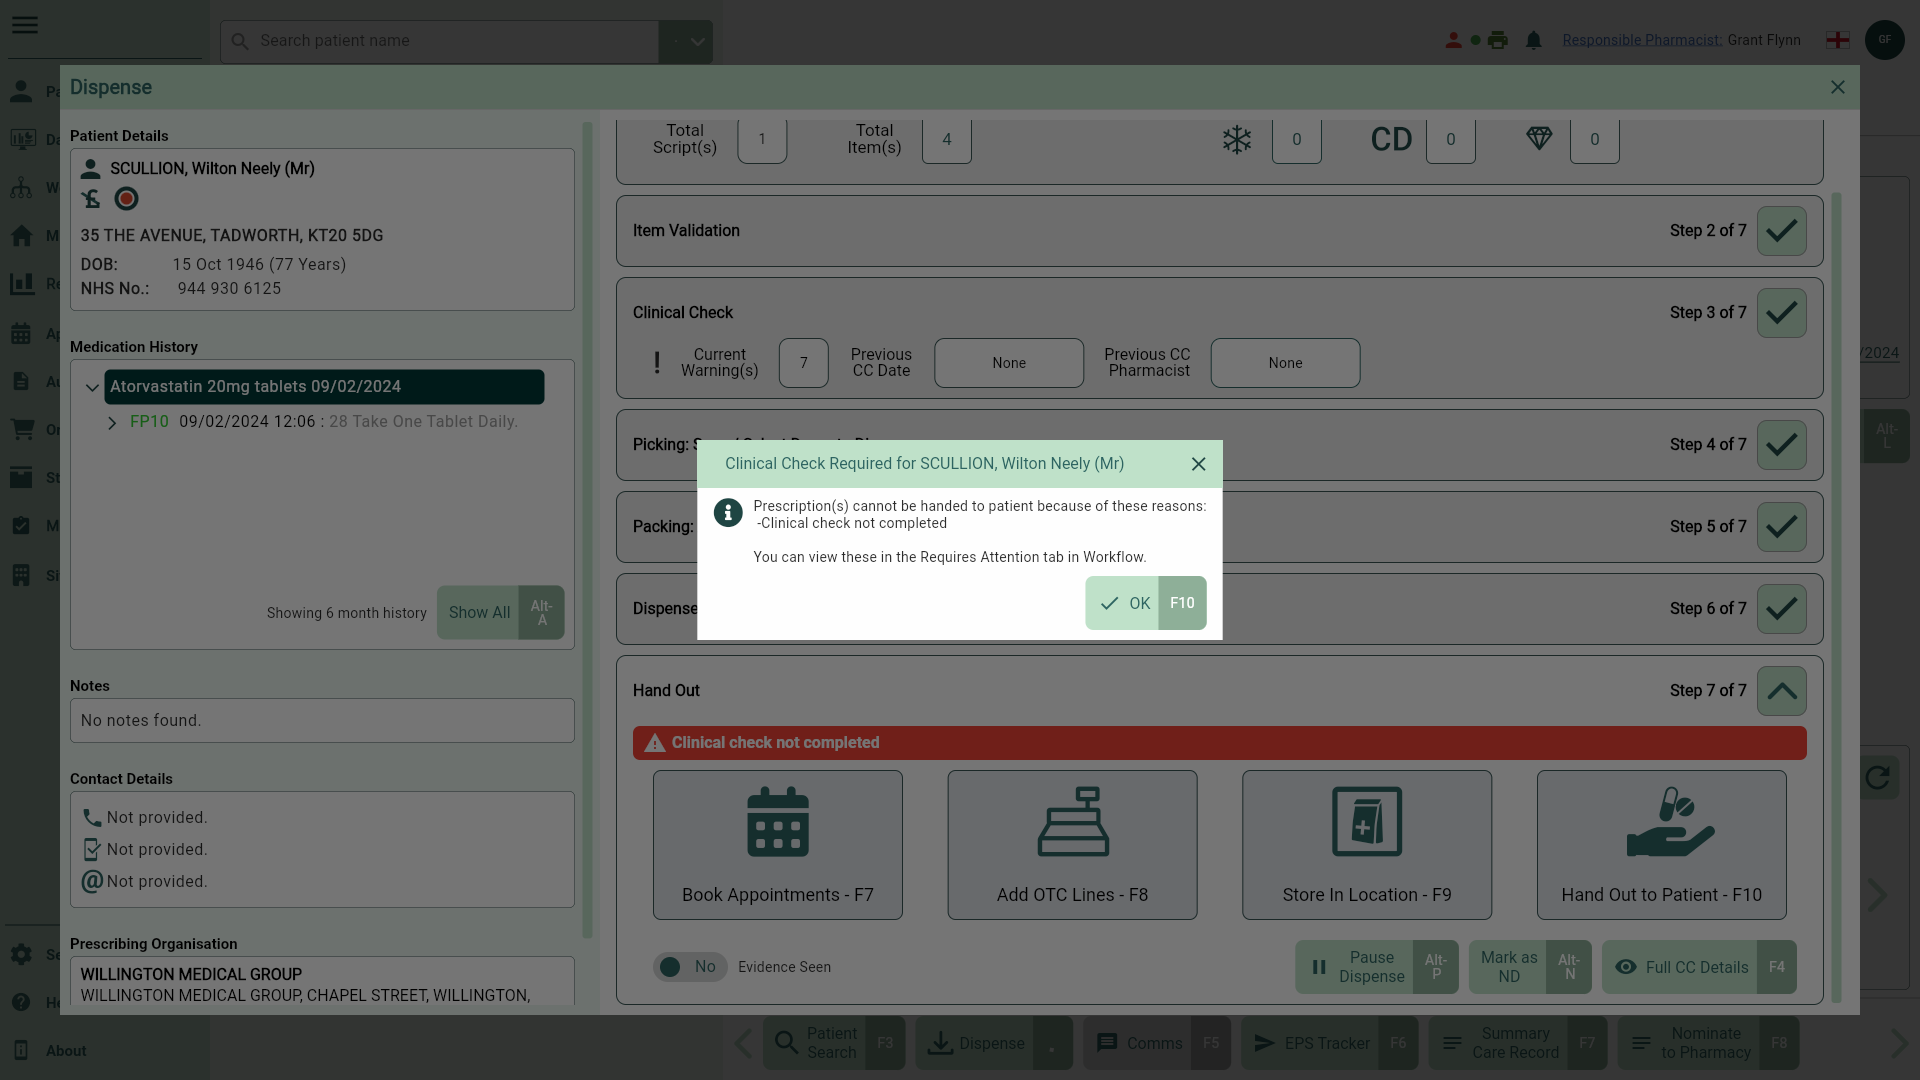
- After processing the script through the Dispensing Wizard, a prompt displays informing you that the script cannot be handed out to the patient until the clinical check is complete. All scripts flagged as Clinical Check not completed are moved to the Requires Attention tab in Workflow for review.
- The [Mark as CC - F10] will only be available to Pharmacist level users. If required, you can park the clinical check and return to it later using the [Park CC - F2] button.
Picking
The main focus of this stage is to select the dispensable packs for each prescribed item. Apotec CRM will automatically select the last dispensed pack for the given prescribed item as the best pack and populate the Scanned Qty to match the Total Qty. If no packs have previously been dispensed, the best pack will be selected based on the prescribed quantity and the available pack sizes.
- Once the correct dispensable pack(s) have been selected, you can move onto the Packing (Accuracy Check) step by selecting the [Next Step - F10] button.
Learn how to amend the chosen pack from the Product Choice window
If you need to amend the chosen pack, follow the steps below:
- Highlight the item and select the [Product Choice - F3] button. The Product Choice window displays.
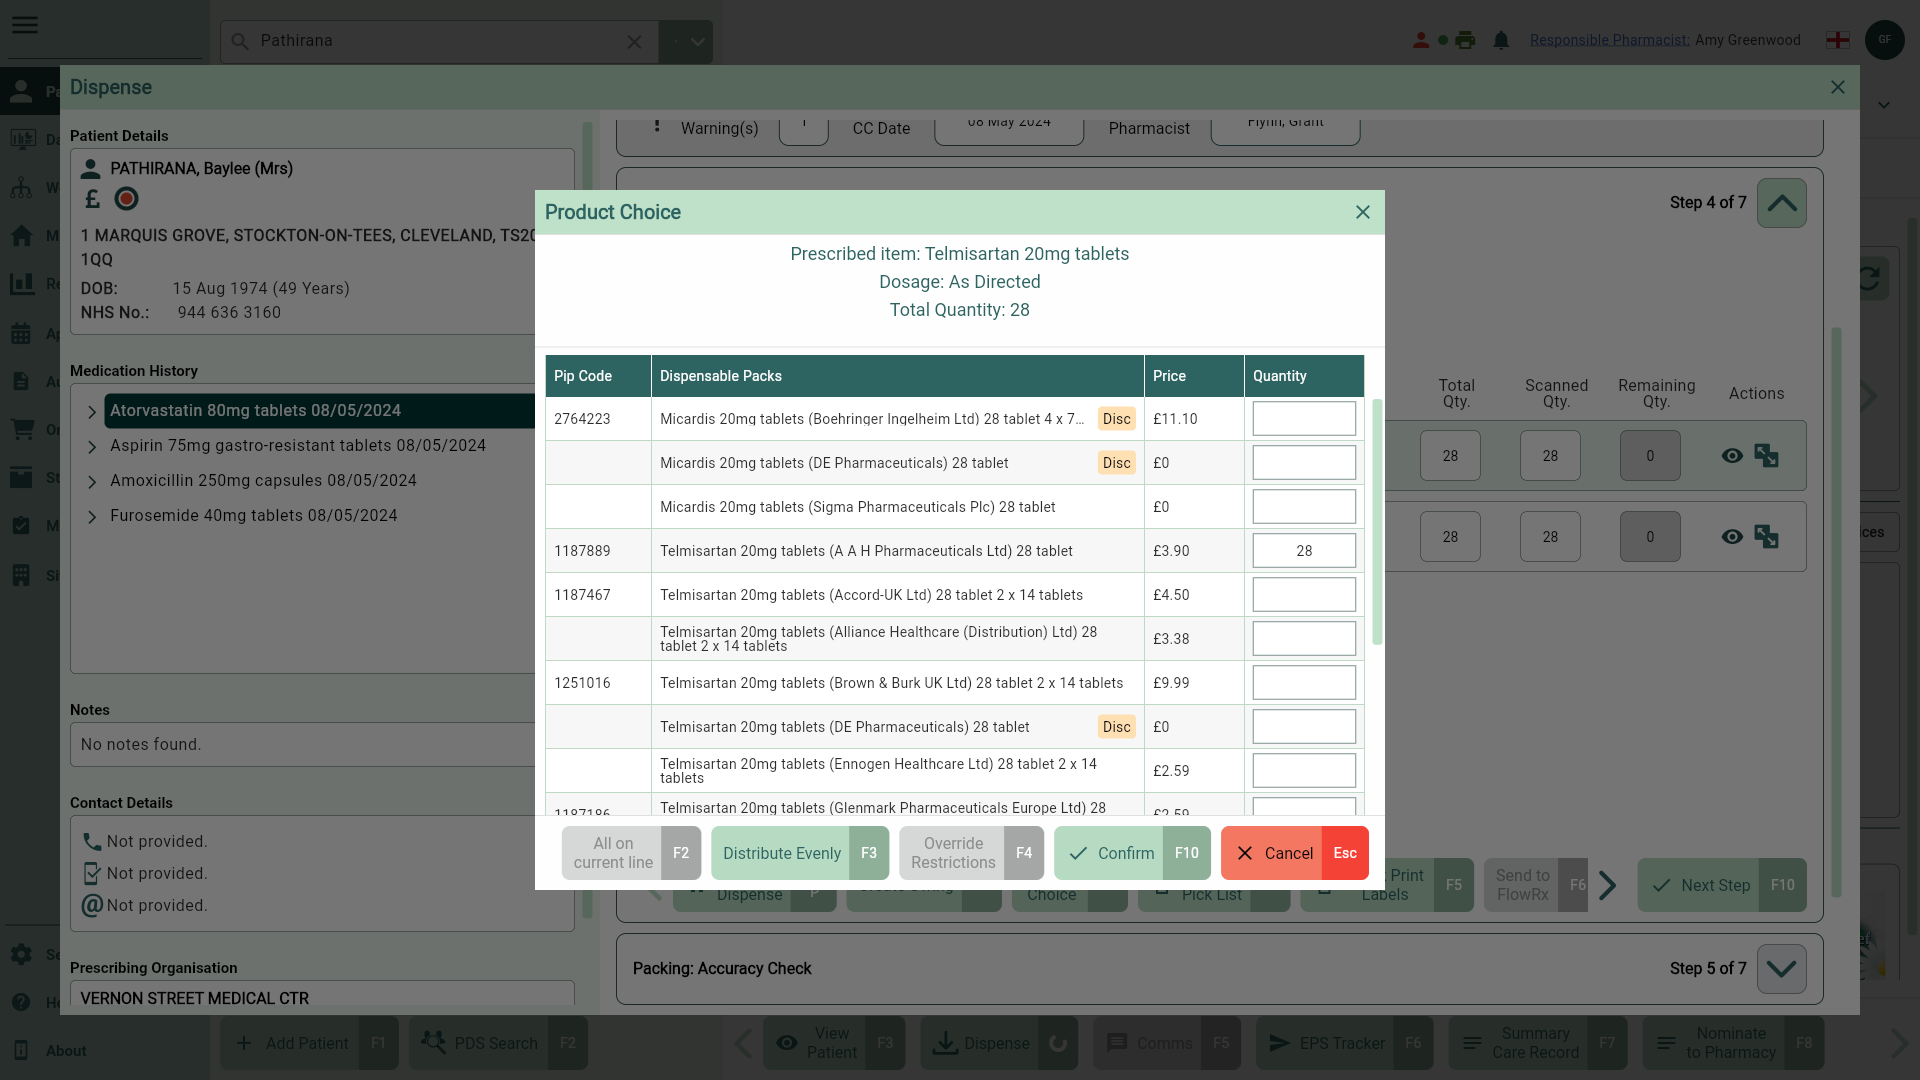
- Select the correct dispensable pack(s) based on current restrictions by populating the dispensed quantity in the Quantity field. You can make use of the function keys in this window to assign the total quantity to the highlighted pack using the [All On Current Line - F2] button, or distribute the quantity across all available packs using the [Distribute Evenly - F3] button.
- Confirm your selection using the [Confirm - F10] button.
Learn how to amend the number of labels being printed from the Label Split window
If you need to split the dispensed quantity across multiple labels, or add extra labels follow steps below:
- Highlight the item in the Picking list and then select the [Label Split – F9] button or the adjacent
 Label Split icon in the Actions column. The Label Split window displays.

Each standard label is represented in a single row with a quantity to be printed. You can add an extra label by selecting the  Add icon, with the total number of additional labels shown in the totals summary. To reduce the extra label count by one, select the
  Minus icon. To remove a row, select the
  Delete icon. Note: the Delete icon is disabled if only one label remains in the grid.
From here, use the available function keys to manage your label preferences:
[Single – F1]: Select to print the total quantity onto one label.
[Split – F2]: Add an additional row to the grid, the total quantity is 'split' and divided by the total number of rows.
[No. of Labels – F3]: Select to manually enter a numerical value which will then automatically split the total quantity across the labels accordingly.
[Move Last Up – F4]: The removed quantity will be added to the total to the row above. The [Move Last Up - F4] button is disabled when only one label is displayed in the grid.
[Extra Label – F5]: Adds an extra label to the selected row. The total number of extra labels are indicated in the totals summary.
- Confirm your selection using the [Confirm - F10] button.
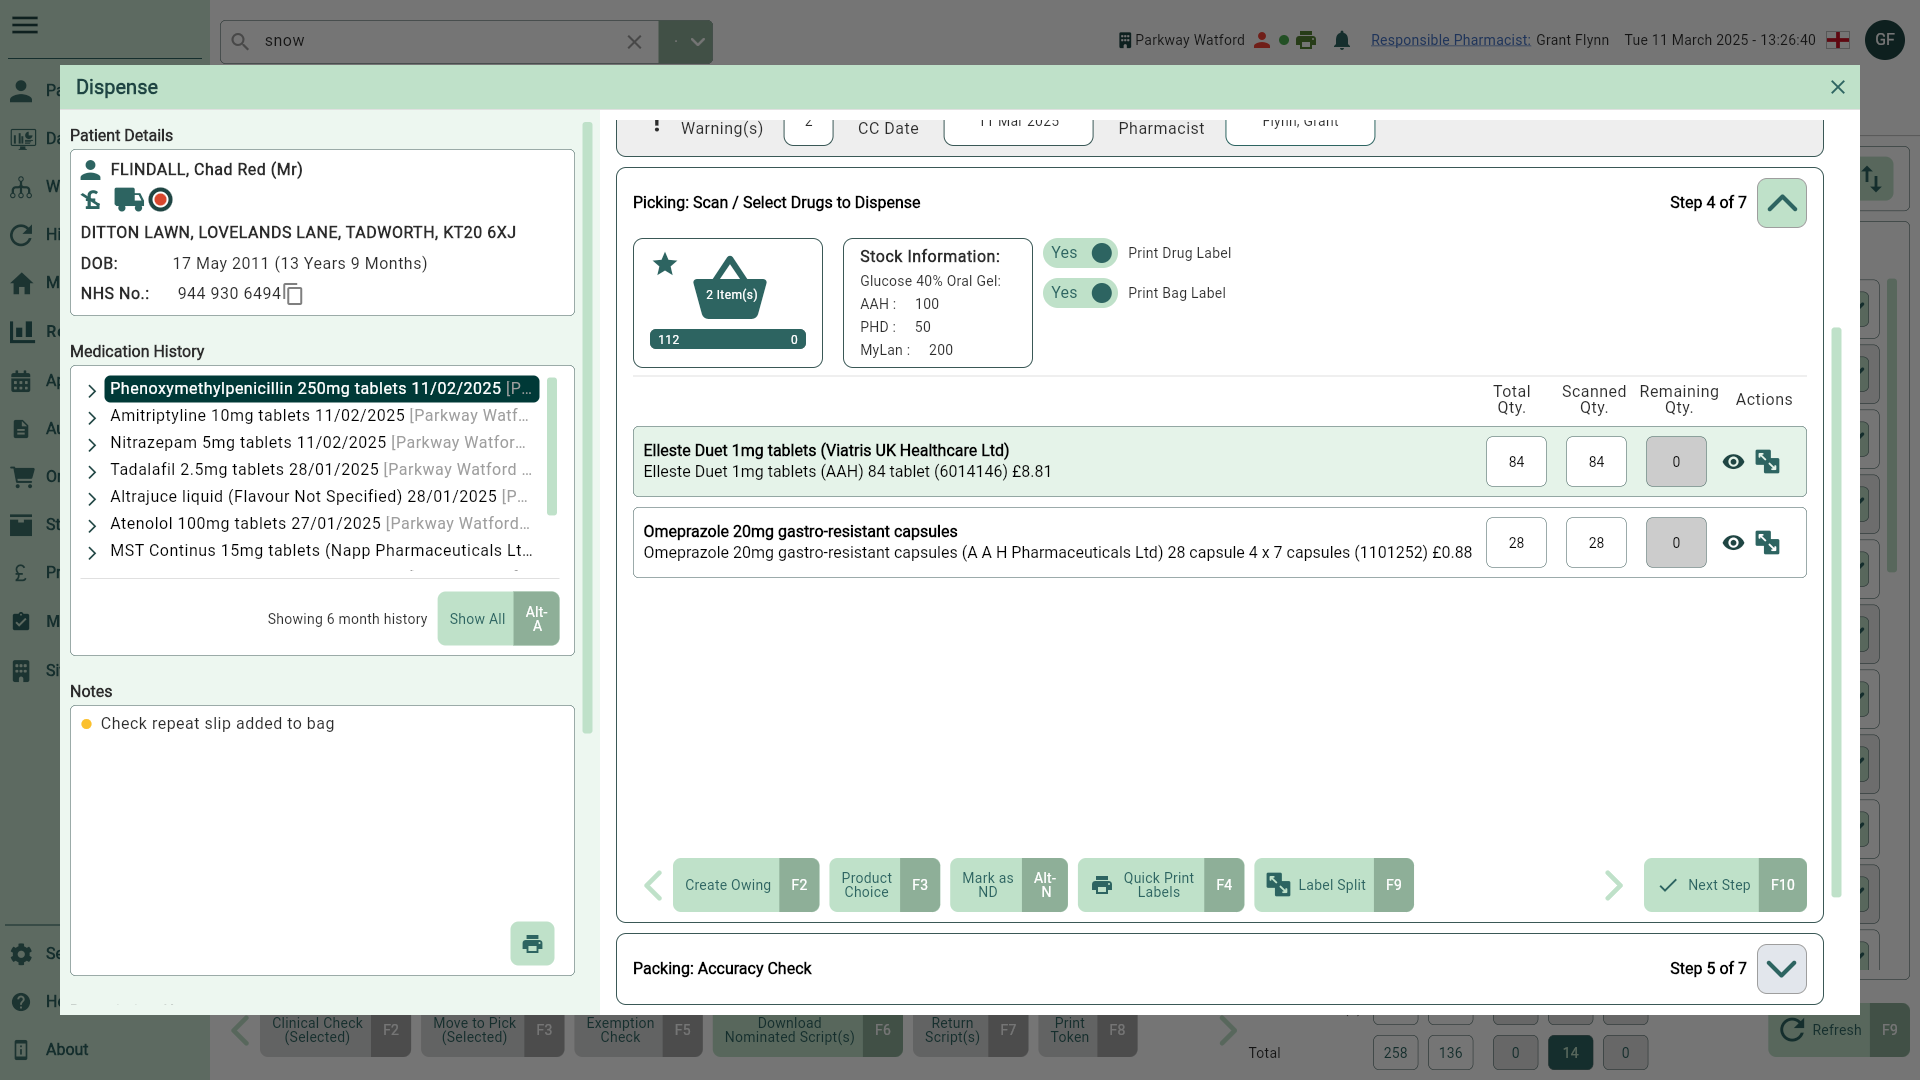
- Label(s) will be automatically generated once you have selected the [Next Step - F10] button. You can toggle the Print Drug Label and/or Print Bag Label switches to No to prevent printing either label. To preview your labels, select the View icon in the Actions column.
- Select the [Label Split - F9] button or the Label Split icon in the Actions column if you need to change the number of labels being printed. This will open the Label Split window. You can print the total dispensed quantity on a single label, split the quantity over several labels or add extra labels if required.
- Label Split will be disabled for MDS items, and labels will not automatically be printed for MDS items at this stage. If labels are required you can highlight the item and select [Quick Print Labels - F4] or [Label Split - F9].
- If you need to mark an item as Not Dispensed, select the [Mark as ND - Alt-N] button, or to create an owing, select the [Create Owing - F2] button. To learn how to create owings and mark items as Not Dispensed see our Creating Owings and Marking items as Not Dispensed articles.
- Proceeding with Remaining Quantity against any item will require you to create an owing or mark the item as Not Dispensed.
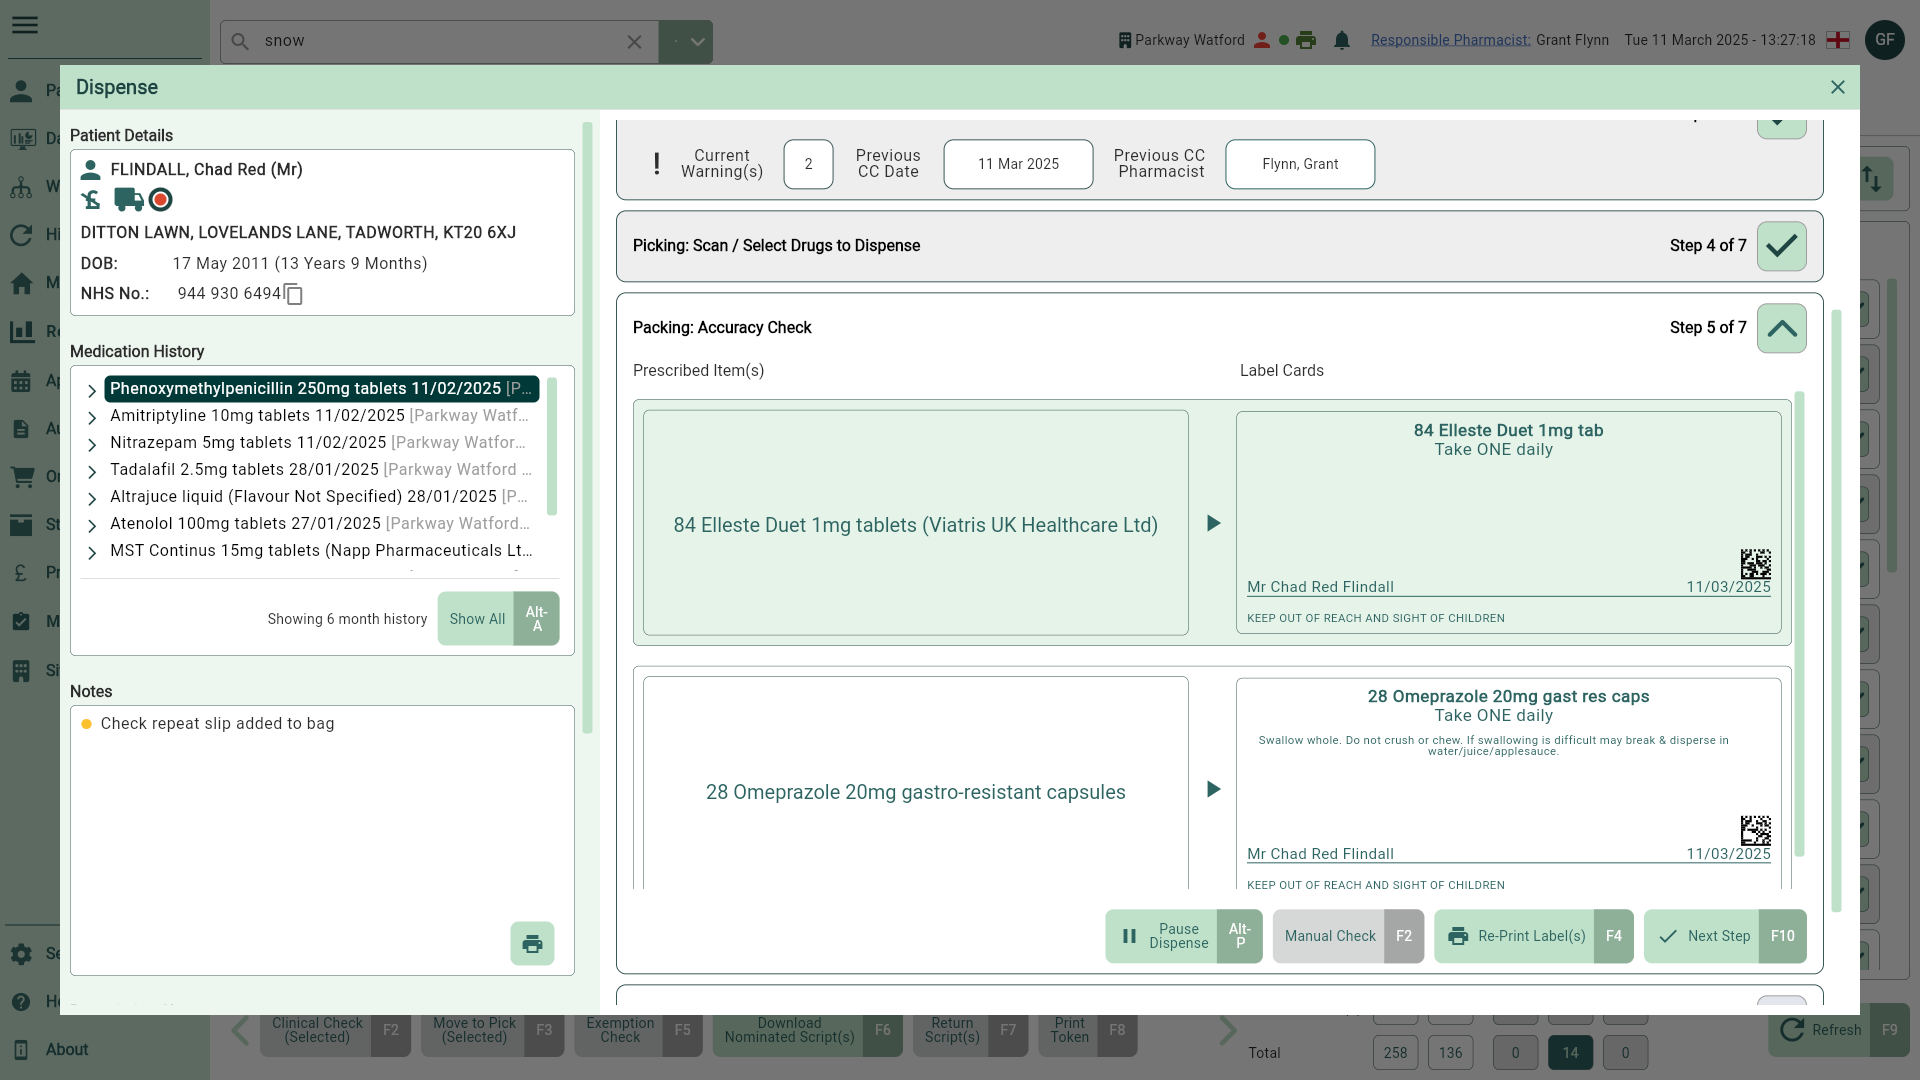
Packing (Accuracy Check)
At the Packing (Accuracy Check) step it is important to carefully pack each item and perform an accuracy check to ensure that everything is accounted for and properly matched prior to dispensing to the patient. Full functionality for this step is coming soon.
In this step, you can scan an alternative pack. If the scanned pack differs from the selected one, the CRM will validate it and, if needed, prompt you to generate new labels.
- To move onto the Dispenser Endorsement step of the Dispensing Wizard, select the [Next Step - F10] button.
Dispenser Endorsement
Add your dispenser endorsements at the Dispenser Endorsement step. Any suggestions will be set as an alert at the top of the window.
If configured in your settings, the Broken Bulk dispenser endorsement may be added automatically to eligible items, or you may be prompted to include it during the dispensing process. Please refer to our Dispensing Settings article for further details.
- If no endorsement(s) are required or you have added your required endorsements, select the [Next Step - F10] button to move onto the Hand Out step.
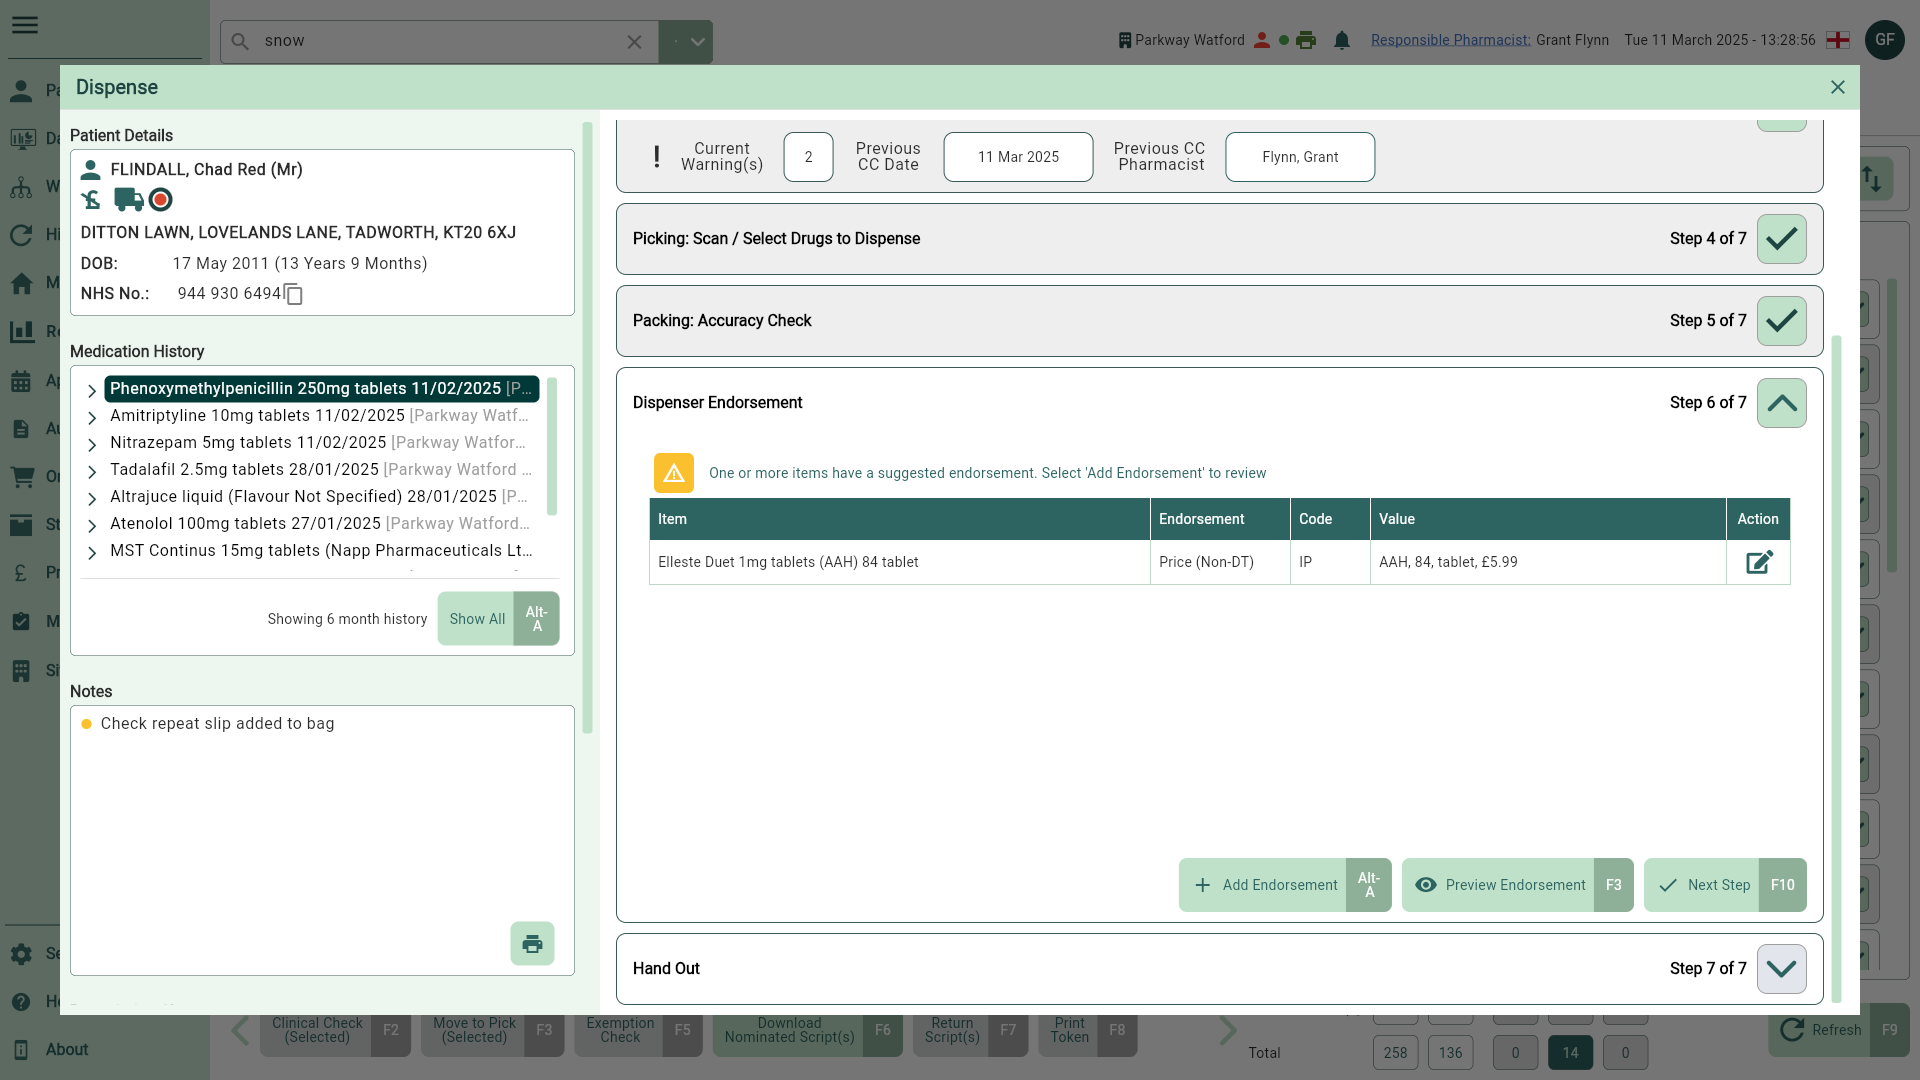
If you have an endorsement(s) to add, select the [Add Endorsement - Alt-A] button. To learn how to add an endorsement see our Adding endorsements article.
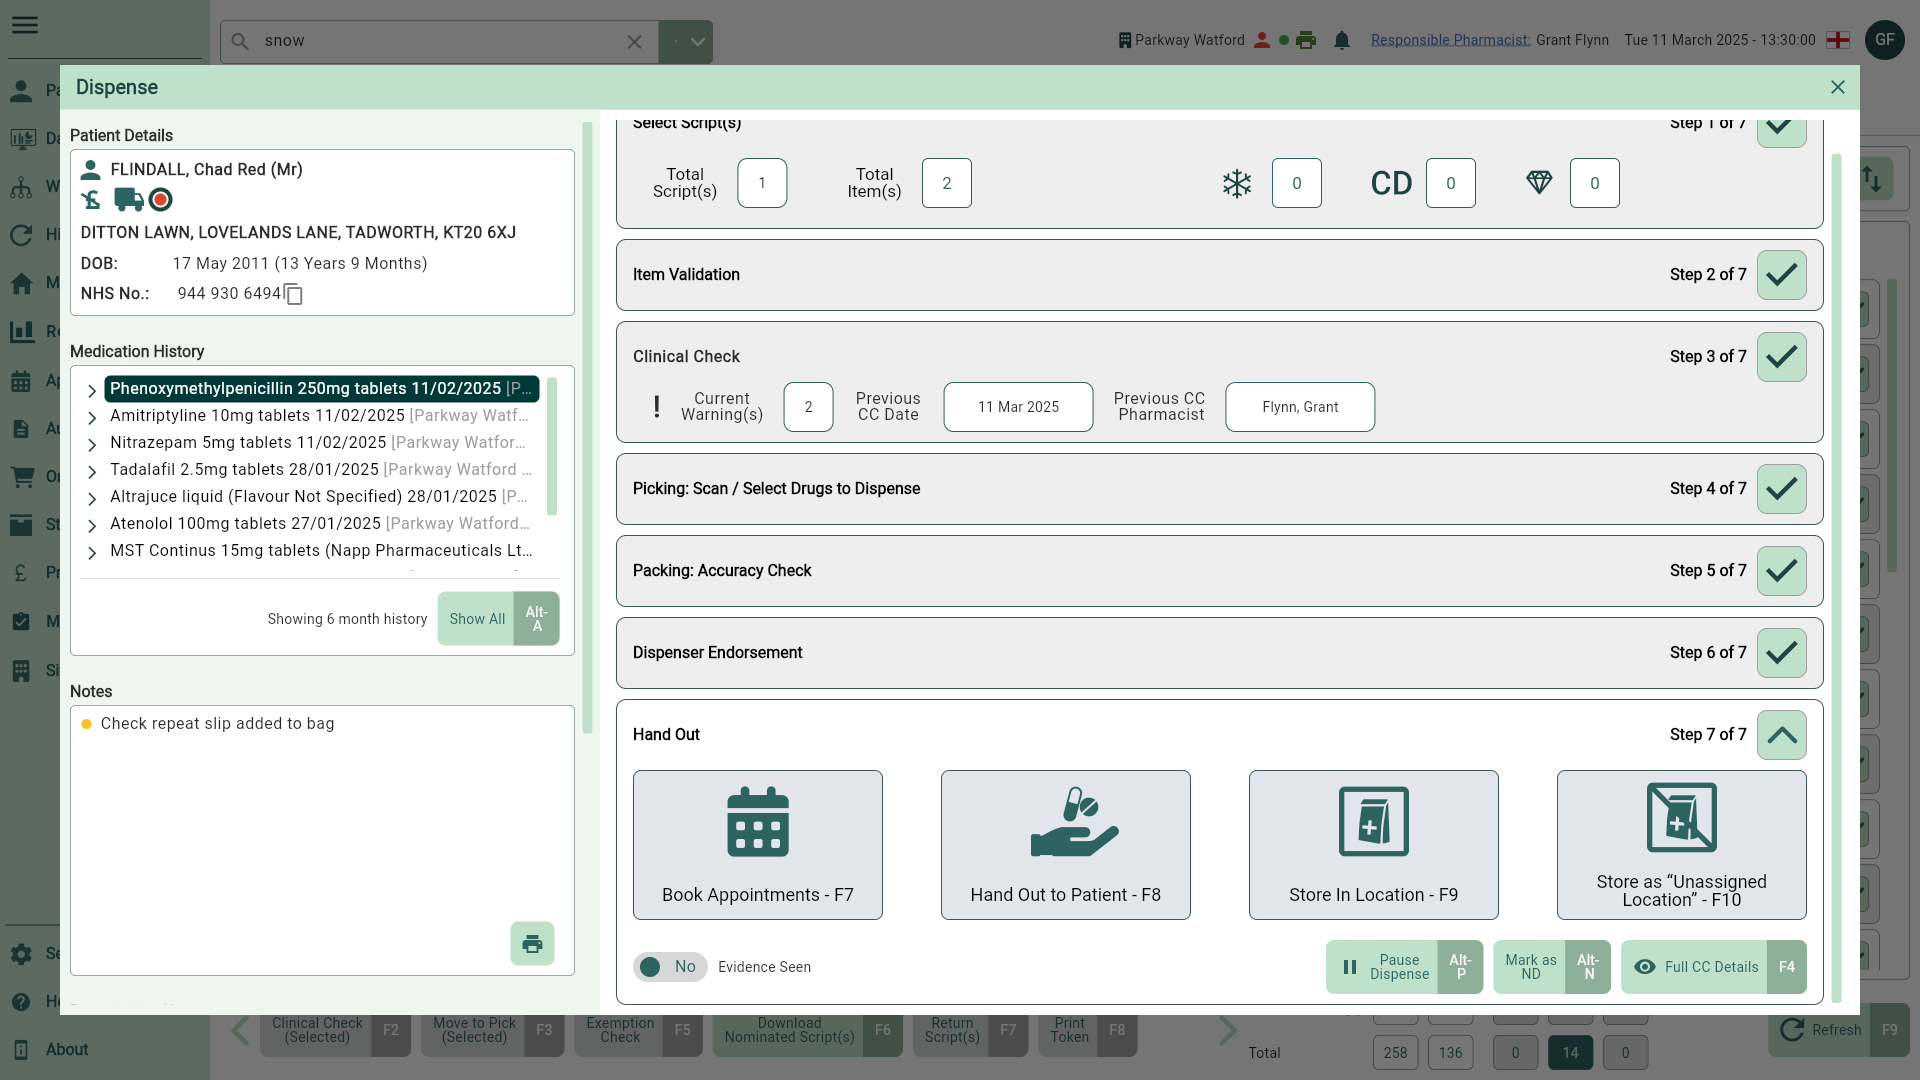
Hand Out
The Hand Out step is the final step in the Dispensing Wizard. You have multiple options during this stage, including to book an appointment, store the prescription in a location, or hand out the prescription to the patient.
- Complete the Dispensing Wizard using one of the available options:
After processing and saving electronic Repeat Dispensing (eRD) scripts the Download Next RD prompt will display. Selecting the [Yes – F10] button will send the dispense notification (DN) for each eRD and download the subsequent repeats. You will need to authenticate a valid NHS smartcard before you can send a DN and download the next eRD script. You can learn how to authenticate your smartcard in our Smartcard authentication article.
| Field | Action |
|---|---|
| [Store as "Unassigned" Location - F10] | Use this button to move your prescription(s) to the Awaiting Collection or Awaiting Delivery tab in Workflow based on the patient's chosen fulfilment option, without assigning a location. |
| [Store in Location - F9] | Use this button to mark your prescription as stored in a location within your pharmacy to await collection. Once selected, the Select/Scan Location window displays for you to select an available location based on the locations you have created within the Location Manager. After confirming, the prescription will move to the Awaiting Collection tab in Workflow. |
| [Hand Out to Patient - F8] | Using this button will update the prescription status to Completed. EPS prescriptions will move to the To Be Claimed tab in Workflow ready for you to send the dispense notification and claim. Manual prescriptions will move to the Completed Workflow tab. |
| [Book Appointments - F7] | Functionality coming soon. |
Once dispensed and saved, prescriptions with an exemption status of Not Known will be moved to the Requires Attention tab on Workflow with the reason Exemption marked as not known, pending review.
- If a patient is exempt and if appropriate, you can toggle the Evidence Seen switch to Yes once evidence has been provided.
- If configured, the Order Basket may display after you have handed the prescription out to the patient. You can learn more about the Order Basket in our Dispensing Order Basket article.
- If enabled, once the Order Basket prompt is closed, you will be prompted to complete an NMS for all eligible NMS items. Learn how to complete the NMS Engagement using our Completing the Engagement stage article.
- If configured in your application settings, the Auto Send Dispense Notification prompt may display. You will need to authenticate a valid NHS smartcard before you can send a dispense notification. You can learn how to authenticate your smartcard in our Smartcard authentication article.
Related/useful articles
Get to Know the Dispensing Wizard
After a prescription has been fulfilled and collected by the patient it is necessary to send a dispense notification.
Creating owings
If you are unable to fully or partially meet the demand for a specific item, you can create an owing for the patient.
Marking items as Not Dispensed
Where you decide not to dispense an item, for instance a cancelled item or if the patient decides to purchase over the counter (OTC), you will need to mark it as Not Dispensed (ND).
Creating Emergency Supplies
An Emergency supplies (ES) script is required when you need to provide medication without a prescription.
Managing Serious Shortage Protocols
Serious Shortage Protocols (SSPs) are announced when there are shortages of an item(s) in the market.
Adding endorsements
How to add an additional endorsement during the Dispenser Endorsement step of the Dispensing Wizard.
Dispensing Order Basket
If configured in your application settings, the Order Basket may display once you've finished processing your script through the Dispensing Wizard
Dispensing settings
Learn about our configurable dispensing application settings.