Get to know the patient CRM
The patient CRM (Customer Relationship Manager) is a complete patient-centric solution providing you with a location to store all your patient's demographic details, repeat medication, appointments and services and more. Within a patient's CRM you can utilise our quick dispensing solution, log and send communications and access various external tools such as the patient's Summary Care Record (SCR) and EPS Tracker.
You will need to authenticate a valid NHS smartcard before you can perform a PDS search or add/remove patient nominations. You can learn how to authenticate your smartcard in our Smartcard authentication article.
Patient CRM settings
| Setting | Category | Value/Description |
|---|---|---|
| SMS Auto Updates | SMS | Null; Set by default. Once configured, this setting will determine when SMS messages are sent to patients based on their prescription status. You can choose when/which updates/messages to send using the available checkboxes. To receive SMS updates, the patient must have SMS Updates enabled in Additional Services and provide a valid mobile number. The available messages are:
|
| SMS Sending Name | SMS |
|
SMS services will need to be enabled at branch level by a Head Office user before SMS notifications can be sent. See our Editing sites article to learn more about enabling services for your site(s).
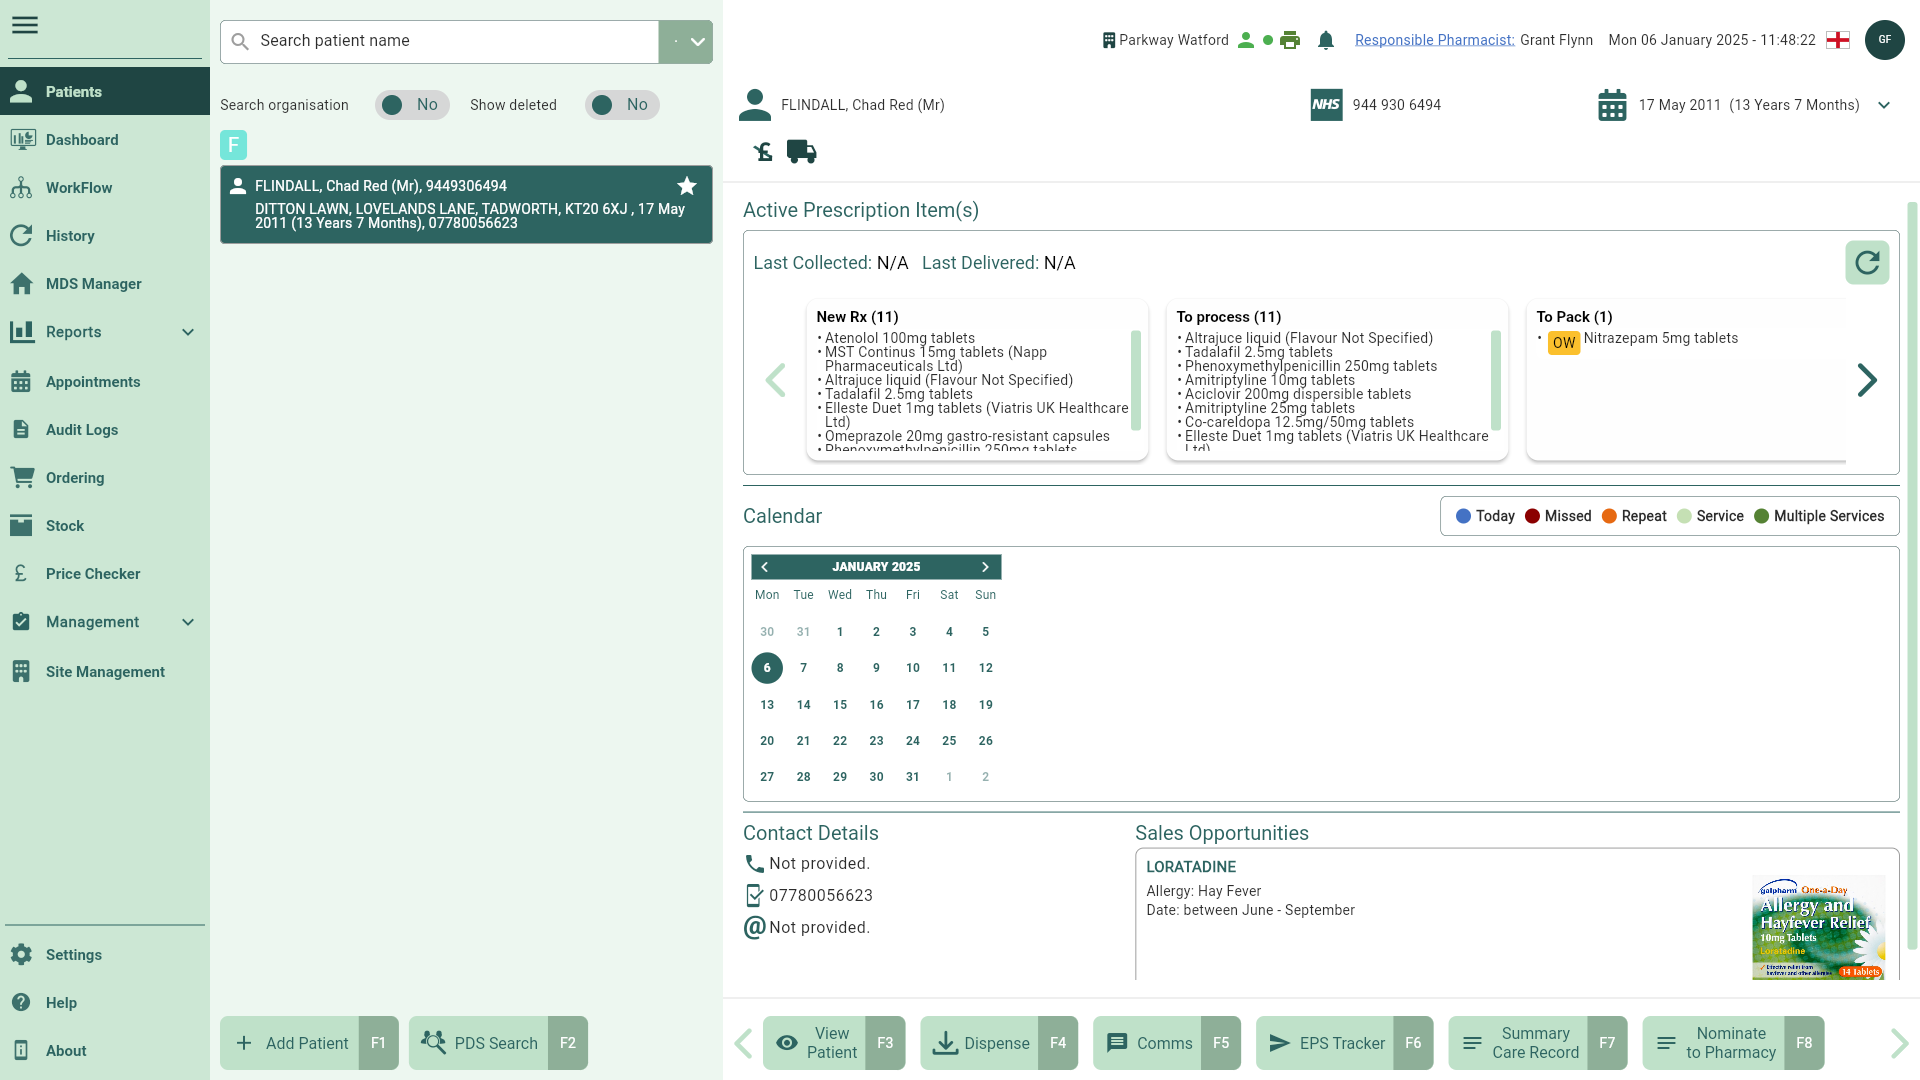
Patient preview
The patient preview window is displayed once a patient is selected from the search results. It provides a summary of the most useful information from the patient's CRM including upcoming appointments, contact and demographic details, and potential sales opportunities. You can also access the main patient CRM function keys to perform tasks for your patient, such as dispensing or logging communications, without having to open the CRM.
To access the patient preview, from any module within Apotec CRM, type the patient's surname into the Search bar and press [Enter] on the keyboard. Locate and highlight the patient from the search results.
| Field | Description |
|---|---|
| Search panel | An alphabetised list of all the patient records in your organisation's database. Selecting a patient on this list will display their patient preview in the right panel. |
| Search organisation | Toggle this switch to Yes to perform a patient search at organisation level. This field is only visible to organisations with multiple branches. |
| Show deleted | Toggle this switch to Yes to include patients marked as Deleted in your search results. Deleted patients will display a Deleted badge. |
| [Add Patient - F1] | Use this button to open the Add Patient window to add a new patient to your organisation. You must have a value entered in the Search field to display this button. |
| [PDS Search - F2] | Open the PDS window to perform a Patient Demographics Service (PDS) search by NHS Number or the patient's demographic details. In this window, you can capture EPS consent and patient nominations, and add the patient if they don't exist in your organisation's database. You must have a value entered in the Search field to display this button. |
| Patient demographics bar | Expand the patient demographics bar at the top of the patient preview to quickly view the patients age, date of birth, address and postcode. |
| Patient icons | A horizontal stack of icons to visually display a summary of settings and consent for the patient. These include an allergies indicator, recorded consent and registered services. You can find a full description of the patient icons in our Patient CRM FAQs. |
| Active Prescription Item(s) | See a read-only view of where the patient's active prescription items are within their workflow locations (New Rx, Requires Attention, To Pick, To Pack, Awaiting Collection and Awaiting Delivery). The medication's last collected/delivered date will be displayed where applicable, and any item with an outstanding owing will have a OW badge displayed against it. You may need to select the Any undispensed items in the Active Prescription Item widgets not associated with the current branch will be organised by branch and highlighted in a different colour. Offsite items will be grouped under an Offsite icon, displaying the total number of items. If you hover your cursor over an item or branch tag, it will display the full details of that branch. Offsite icon, displaying the total number of items. If you hover your cursor over an item or branch tag, it will display the full details of that branch. |
| Calendar | View any upcoming appointments and services for the patient. |
| Contact Details | Displays the patient's home number, mobile number and email address from their patient details form. |
| Sales Opportunities | Any sales opportunities relevant to the patient will be displayed here. |
| [View Patient - F3] | Select this button to open the patient CRM for full access to all the CRM's features and functionality including managing repeat medication, editing patient details, and more. |
| [Dispense - F4] | Open the Dispensing Wizard to process an EPS or manual prescription for the patient. |
| [Comms - F5] | Functionality coming soon. The [Comms - F5] button is enabled by adding a valid Mobile No. and/or Email Address on the patient details Contact Details tab. Once enabled, you can use the [Comms - F5] button to access the Contact History window where you can log a record of emails, phone calls and conversations with your patient, and send SMS and push notifications. |
| [EPS Tracker - F6] | Open the NHS EPS Tracker in a new tab. |
| [Summary Care Record - F7] | Open the patient's Summary Care Record (SCR) in a new tab. |
| [Nominate to Pharmacy - F8] and [Remove Nomination - F8] | Patients need to be nominated to your pharmacy for you to download their EPS prescriptions. Using these buttons, you can nominate the patient to your pharmacy or, once nominated, you can remove their nomination. |
 Refresh icon button to refresh the tab to ensure that any recent updates to prescription locations are displayed accurately.
Patient CRM
Jump into the patient's CRM from the search results for full access to all the CRM's features and functionality including managing repeat medication, editing patient details, and more.
To access a patient's CRM, from any module within Apotec CRM, type the patient's surname into the Search bar and press [Enter] on the keyboard. Locate and highlight the patient from the search results and select the [View Patient - F3] button.
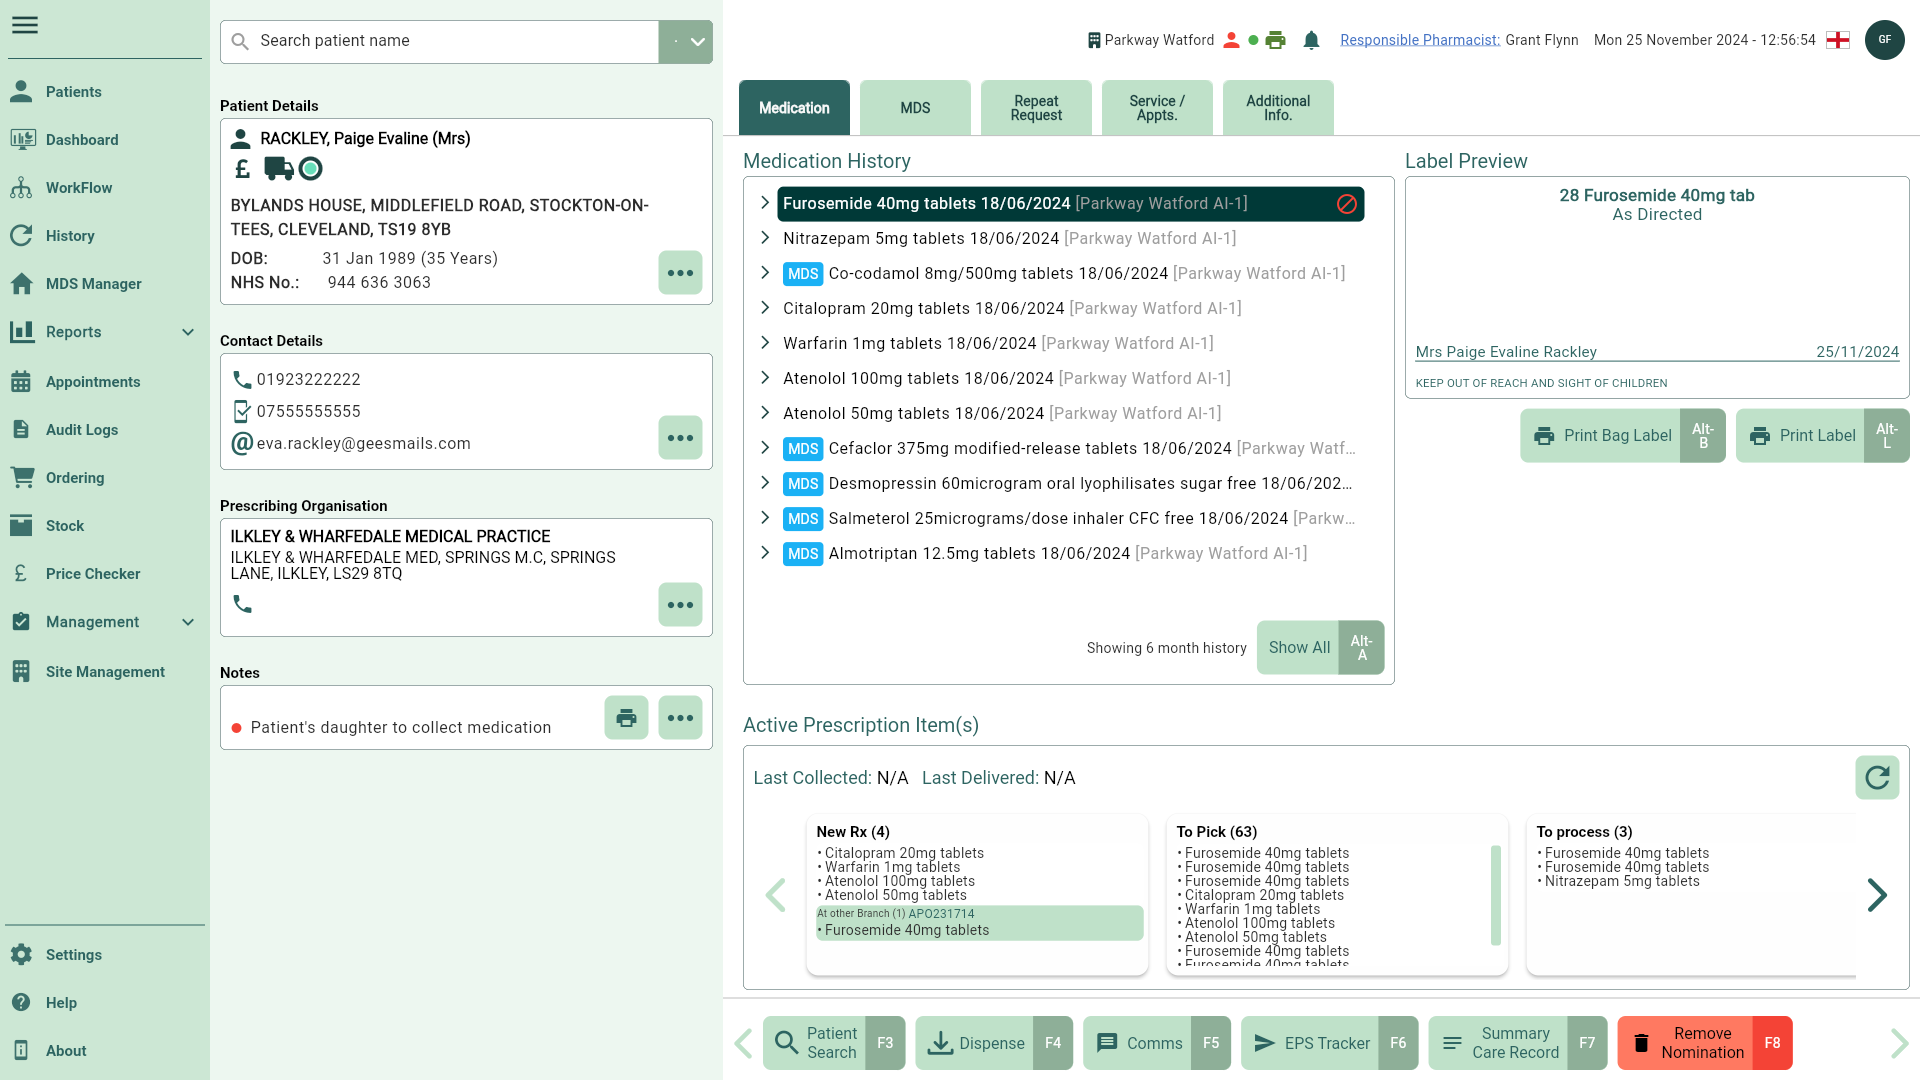
Medication tab
| Field | Description |
|---|---|
| Patient Details | The Patient Details section displays the patient's name, date of birth, address, and patient icons to visually show a summary of the patient's settings and consent. You can find a full description of the patient icons in our Patient CRM FAQs. Use the [...] button in this section to open the Edit Patient window. |
| Contact Details | Displays the patient's home number, mobile number and email address from their patient details form. Use the [...] button to open the Contact Details tab within the Edit Patient window. |
| Prescribing Organisation | Displays the patient's prescriber and prescribing organisation as completed on their patient details form. Use the [...] button to open the Prescriber tab within the Edit Patient window. |
| Notes | Any Warning, Bag Label, or other notes recorded in the patient details form are shown here. Use the [...] button to open the Notes tab within the Edit Patient window. You can print any available notes to a label by selecting the  Print button. Print button. |
| Medication History | A tree view displays the patient’s medication history, showing a 6 month history by default. To view the full history, select the [Show All – Alt-A] button. If you are part of an organisation, hovering your cursor over an item will display the prescribed item and dosage along with the dispensing branch details in full. You can find the full details of what information is displayed in the tree view in our Patient CRM FAQs. |
| Label Preview | Select an item in the Medication History to view it's label preview. |
| [Print Bag Label - Alt-B] | Reprint a bag label for the item and dispensing event highlighted in the Medication History. |
| [Print Label - Alt-L] | Reprint a label for the item and dispensing event highlighted in the Medication History. |
| Active Prescription Item(s) | See a read-only view of where the patient's active prescription items are within their workflow locations (New Rx, Requires Attention, To Pick, To Pack, Awaiting Collection and Awaiting Delivery). The medication's last collected/delivered date will be displayed where applicable, and any item with an outstanding owing will have a OW badge displayed against it. You may need to select the Any undispensed items in the Active Prescription Item widgets not associated with the current branch will be organised by branch and highlighted in a different colour. Offsite items will be grouped under an Offsite icon, displaying the total number of items. If you hover your cursor over an item or branch tag, it will display the full details of that branch. |
| [Patient Search - F3] | Select this button to return to the patient search. |
| [Dispense - F4] | Open the Dispensing Wizard to process an EPS or manual prescription for the patient. |
| [Comms - F5] | Functionality coming soon. The [Comms - F5] button is enabled by adding a valid Mobile No. and/or Email Address on the patient details Contact Details tab. Once enabled, you can use the [Comms - F5] button to access the Contact History window where you can log a record of emails, phone calls and conversations with your patient, and send SMS and push notifications. |
| [EPS Tracker - F6] | Open the NHS EPS Tracker in a new tab. |
| [Summary Care Record - F7] | Open the patient's Summary Care Record (SCR) in a new tab. |
| [Nominate to Pharmacy - F8] and [Remove Nomination - F8] | Patients need to be nominated to your pharmacy for you to download their EPS prescriptions. Using these buttons, you can nominate the patient to your pharmacy or, once nominated, you can remove their nomination. |
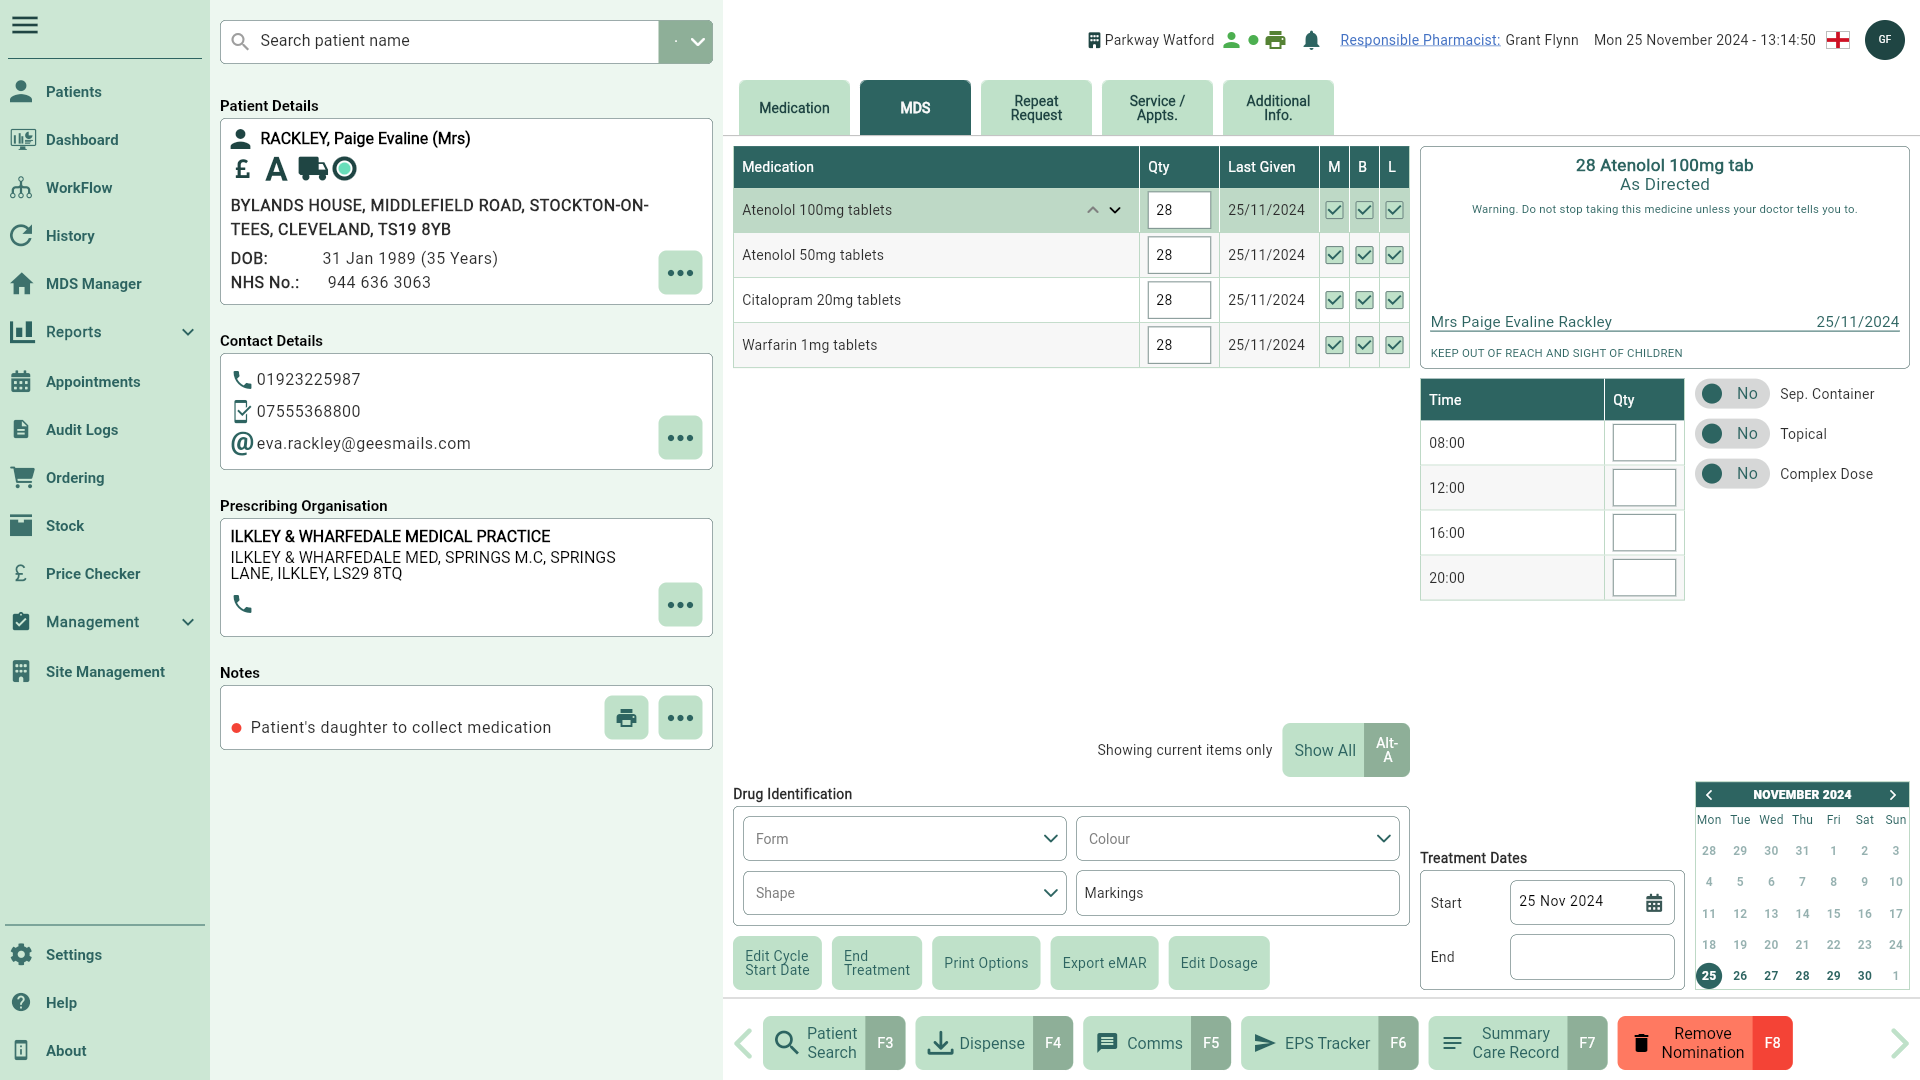
MDS Tab
Once patients are added to a nursing home or as a community patient, an MDS tab will display in their patient record.
Please take the utmost care when editing nursing home details as any amendments made will apply to all patients within the home.
| Field | Description |
|---|---|
| Medication table | Displays all the medication on the patient's MDS record including the item name, quantity, when the item was Last Given and the M, B and L checkboxes to flag items to print/export MAR Charts (M), Backing Sheets (B) and/or Labels (L) when the relevant print/export option is selected. Updates to quantities will only reflect on the MDS stationery and will not impact the patient's medication history. If configured in your application settings, you can highlight an item in the Medication panel and use the adjacent |
| [Show All - Alt-A] and [Show Current - Alt-A] | Show only current MDS items in the Medication table, or show all items (including Ended treatments). |
| Drug Identification | Add drug identification details for each of the items in the Medication table including the Form, Colour, Shape and Markings. Apotec CRM will save these settings and automatically populate these for your patient if you give further items from the same dispensed pack. |
| [Edit Cycle Start Date] | Open the Medication Cycle window where you can edit the cycle Start Date and Medication Cycle, including setting a Temporary Start Date that will refresh once you leave the patient record. Reset the Dispensed quantity, Printed, eMAR exported and eMAR failed status badges for your highlighted patient or for all patients within the nursing home. If the Temporary Start Date is enabled the Resets options are disabled. |
| [End Treatment] and [Restart Treatment] | Use the [End Treatment - F8] button to end the treatment for the highlighted item in the Medication table. Once an item has been marked as Ended, you can restart the treatment using the [Restart Treatment - F8] button. |
| [Print Options] | Select this button to display all the printing options. You can print MAR Charts (M), Backing Sheets (B) and Labels (L) for items flagged as M, B and L, and consolidated or non-consolidated picking lists (as configured in your Nursing Home/Community patient's settings) for your patient. |
| [Export eMAR] | Select this button to transmit all items flagged as M for your patient on an electronic MAR (eMAR) chart. |
| [Add Duplicate Treatment - F9] and [Remove Duplicate Treatment - F9] | Functionality coming soon. Highlight an item and select the [Add Duplicate Treatment - F9] button to open the Add Duplicate Treatment window where you can duplicate the item in the Medication table with differing quantities, dosage instructions and administration times. Duplicate treatments will display with a ** DUPLICATE TREATMENT ** caption on MAR Charts and Backing Sheets. You will need to enable the Allow Duplicate Treatment application setting to see this button. Highlighting an item with the Duplicate badge will display the [Remove Duplicate Treatment - F9] button, which you can select to remove the duplicated item from the Medication table. |
| Label preview | View a preview of the label for the highlighted item in the Medication table. |
| Administration Times table | Update administration quantities against the available Times in the table. Administration times are configured in the Nursing Home/Community patient's settings and will update for all patients in the home if amended. |
| Sep. Container switch | Highlight an active item in the Medication table and toggle the Sep. Container switch to Yes to mark it as a separate container item. This switch may automatically be set to Yes if the item is stored as Topical in our drugs database. Any manual overrides to this switch will be remembered for your patient. By default the text Separate container will print on all MAR Charts and Backing Sheets below the drug name, dosage instruction and warnings for all items with this flag enabled. You can enter custom text for separate container items for all your nursing home/community patients in the Nursing Home/Community patient's settings. |
| Topical switch | Highlight an active item in the Medication table and toggle the Topical switch to Yes to mark the item as topical. A body image will print below each medication that has been marked as Topical on MAR Charts if a Body MAR Sheet has been selected as the MAR template in the Nursing Home/Community patient's settings. This switch may automatically be set to Yes if the item is stored as Topical in our drugs database. Any manual overrides to this switch will be remembered for your patient. |
| Complex Dose switch | Functionality coming soon. Enable the  Edit icon button to edit complex dose times for each item in the Medication table. Edit icon button to edit complex dose times for each item in the Medication table. |
| Edit icon button (Complex Dose) | Select this button to open the Edit MDS Complex Dosage window where you can configure a complex dose schedule for non-daily or irregular doses for each item in the Medication table. |
| Treatment Dates | By default, the Start date is set to the first date the item was given. This can be amended if needed. The End date is only set once the treatment has been marked as Ended. When updating the start date of an item marked as Complex Dose, the calendar within the Edit MDS Complex Dosage window highlights the days within the cycle. It displays administration times only for those specific days. For example, if the start date is 1/1/2024 with a 28-day cycle, the calendar will highlight the events from 1/1/2024 to 28/01/2024. |
| Calendar | Dates in the calendar will be highlighted to indicate administration days. |
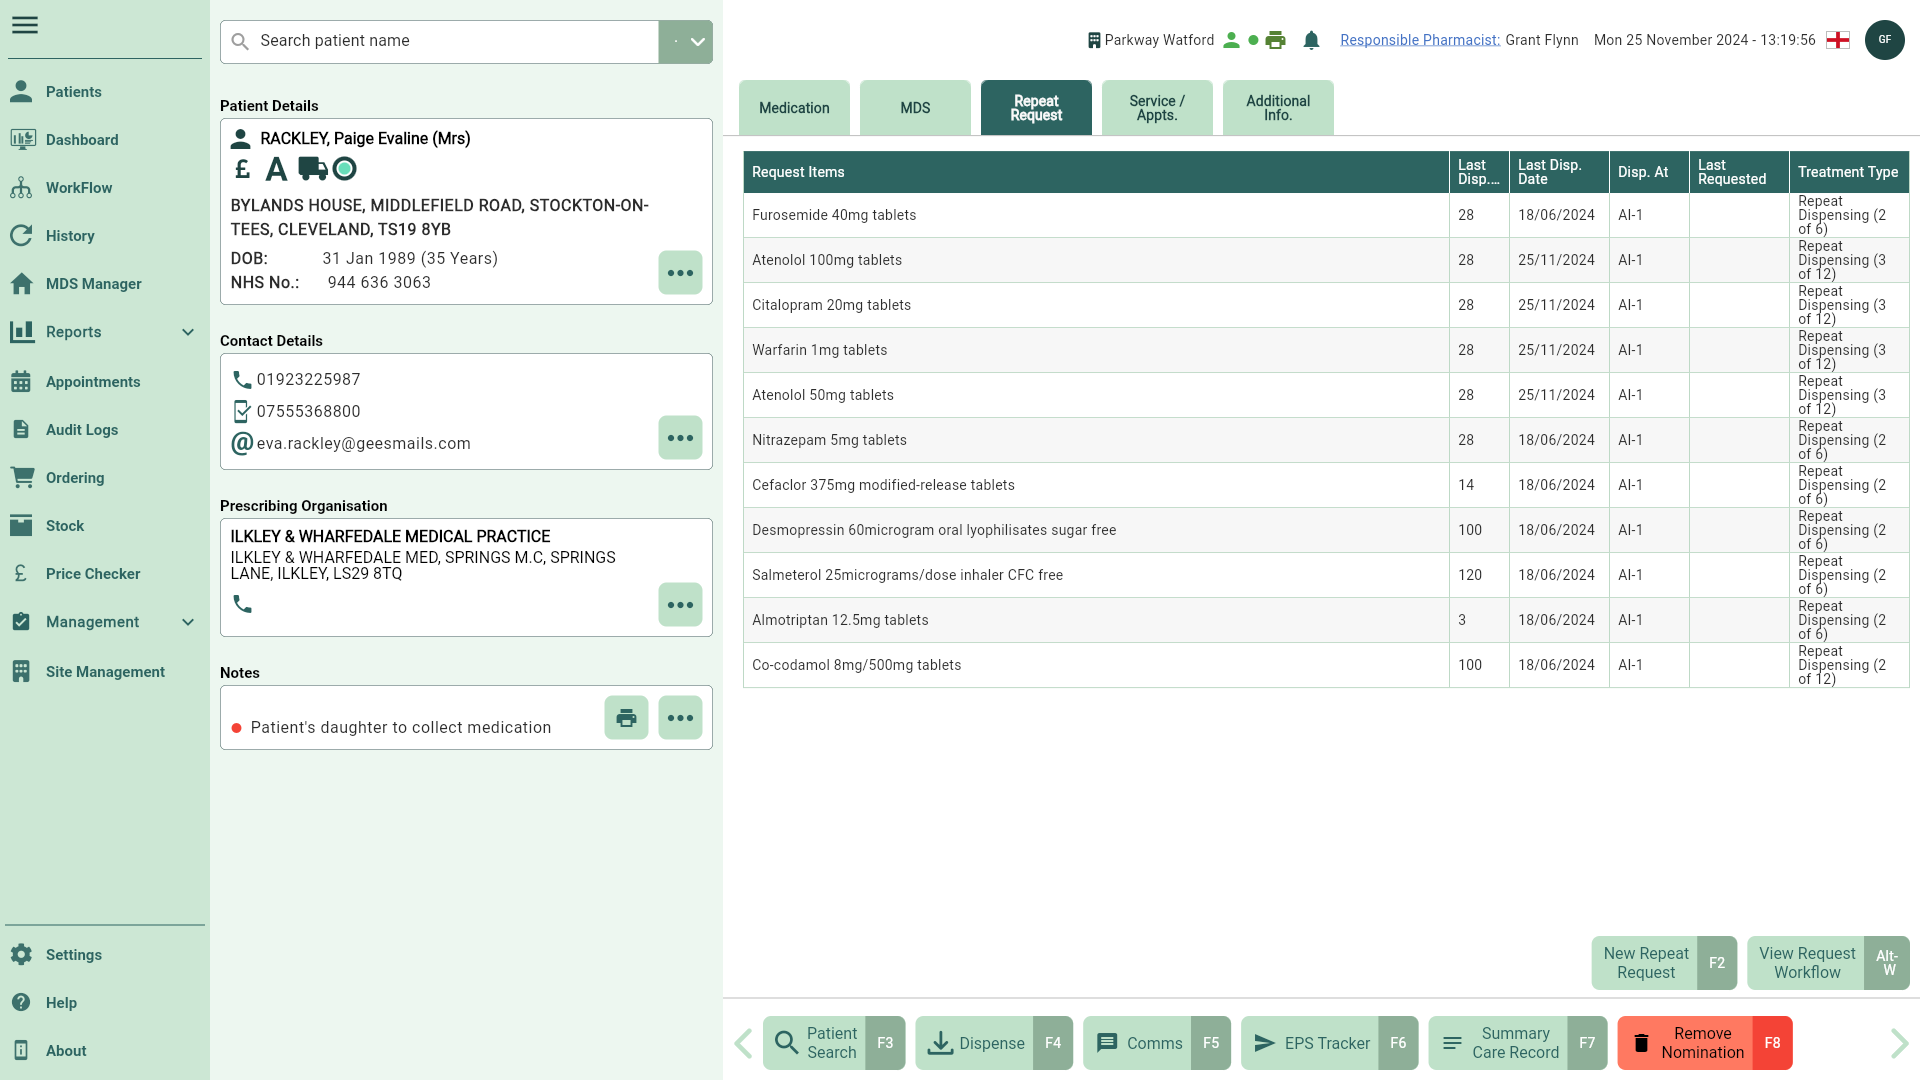
Repeat Request tab
| Field | Description |
|---|---|
| Grid | The Requested Items grid displays all requested items, Last Dispensed Quantity, Last Dispense Date, Dispensed At location, Last Requested Date and Treatment Type. |
| [New Repeat Request - F2] | Select this button to create a new request. |
| [View Request Workflow - Alt - W] | Select to be taken to the Request tab in Workflow filtered on your selected patient. |
Services & Appointments tab
Functionality coming soon.
Additional Information tab
Functionality coming soon.