Get to Know RMS
Use the Repeat Management Solution (RMS) module to manage your prescription requests for your patients. From creating and editing requests, setting reminders to seamlessly running and printing detailed request reports.
You can manage your requests from several places within Apotec CRM, they are the;
- New Request window
- Request tab in the Workflow module
- Patient Repeat Request tab
RMS Settings
| Setting | Value/Description |
|---|---|
| RMS Enabled |
|
| Warn RMS Requests In PMR |
|
| Use Prescriber On RMS Request |
|
| Prescribing Organisation Collection Lead Time | 5; Set by default. Use this setting to configure the time (in days) after which a request is marked as overdue. |
| Add ETP Repeat Dispensing to RMS |
|
| Print Prescribing Organisation Details |
|
| Print Quantity on RMS Request |
|
| Print Dosage on RMS Request |
|
| Consolidate Repeats for Same Patient |
|
| Set Last Requested Date from PMR |
|
| Print Details on RMS Request | If enabled, the selected fields will be included on the Repeat Request print out; if disabled (or no prescriber selected), the report will print Doctor in the absence of a prescriber name. Note: Prescriber, Prescribing Organisation, Quantity, and Dosage are selected by default.
|
Workflow Request tab
The Request tab in Workflow is the central location for managing your requests for all your patients.
To access the Request tab, select Workflow from the left-nav and the Request tab.
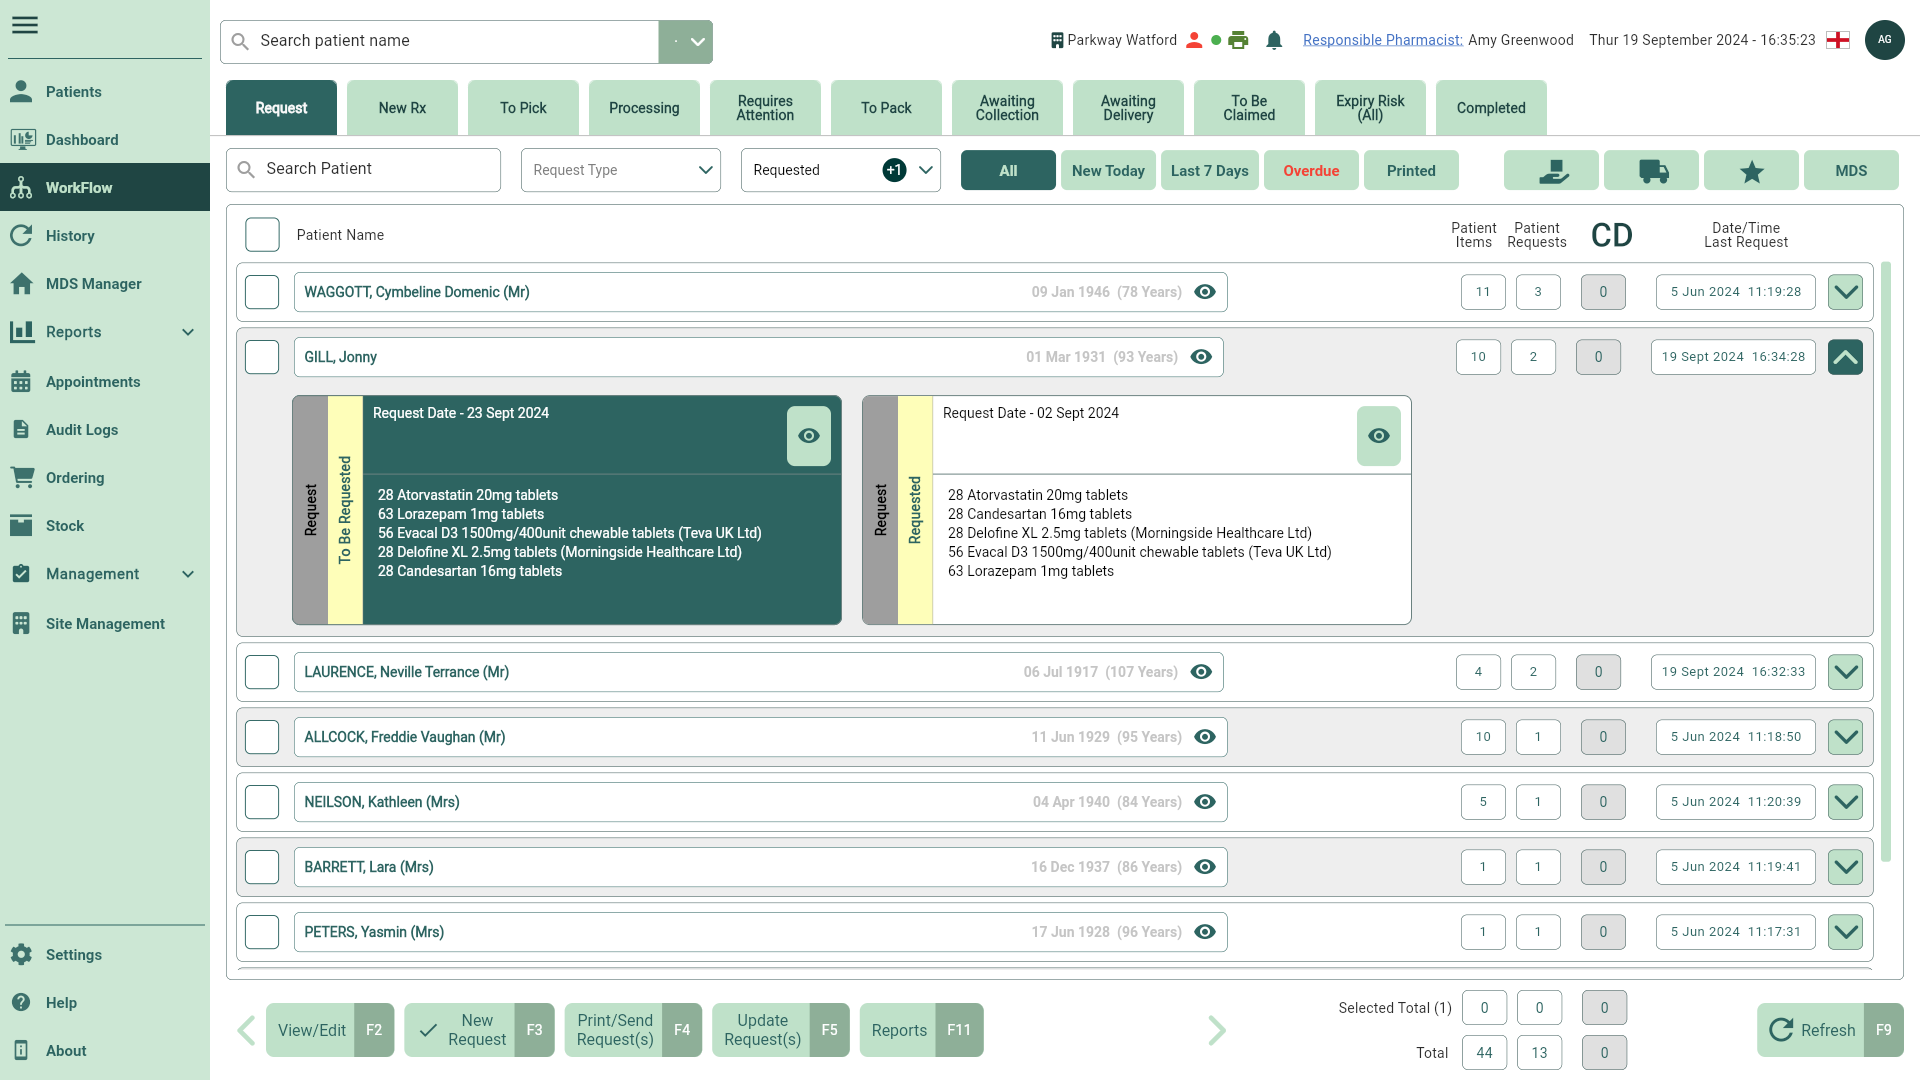
| Field | Description |
|---|---|
| Filters | Use the available filters to refine the grid. |
| Grid | By default, the Request grid displays all your current patients and repeat items. At a glance, you can view the total number of requests and the date/time a request was added. Each widget represents one request and displays the status, date and the items it contains. You can view/edit the request by selecting the  View icon button. View icon button. |
| [View/Edit - F2] | Select this button to view or edit your requests. Within the Edit Request window you will be able to take the following actions:
|
| [New Request - F3] | Select your patient and select the [New Request - F3] button to create a new request. |
| [Print/Send Request(s) - F4] | Select the required requests in the grid and select this button to print and/or send your requests. |
| [Update Request(s) - F5] | Select the required requests in the grid and select this button to manually update the status of your requests. |
| [Reports - F11] | View and run your RMS reports by selecting this button. |
| Selected Total | The total number of selected Patient Items and Patient Requests. This field cannot be edited. |
| Total | The total number of Patient Items and Patient Requests displayed based on your filters. This field cannot be edited. |
 Edit icon in the Actions column
 Delete icon in the Actions column to remove an item from the request
 Calendar icon or using the available function keys.
Patient Repeat Request tab
To access the Repeat Request tab in the patient record, open the patient CRM and select the Repeat Request tab.
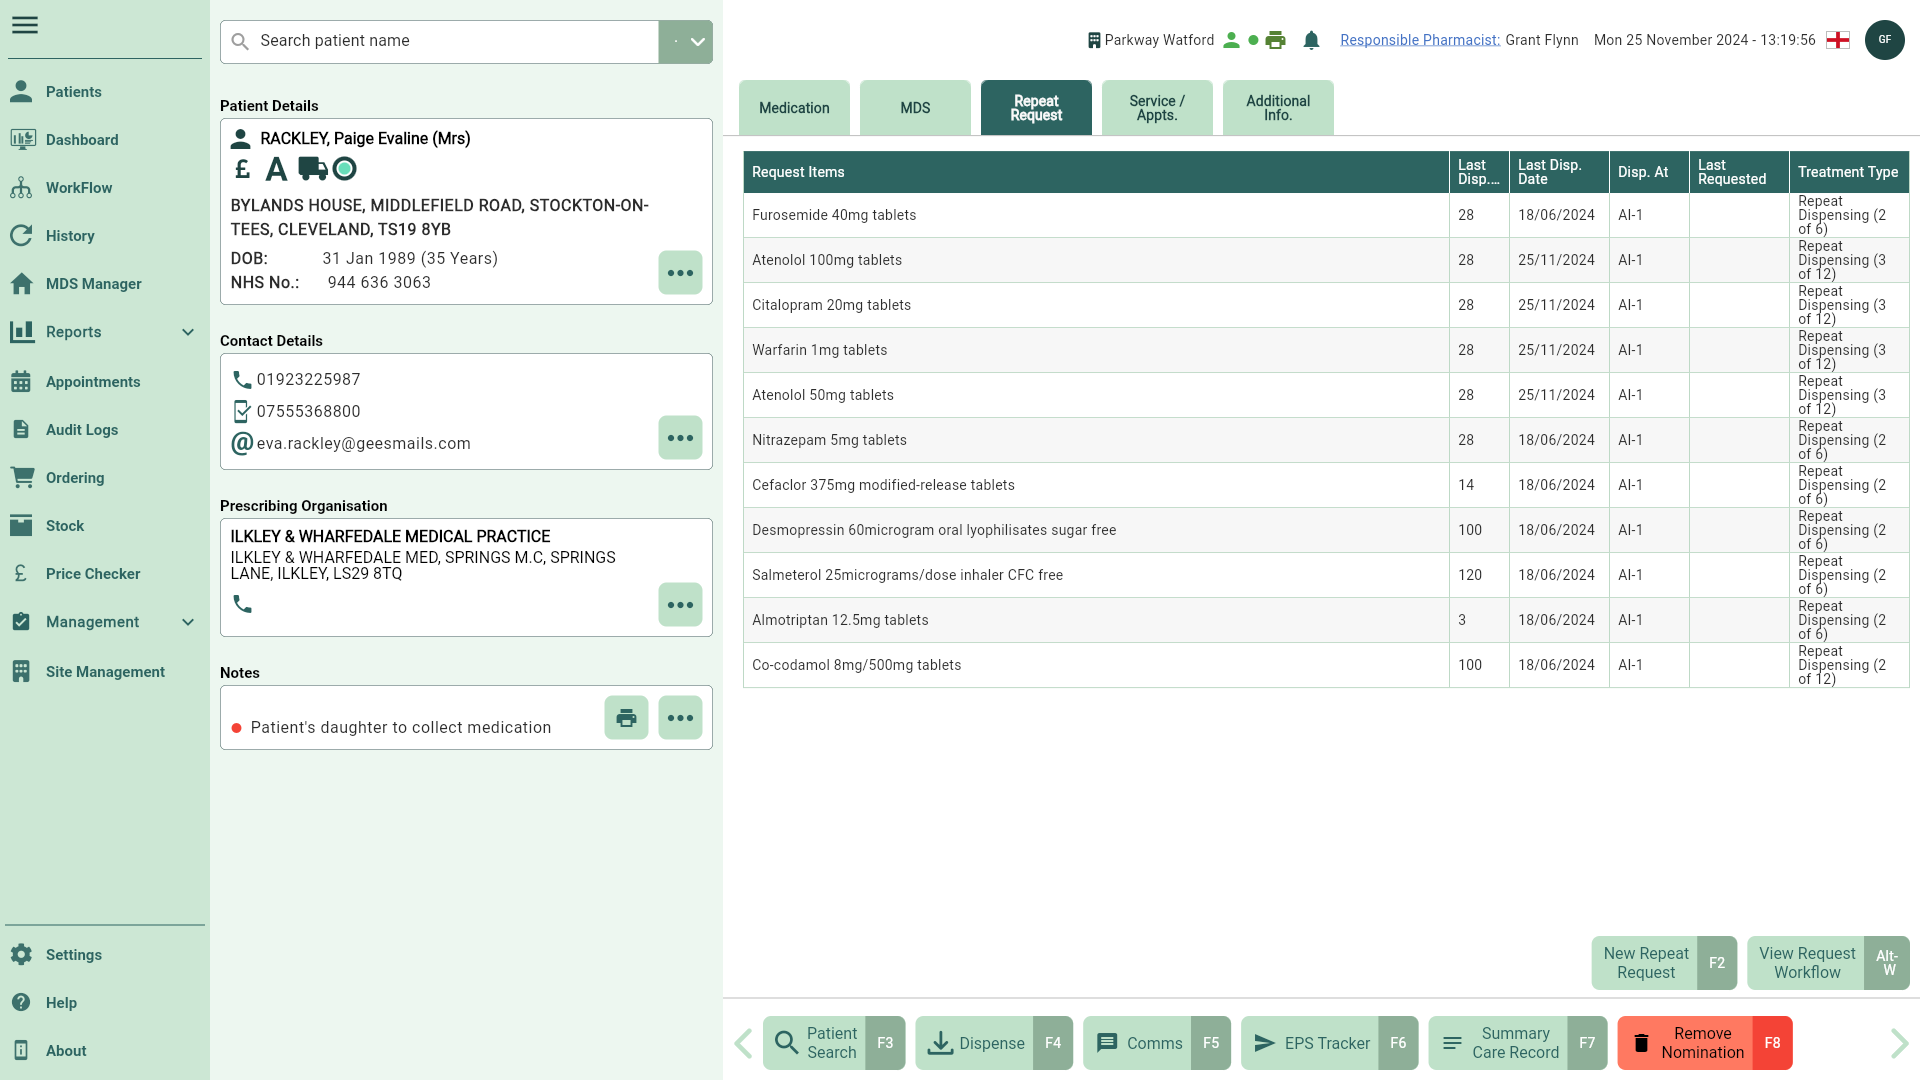
| Field | Description |
|---|---|
| Grid | The Requested Items grid displays all requested items, Last Dispensed Quantity, Last Dispense Date, Dispensed At location, Last Requested Date and Treatment Type. |
| [New Repeat Request - F2] | Select this button to create a new request. |
| [View Request Workflow - Alt - W] | Select to be taken to the Request tab in Workflow filtered on your selected patient. |
New Request window
The New Request window is where all requests are created. You can access the New Request window from several places within Apotec CRM:
- Request tab in the Workflow module
- Patient Repeat Request tab
- MDS Manager
Request
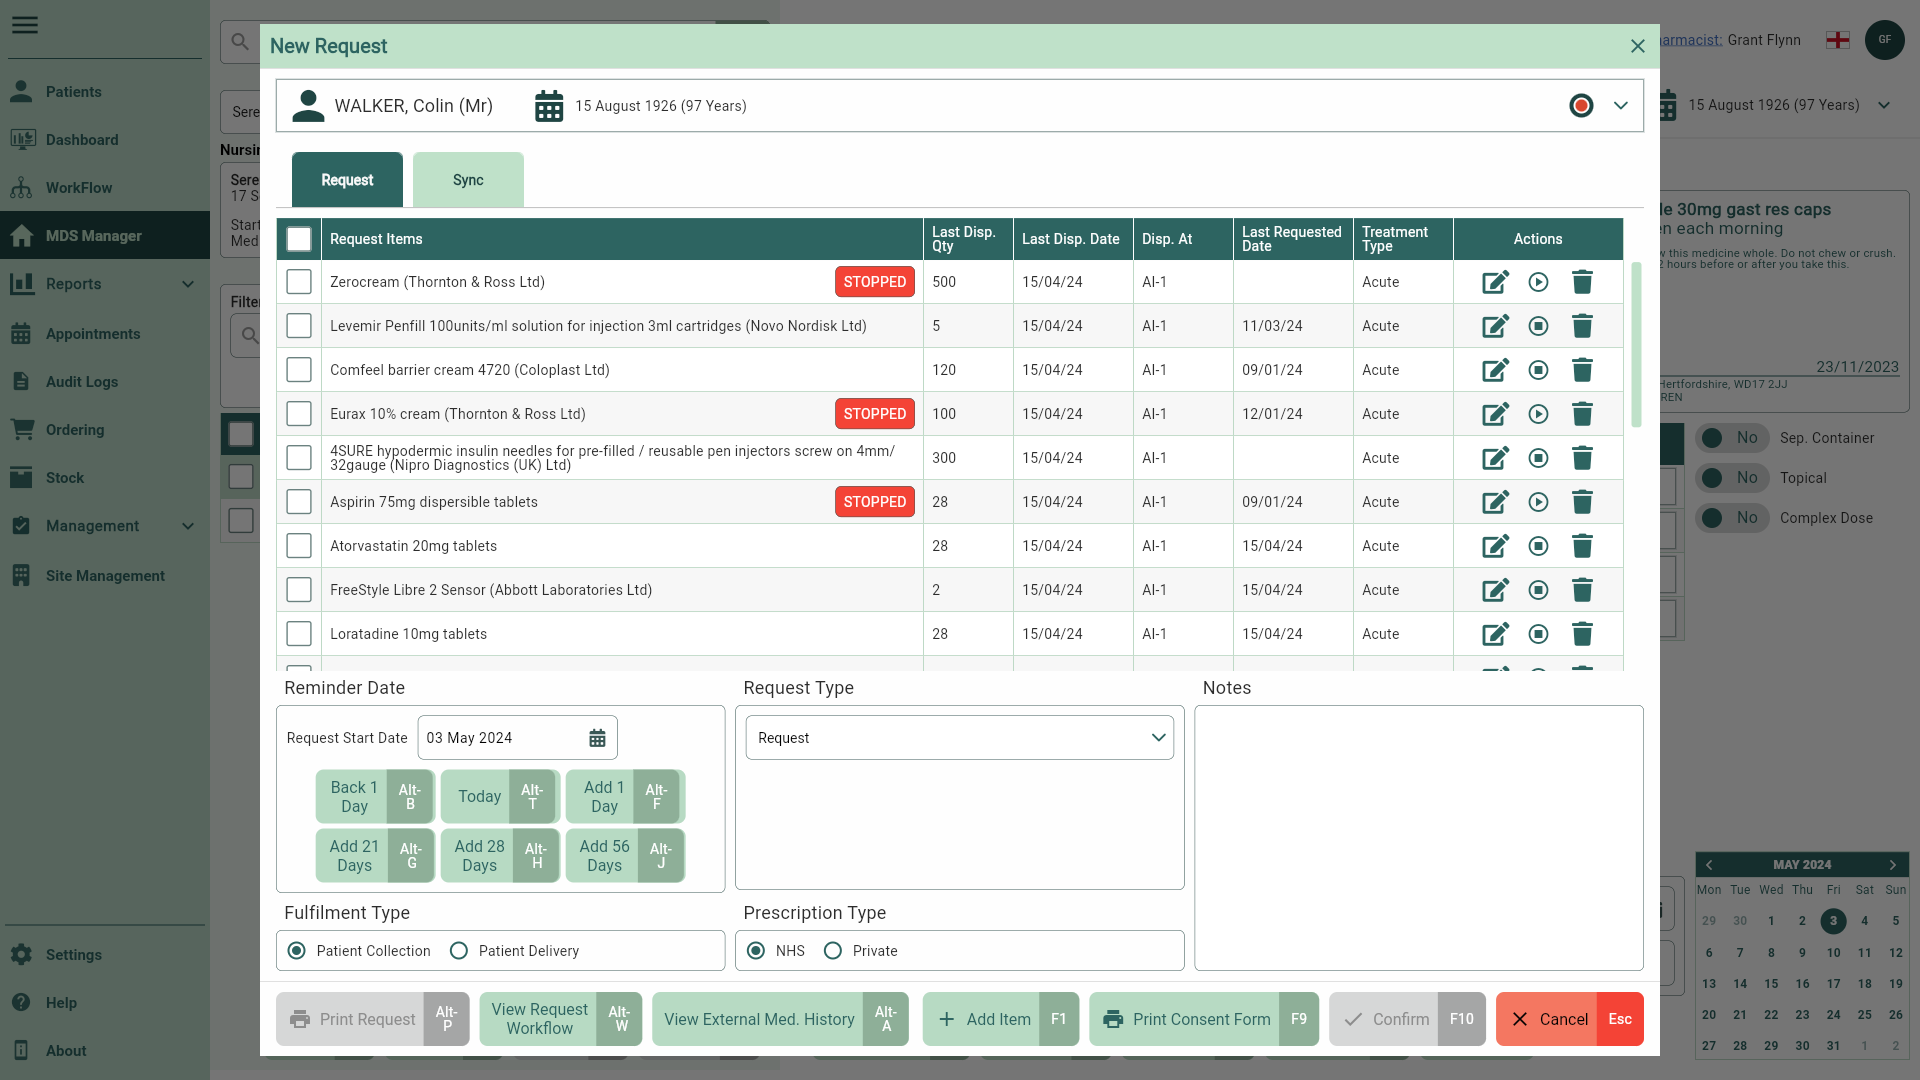
| Field | Description |
|---|---|
| Patient demographics bar | Expand the demographics bar at the top of the window to view the patient's details including their Address, Prescribing Organisation, Characteristics, Contact Details and Status. |
| Grid | The Request Items grid displays the all the items from the patient's medication history. Where available and configured, this grid will display the Last Dispensed Quantity, Last Dispensed Date, Dispensed At location, Last Requested Date and Treatment Type. Use the Actions column icons to:
|
| Reminder Date | You can enter a start date manually, or by selecting the You can perform the following actions using the function buttons below:
|
| Request Type | When creating requests, use the dropdown to select a request type:
|
| Fulfilment Type radio dials | Set the radio dial to your patient's requirements. Once packed, reconciled prescriptions will be moved to the appropriate tab in Workflow. Options include Patient Collection or Patient Delivery. |
| Prescription Type radio dials | Set the Prescription Type radio dial to either NHS or Private. |
| Notes | Add any additional notes to your request. |
| [Print Request - Alt-P] | Select to print your requests. |
| [View Request Workflow - Alt-W] | Select to be taken to the Request tab in Workflow. |
| [View External Med. History - Alt-A] | Select to view the patient's external PMR data if available. |
| [Add Item - F1] | Select to manually add items to the Request Items grid. Items added manually will not be displayed in the grid by default until they are dispensed for the patient and displayed in their medication history. |
| [Print Consent Form - F9] | Select to print a patient consent form. |
| [Confirm - F10] | Select to save your request. |
| [Cancel - Esc] | Select to cancel creating your request. |
 Stopped icon: Mark the item as Stopped. Stopped items will be displayed with a
 Sync
Functionality coming soon.