Get to know Workflow
Our Workflow module enables you to effectively manage your workload from downloading repeats, redeeming your Emergency Supplies and more. Workflow is split across several tabs which segment the dispensing process into relevant sections and allow for batch dispensing. The fields on each tab have been described below.
To access Workflow, select Workflow from the left-nav and navigate to the required tab.
In some areas of Workflow, you will need to authenticate a valid NHS smartcard before performing actions, such as downloading or returning nominated prescriptions. You can learn how to authenticate your smartcard in our Smartcard authentication article.
Workflow Settings
| Setting | Value/Description |
|---|---|
| Workflow Dispensing Maximum Limit | 25; Set by default. Set the maximum number of patients that can be included in a single New Rx or To Pick selection, such as when selecting [Clinical Check (Selected) – F2] or [Move to Pick (Selected) – F3] from the New Rx tab, or when choosing [Create List (Selected) - F1] or [Create & Print (Selected) - F2] from the To Pick tab in Workflow. This configuration also applies when performing a batch clinical check from the Requires Attention tab.
|
| Print Drug Label on Processing | Determines whether drug labels are printed all at once when marked as complete, or printed one by one as each drug pack is scanned or selected in the Processing tab of Workflow.
|
| Print Bag Label in Workflow | Determines when bag label(s) are printed within Workflow.
|
| Print Additional Bag Label(s) in Workflow | This setting works in conjunction with Print Bag Label in Workflow to determine if additional bag labels are printed for Fridge Lines, or Schedule 2/3 CDs requiring safe custody. Note: Updating the Print Additional Bag Label(s) in Workflow setting will not retroactively apply to items already in the To Pick tab. Therefore, any items that were previously bagged will need to be manually reassigned to separate bags if this change is required.
|
| Prompt Location After Completing Pack | When enabled, a prompt will display to select or scan the bag to a location in the pharmacy.
|
| Processing Basket Layout | Blank; Set by default. This configuration allows users to align the on-screen display of patient baskets with the real-world setup in their branch. The Processing Basket Layout configuration includes two primary options for arranging baskets on screen:
|
| Prompt Order Basket in Workflow | When enabled, this setting determines when the Order Basket will appear when processing prescriptions through Workflow.
|
| Prompt to Print Token in Workflow | This configuration determines when EPS token(s) are printed during prescription processing in Workflow. Users can select from the following options:
|
| Prompt Accuracy Check | When enabled, this setting prompts users to scan an accuracy check barcode after bagging each item in the To Pack tab, ensuring that items are verified before proceeding. If this step is skipped, the CRM will flag the script as Accuracy check required Note: This is dependant on the Print Accuracy Check Barcode setting being enabled.
|
Request
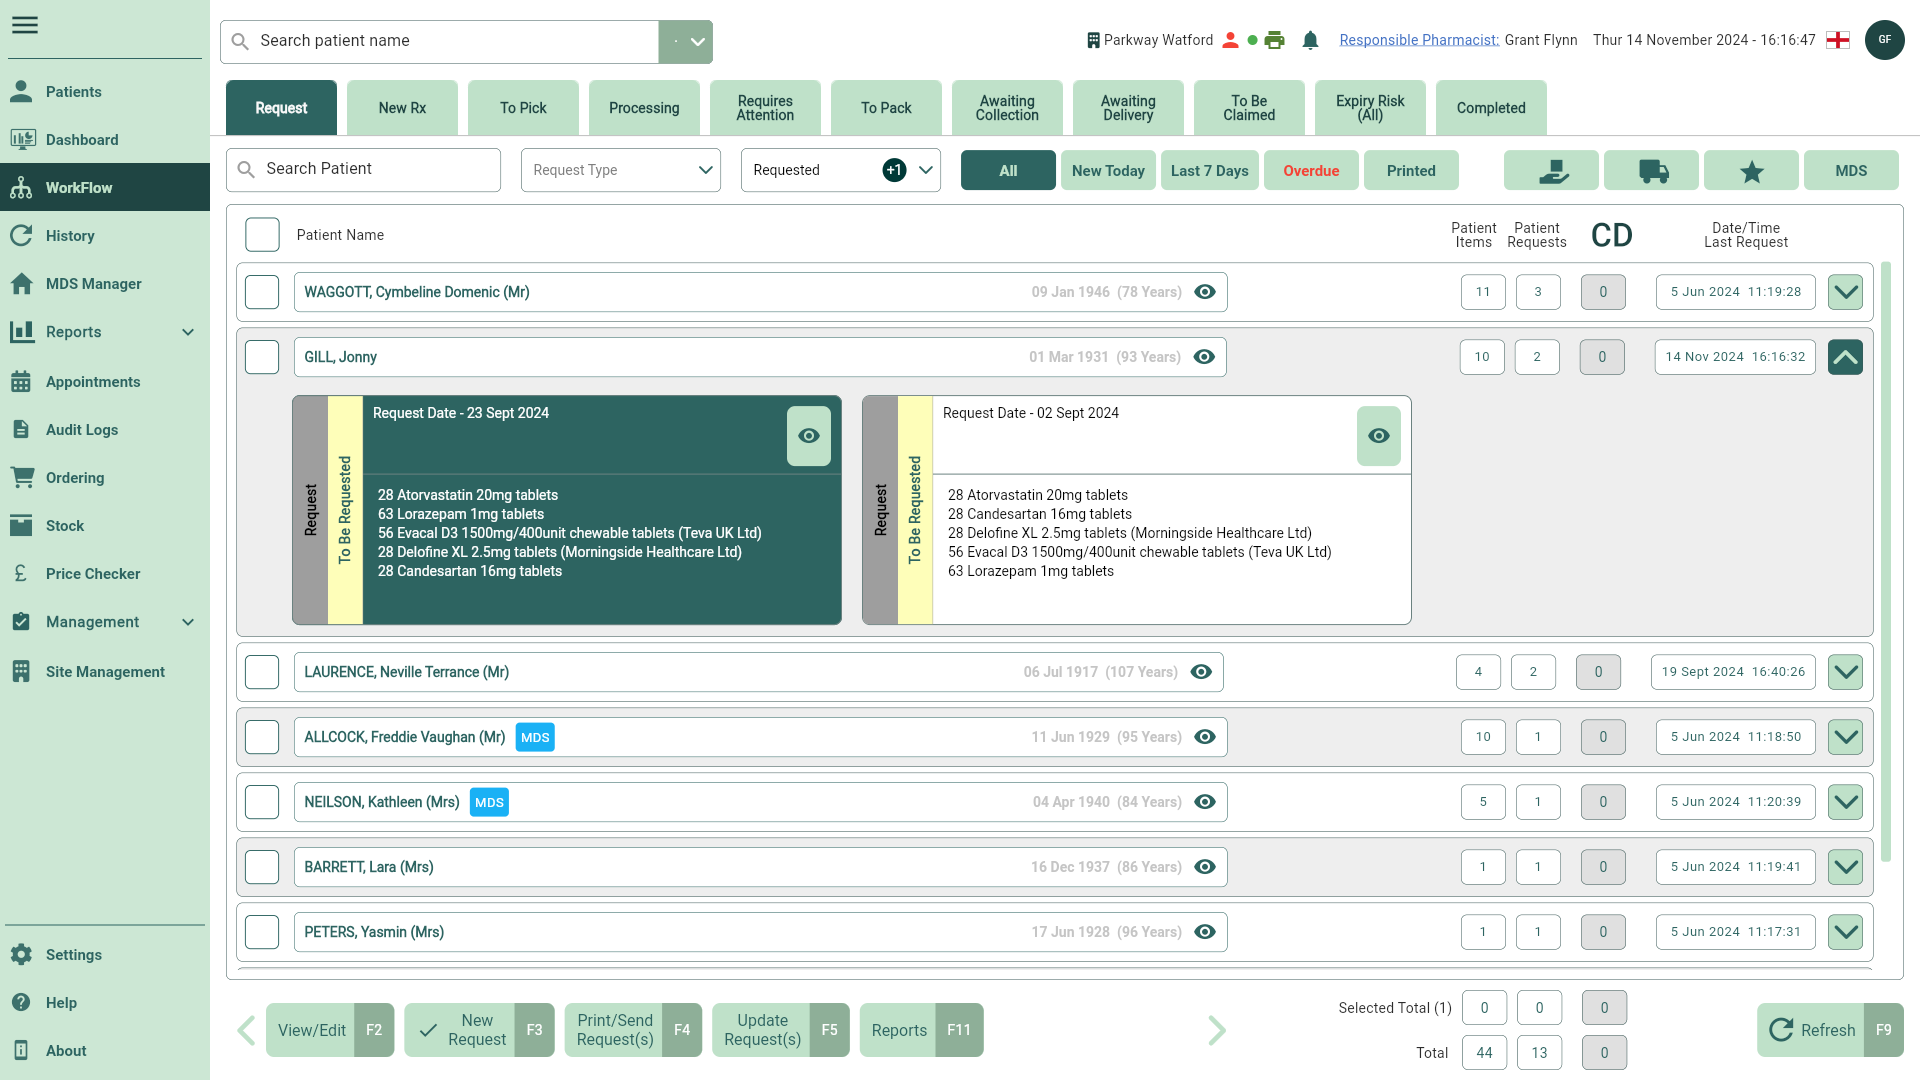
View and manage your prescription requests. Any MDS patients will be identified with an MDS badge for easy recognition.
| Field | Description |
|---|---|
| Search field | You can use the Search box to search for patients within the grid. Search by entering the patient name, prescription ID, or date of birth. |
| Filters | Use the available filters to refine the grid. |
| Grid | By default, the grid displays all your current patients and repeat items. At a glance, you can view the total number of requests and the date/time a request was added. Each widget represents one request and displays the status, date and the items it contains. You can view/edit the request by selecting the  View icon button. View icon button. |
| [View/Edit - F2] | Select this button to view or edit your requests. Within the Edit Request window you will be able to take the following actions:
|
| [Print/Send Request(s) - F4] | Select the required requests in the grid and select this button to print and/or send your requests. |
| [Update Request(s) - F5] | Select the required requests in the grid and select this button to manually update the status of your requests. |
| [Reports - F11] | View and run your RMS reports by selecting this button. |
| Selected Total | The total number of selected Patient Items and Patient Requests. This field cannot be edited. |
| Total | The total number of Patient Items and Patient Requests displayed based on your filters. This field cannot be edited. |
 Edit icon in the Actions column
 Calendar icon or using the available function keys.
New Rx
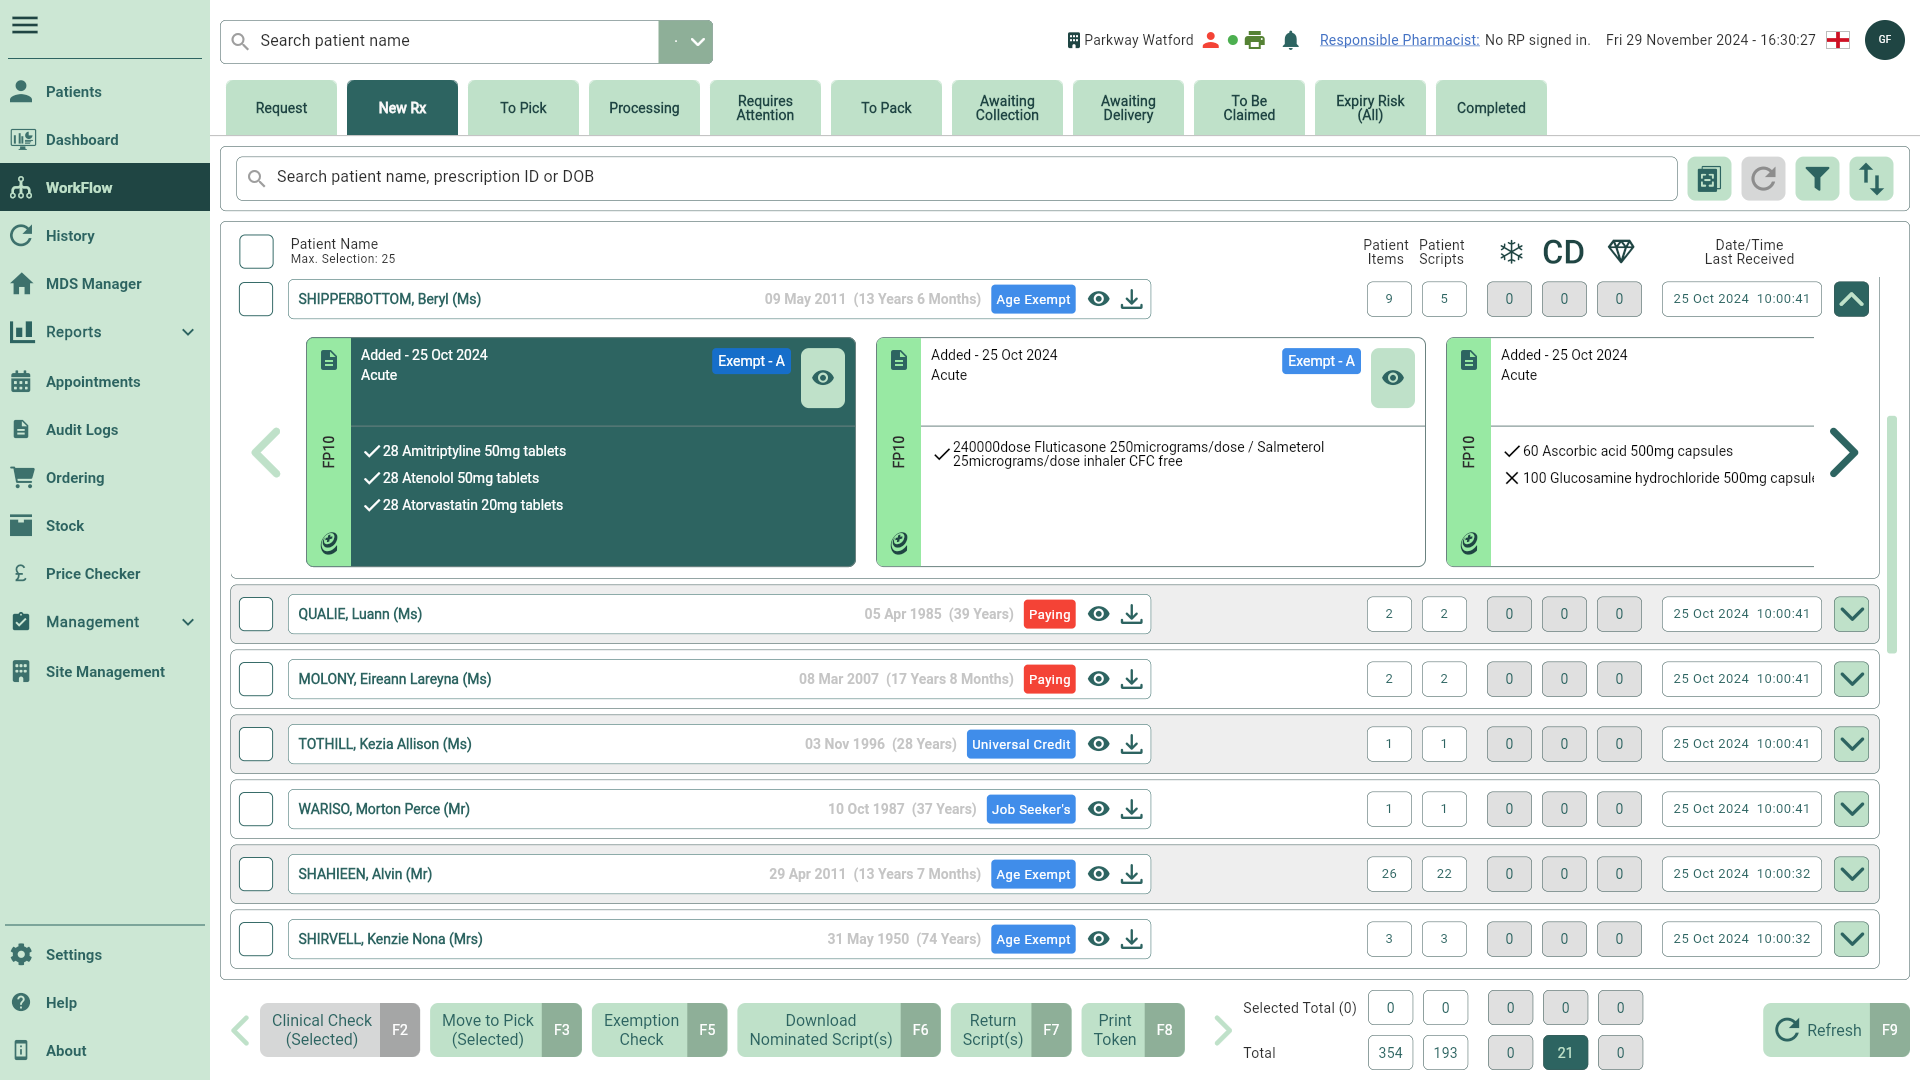
All your new EPS and manually added prescriptions will display on the New Rx tab in Workflow ready for processing. Any MDS patients will be identified with an MDS badge for easy recognition.
| Field | Description |
|---|---|
| Search field | You can use the Search box to search for patients within the grid. Search by entering the patient name, prescription ID, or date of birth. |
 Batch Scan Batch Scan | Use the Batch Scan functionality to scan tokens and download them as a batch. Batch Scan opens in a new window. |
| Filters | Use the available filters to refine the grid. |
| Sort by options | By default, the grid will sort by Newest First. You can select the Sort By button to choose a different sorting order. Your chosen order will remain until manually changed. |
| Grid | By default, the grid displays all your patients and prescriptions that are ready to be processed. At a glance, you can view the total number of items/scripts for each patient and the date/time the script(s) were received. You can jump to the patient PMR directly from Workflow by selecting the adjacent View icon button and any EPS logs by selecting the  Note icon. Note icon. |
| [Clinical Check (Selected) - F2] | Use the [Clinical Check (Selected) – F2] button to perform batch clinical checks for all your new EPS and manually added prescriptions. |
| [Move to Pick (Selected) - F3] | Use the [Move to Pick (Selected) - F3] button to review all selected items and make amendments to each item if necessary, including marking items as Stopped. You can perform this step as a batch. Once completed all selected items move to the To Pick tab. It's important to remember that when making amendments, such as updating the confirmed quantity, you cannot increase the amount beyond what is prescribed, but you do have the option to decrease it. |
| [Exemption Check - F5] | Where possible, an RTEC check is performed as soon as the prescription is downloaded, and any exemption details found are displayed in an RTEC badge on the main grid and prescription widget. Should you need to perform an RTEC check manually, you can do so by selecting the [Exemption Check – F5] button. This is only applicable for EPS scripts and does not apply to manual scripts. |
| [Download Nominated Script(s) - F6] | Use the [Download Nominated Script(s) – F6] button to pull down the prescriptions for your nominated patients from the NHS Spine. You will need to authenticate a valid NHS smartcard before using this feature. |
| [Return Script(s) - F7] | Select the [Return Script(s) – F7] button, and provide a Return Reason to return scripts to the NHS Spine. You will need to authenticate a valid NHS smartcard before using this feature. |
| [Print Token - F8] | Print the EPS token to the configured printer. |
 Dispense icon.
To Pick
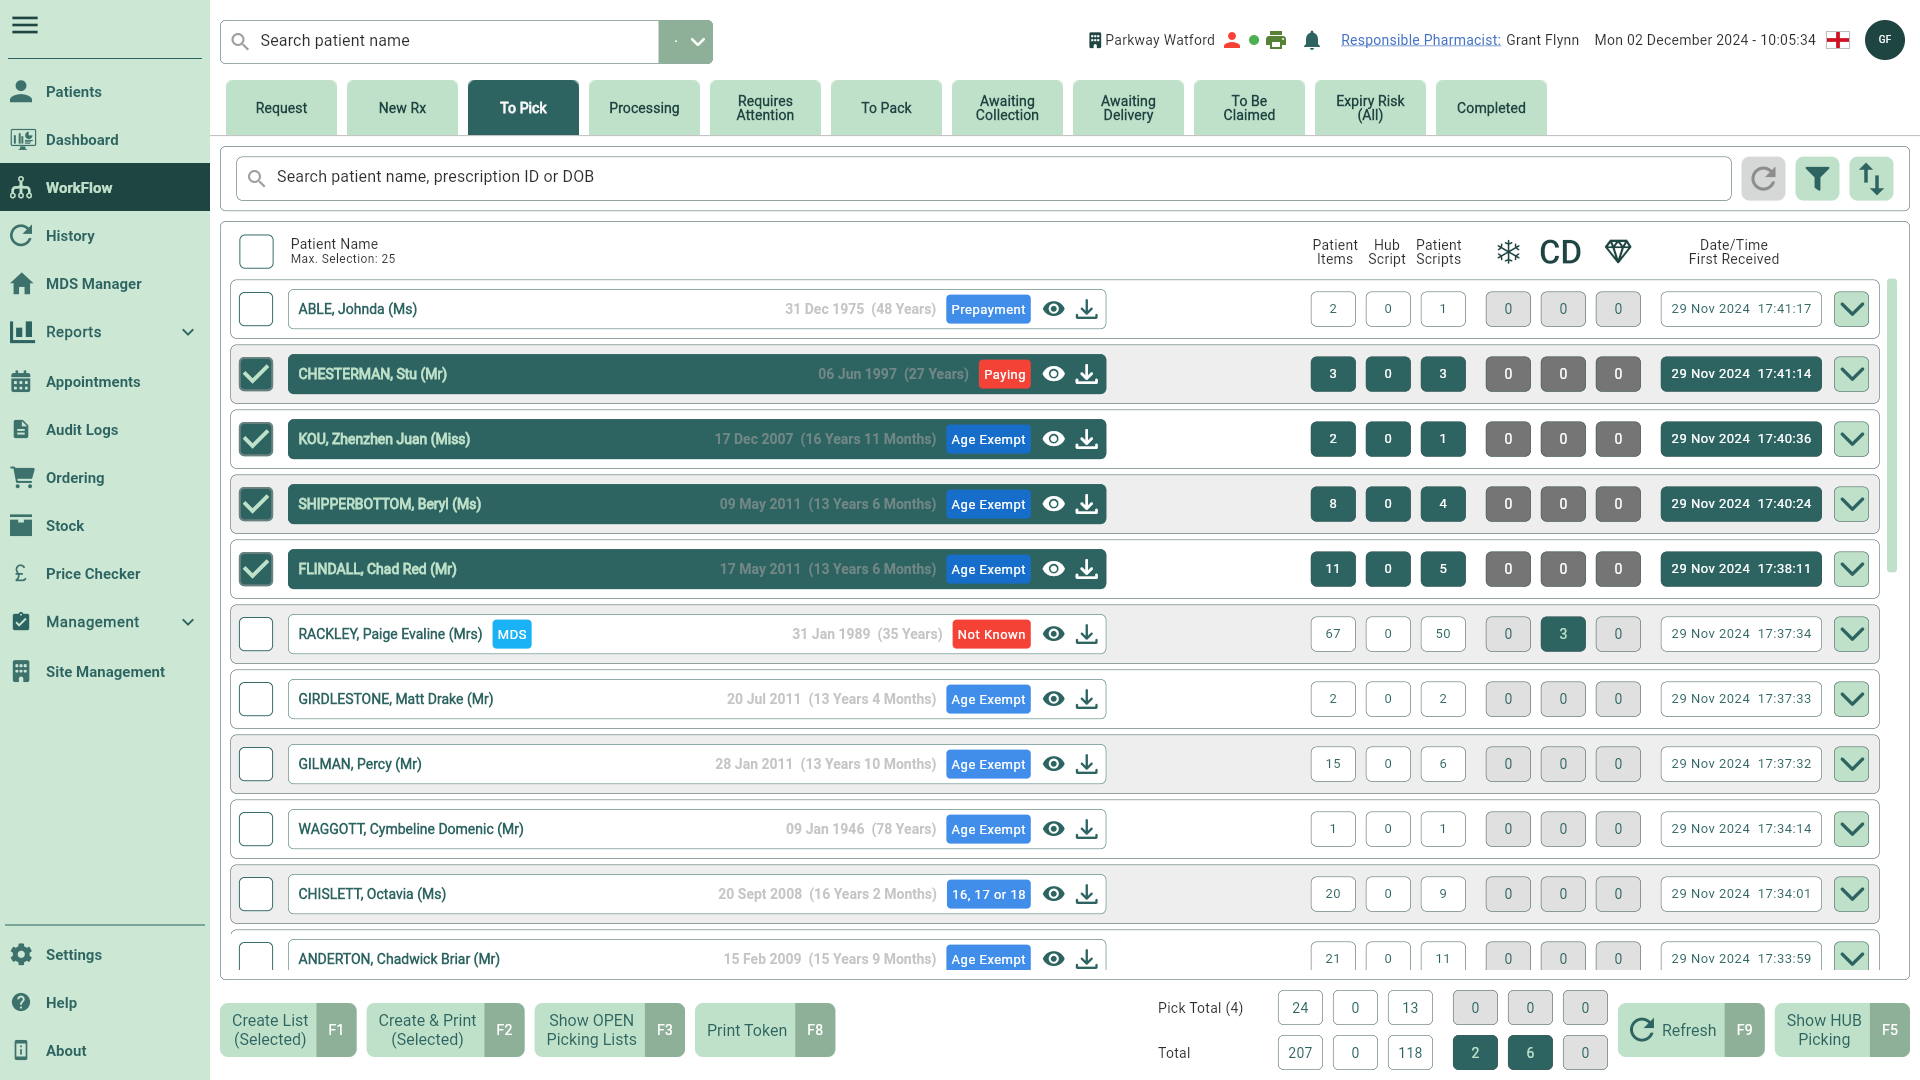
Learn how to select multiple prescriptions to create picking lists.
| Field | Description |
|---|---|
| Search field | You can use the Search box to search for patients within the grid. Search by entering the patient name, prescription ID, or date of birth. |
| Filters | Use the available filters to refine the grid. |
| Sort by options | By default, the grid will sort by Newest First. You can select the Sort By button to choose a different sorting order. Your chosen order will remain until manually changed. |
| Grid | By default, the grid displays all patients/prescriptions that have been clinically checked or manually moved from the New Rx tab. At a glance, you can view the total number of items/scripts for each patient and the date/time the script(s) were received. Any HUB scripts are also displayed. You can jump to the patient PMR directly from Workflow by selecting the adjacent View icon button and any EPS logs by selecting the Note icon. |
| [Create List (Selected) - F1] | Create a pick list for your selected patients/items. |
| [Create & Print (Selected) - F2] | To assist with product selection a pick list can be printed for your selected patients by selecting the [Create & Print (Selected)] button. |
| [Show OPEN Picking Lists - F3] | Functionality coming soon. |
| [Show HUB Picking - F5] | Functionality coming soon. |
| [Print Token - F8] | Print the EPS token to the configured printer. |
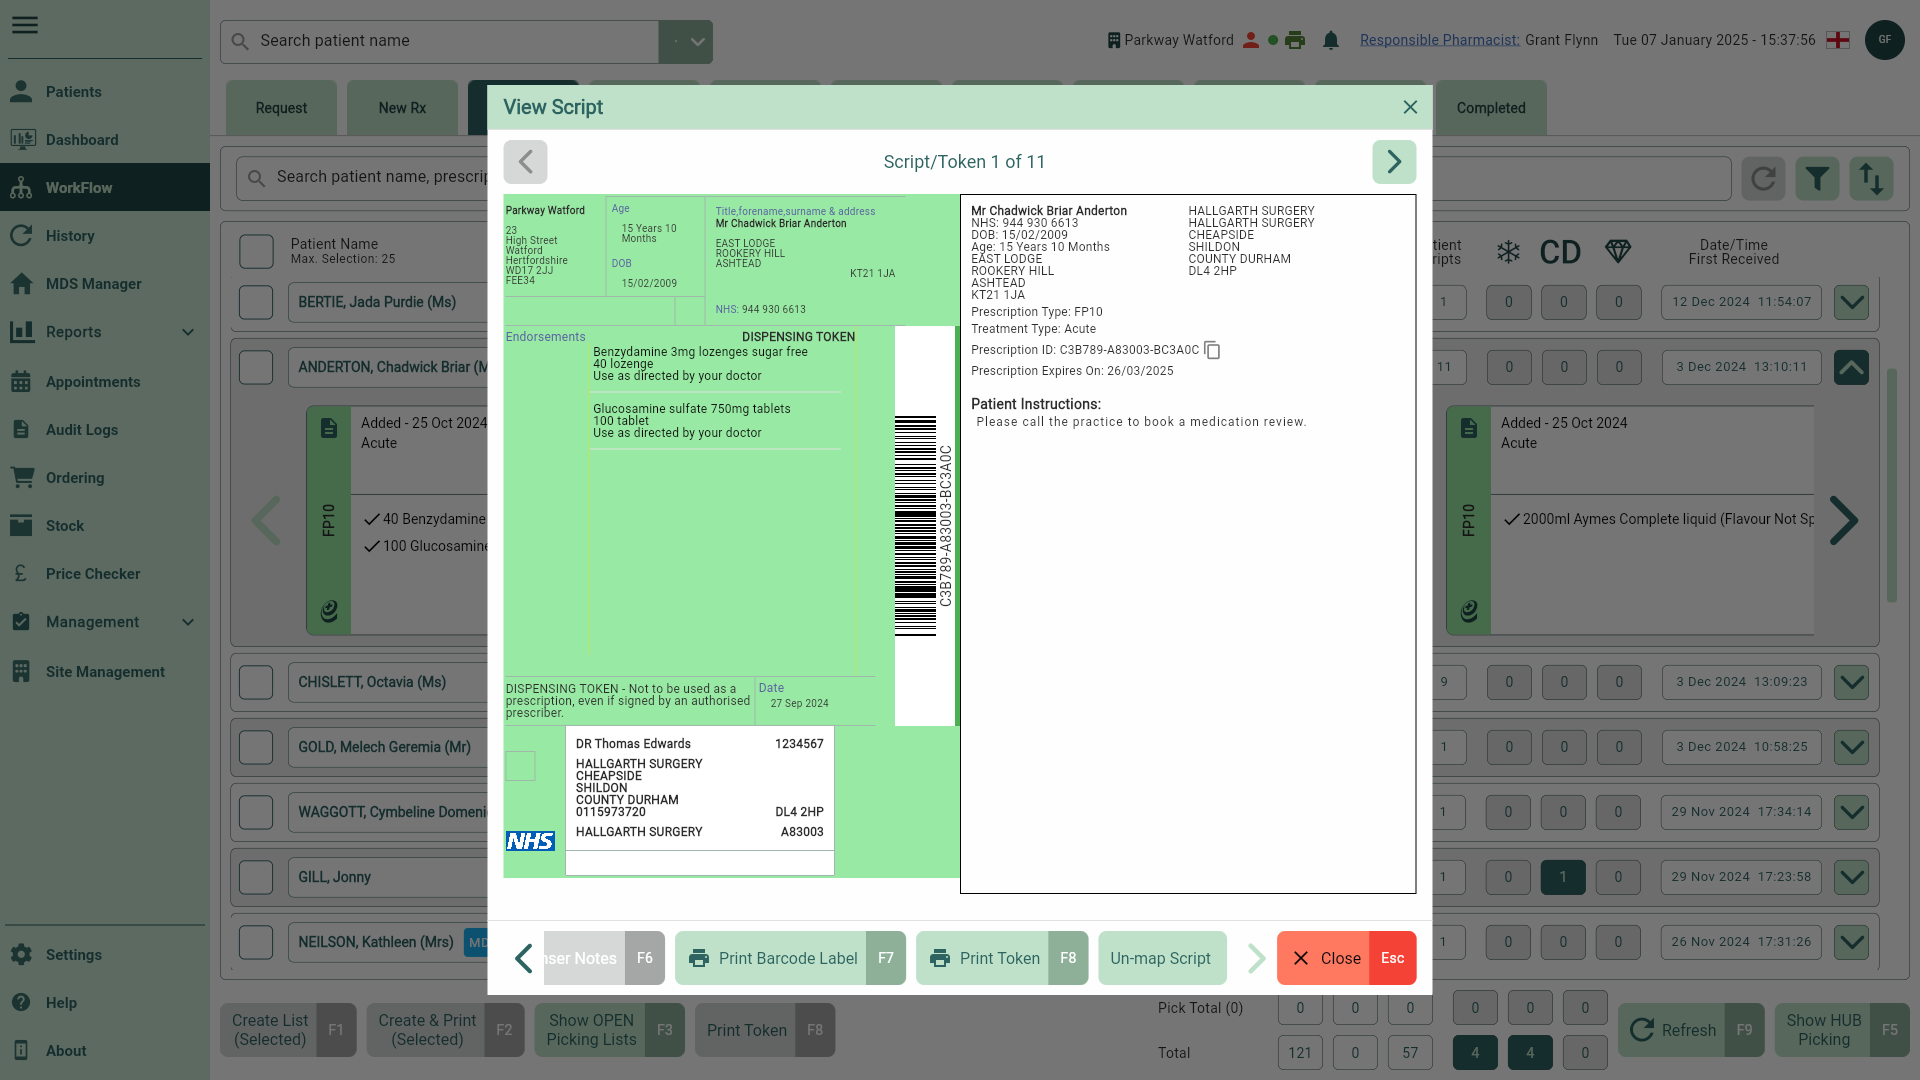
View Script
You are able to view a prescription preview on screen by accessing the View Script window using the View icon button.
| Field | Description |
|---|---|
 Previous and Previous and  Next icon buttons Next icon buttons | If you have selected multiple prescriptions to view, you can scroll through these using the Previous and Next icon buttons. |
| Script/Token X of X | Where multiple prescriptions have been selected to view, you will see the total selected prescriptions and the prescription number you are currently viewing at the top of the View Script window. |
| Token preview | The token preview displays all the prescription details including the patient's details, prescribed item(s), treatment type and script ID. |
| [Edit Price - F5] | Select the [Edit Price - F5] button to amend the item(s) values via the Edit Price window if required. Note: This functionality is only available for any paying prescriptions such as Private, PGD (private) or Veterinary scripts. For a full list of eligible prescriptions see our Dispensing FAQs. |
| [View Dispenser Notes - F6] | The [View Dispenser Notes - F6] button is enabled when dispenser notes have been provided on EPS prescriptions. Select this button to view any notes within the Dispenser Notes window. |
| [Print Barcode Label - F7] | Print the prescription ID for EPS prescriptions as a barcode label. Printed labels will also display the patient's name. |
| [Print Token - F8] | Print the EPS token to the configured printer. |
| [Un-map Script] | Select to un-map the prescription. A Patient Not Matched badge will be applied and the patient and script will remain in the New Rx tab on Workflow. |
| [Delete Script - F6] | Delete manually added prescriptions. |
Processing
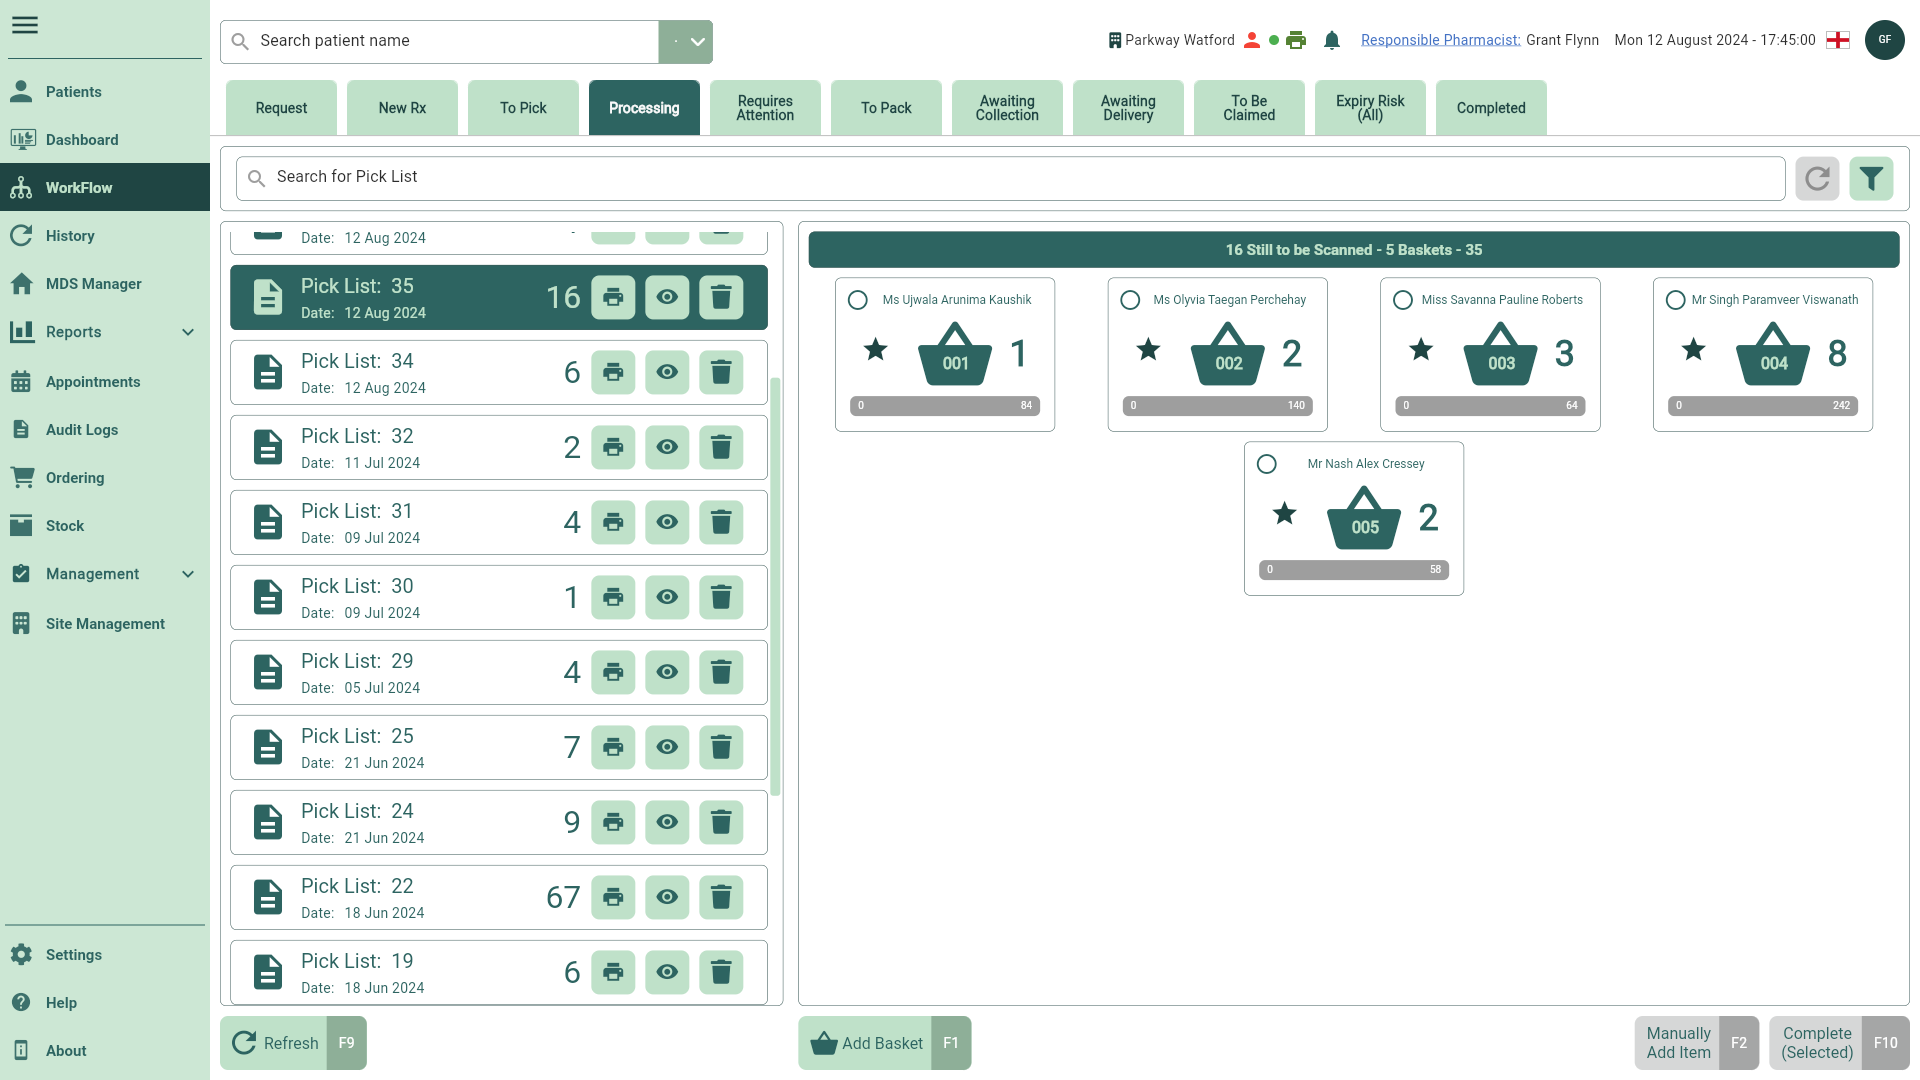
Scan your items into baskets as you process your pick lists.
| Field | Description |
|---|---|
| Search field | You can use the Search box to search for a Pick List within the grid. Search by entering the patient name. |
| Filters | Use the available filters to refine the grid. |
| Grid | The grid is split into two sections. The left panel shows pick lists created from the To Pick tab, with the most recent pick list displayed by default. At a glance, each pick list displays the date the list was created and the number of items required for each patient/basket. Selecting a pick list will display the basket associated with each patient on the right panel. The basket will display patient icons, such as those marked for Delivery or Delivery or  Collection, along with a Note icon if any dispenser notes are available. As items are scanned, the quantities of the relevant baskets update, and labels are generated. Collection, along with a Note icon if any dispenser notes are available. As items are scanned, the quantities of the relevant baskets update, and labels are generated. |
 Print icon Print icon | Select to print a copy of your pick list(s). |
| Pick Preview icon | Opens a digital version of your pick list(s). |
 Cancel icon Cancel icon | Select to cancel your pick list(s) if no longer required. Cancelled pick lists are returned to the To Pick tab on Workflow. |
| [View Dispenser Notes – F6] | This button will be enabled if any notes have been included from the prescriber and will be visible by selecting the [View Dispenser Notes - F6] button. This is only applicable for EPS scripts and does not apply to manual scripts. |
| [Add Basket - F1] | Functionality coming soon. Select the [Add Basket] button if an additional basket is required. |
| [Manually Add Item - F2] | Select the [Manually Add Item] button to display the Product Choice window. Select the correct dispensable pack(s) based on current restrictions by populating the dispensed quantity in the Quantity field. You can make use of the function keys in this window to assign the total quantity to the highlighted pack using the [All On Current Line - F2] button, or distribute the quantity across all available packs using the [Distribute Evenly - F3] button. |
| [Complete (Selected) - F10] | Once all items have been scanned/picked, select the [Complete (Selected)] button to move the script to the To Pack tab. |
Requires Attention
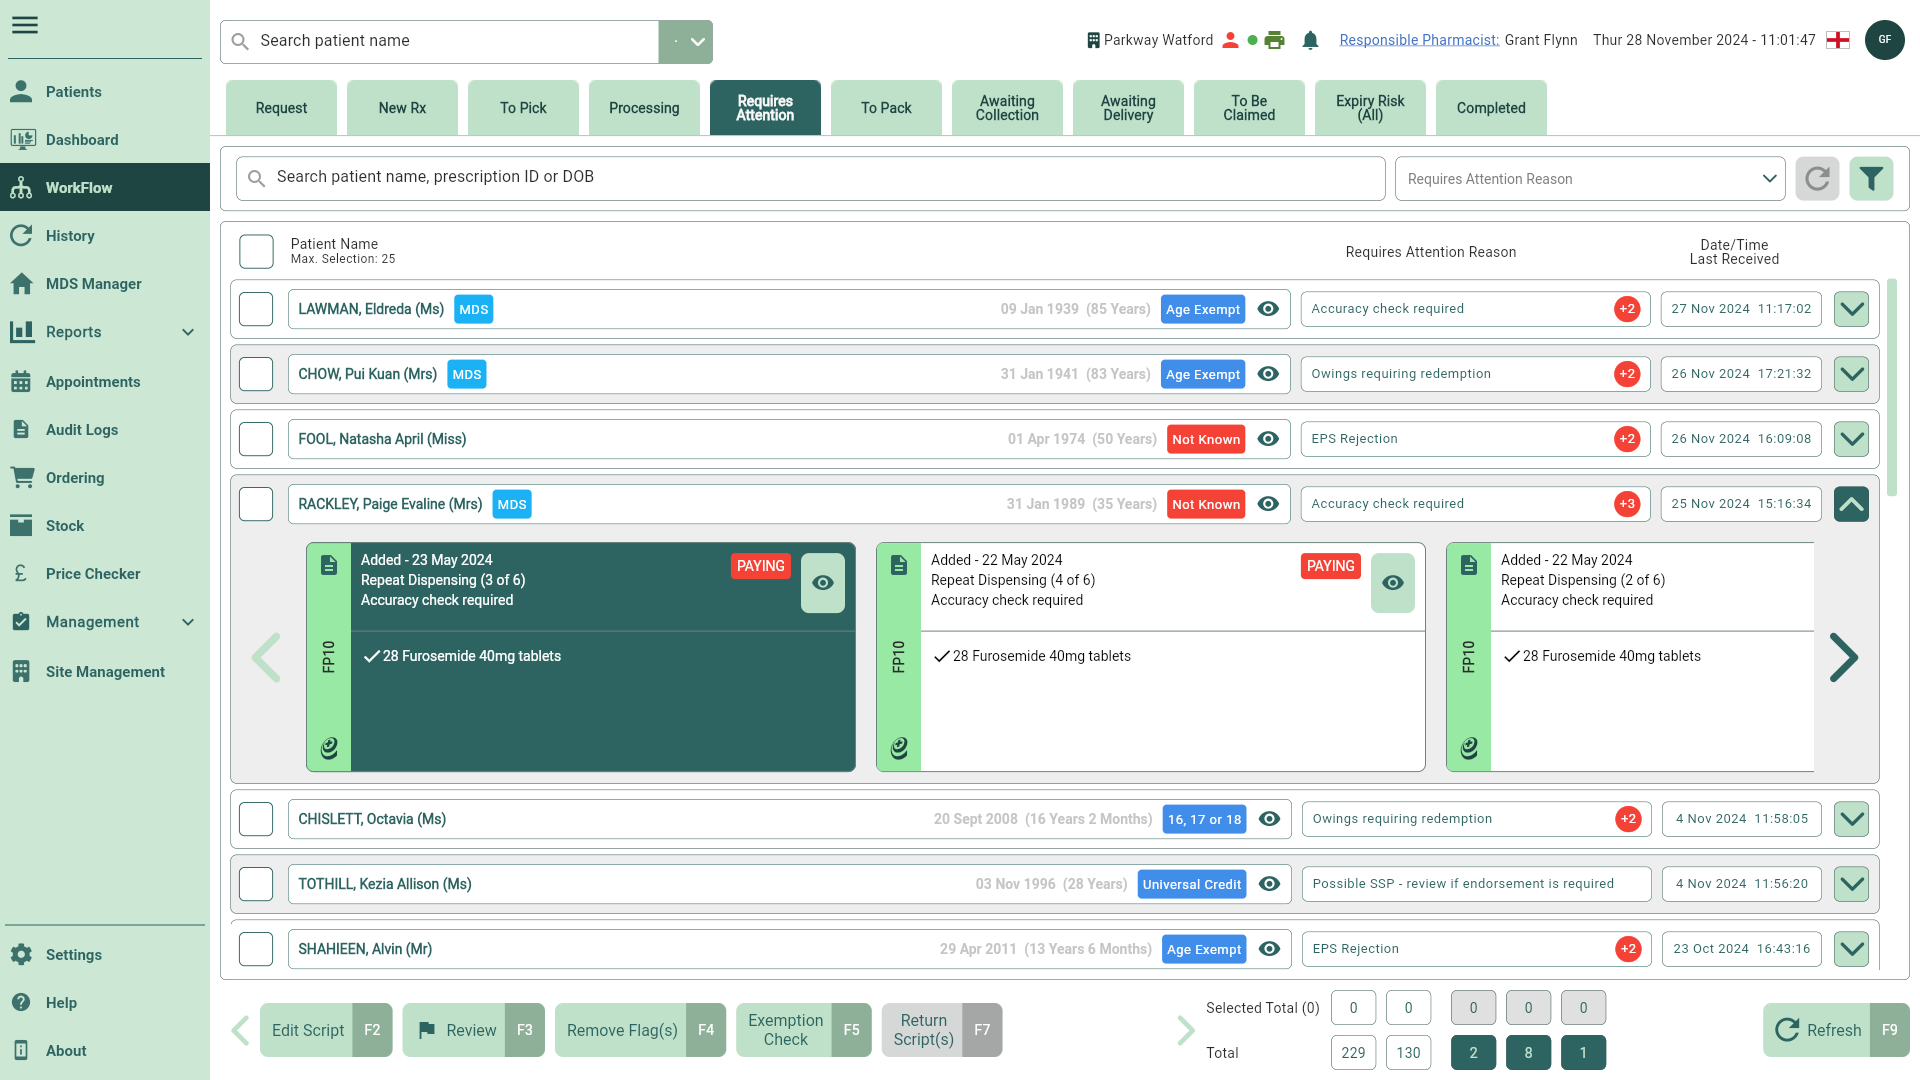
Use the Requires Attention tab to manage your scripts marked as requiring attention. Learn how to redeem Emergency Supplies, add dispenser endorsements and complete your clinical checks.
| Field | Description |
|---|---|
| Search field | You can use the Search box to search for patients within the grid. Search by entering the patient name, prescription ID, or date of birth. |
| Requires Attention Reason dropdown | By default, all scripts flagged as requiring attention will be displayed. If required, you can refine the grid by selecting a reason from the Requires Attention Reason dropdown box. |
| Filters | Use the available filters to refine the grid. |
| Grid | By default, the grid displays all patients/prescriptions that have been flagged as requiring attention. At a glance, you can view the Requires Attention Reason and the date/time the script(s) were received for each patient/script. You can jump to the patient PMR directly from Workflow by selecting the adjacent View icon button and any EPS logs by selecting the Note icon. |
| [Edit Script - F2] | Select the [Edit Script - F2] button to amend your prescriptions after they have been processed/saved. Prescriptions are edited from the Edit Scripts window. |
| [Review - F3] | Select the [Review - F3] button to action your scripts that require reviewing. |
| [Remove Flag(s) - F4] | Select to remove the Requires Attention reason from your selected prescription(s). |
| [Exemption Check - F5] | Where possible, an RTEC check is performed as soon as the prescription is downloaded, and any exemption details found are displayed in an RTEC badge on the main grid and prescription widget. Should you need to perform an RTEC check manually, you can do so by selecting the [Exemption Check – F5] button. This is only applicable for EPS scripts and does not apply to manual scripts. |
| [Return Script(s) - F7] | Select the [Return Script(s) – F7] button, and provide a Return Reason to return scripts to the NHS Spine. You will need to authenticate a valid NHS smartcard before using this feature. |
To Pack
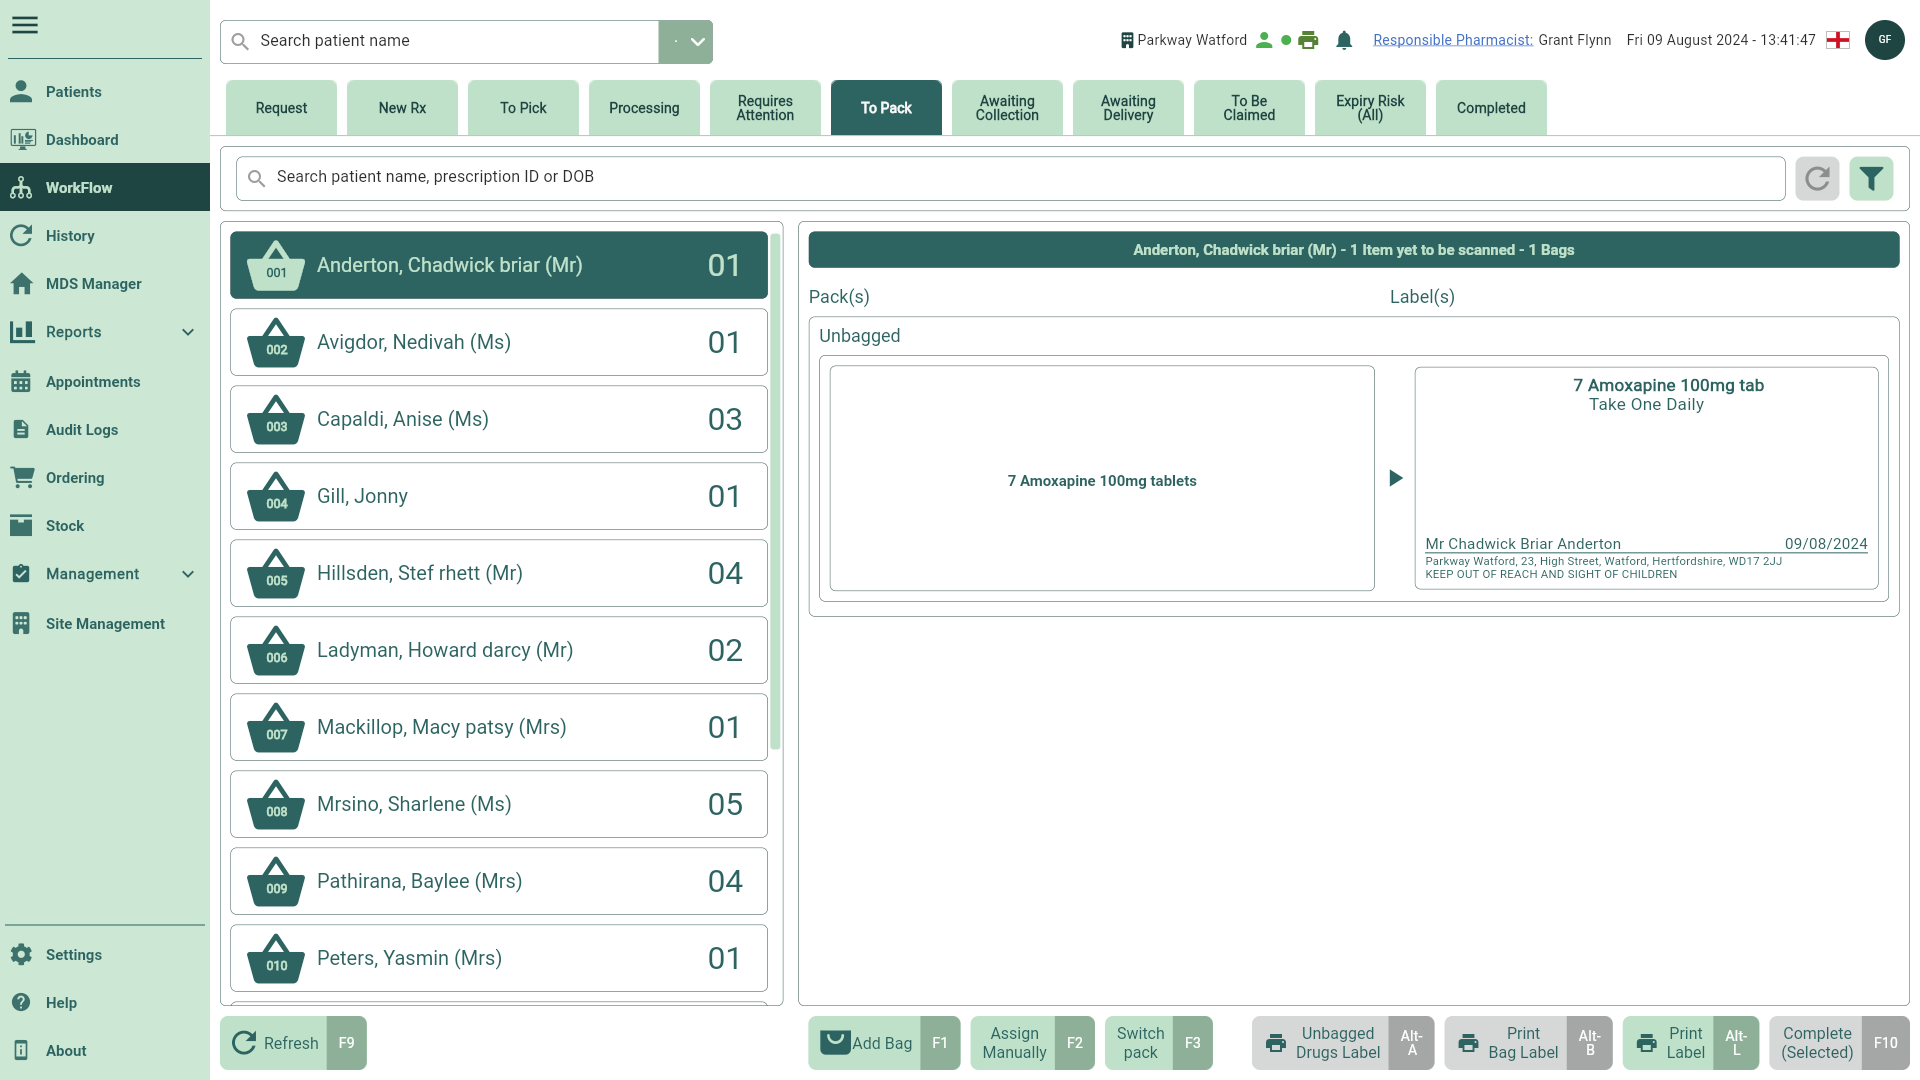
Pack your bags by scanning packs and item labels.
| Field | Description |
|---|---|
| Search field | You can use the Search box to search for patients within the grid. Search by entering the patient name, prescription ID, or date of birth. |
| Filters | Use the available filters to refine the grid. |
| Grid | The grid is split into two sections. The left panel displays patients/packing lists created from the Processing tab. Selecting a patient/list on the left panel will display the packs/drug labels on the right panel. Each list on the left panel includes the patient name, Basket number, and the number of items required for each patient/basket to be scanned. When items are scanned into the relevant baskets, the quantities update, and labels are printed. |
| [Add Bag - F1] | Select to add a new bag to be packed. Once added, you can select the bag and start scanning your items into the bag. |
| [Assign Manually - F2] | Functionality coming soon. |
| [Switch Pack - F3] | Functionality coming soon. |
| [Unbagged Drugs Label - Alt-A] | Select to reprint all unbagged drug labels. This button will remain disabled until the Unbagged label(s) are selected. |
| [Print Bag Label - Alt-B] | Once a bag has been assigned, select to print a bag label. |
| [Print Label - Alt-L] | Select to access the Print Label window. From here, reprint a dispensing label or change the number of labels being printed via the Label Split window. |
| [Complete (Selected)] | Once all items have been scanned/packed, select the [Complete (Selected)] button to move the script to the patients chosen fulfilment tab. (Awaiting Collection or Awaiting Delivery). You can configure various services for the patient such as marking the patient as a Delivery patient using the Additional Services switches on the patient details form. To learn more about Additional Services, please read our Get to know patient details article. |
Awaiting Collection
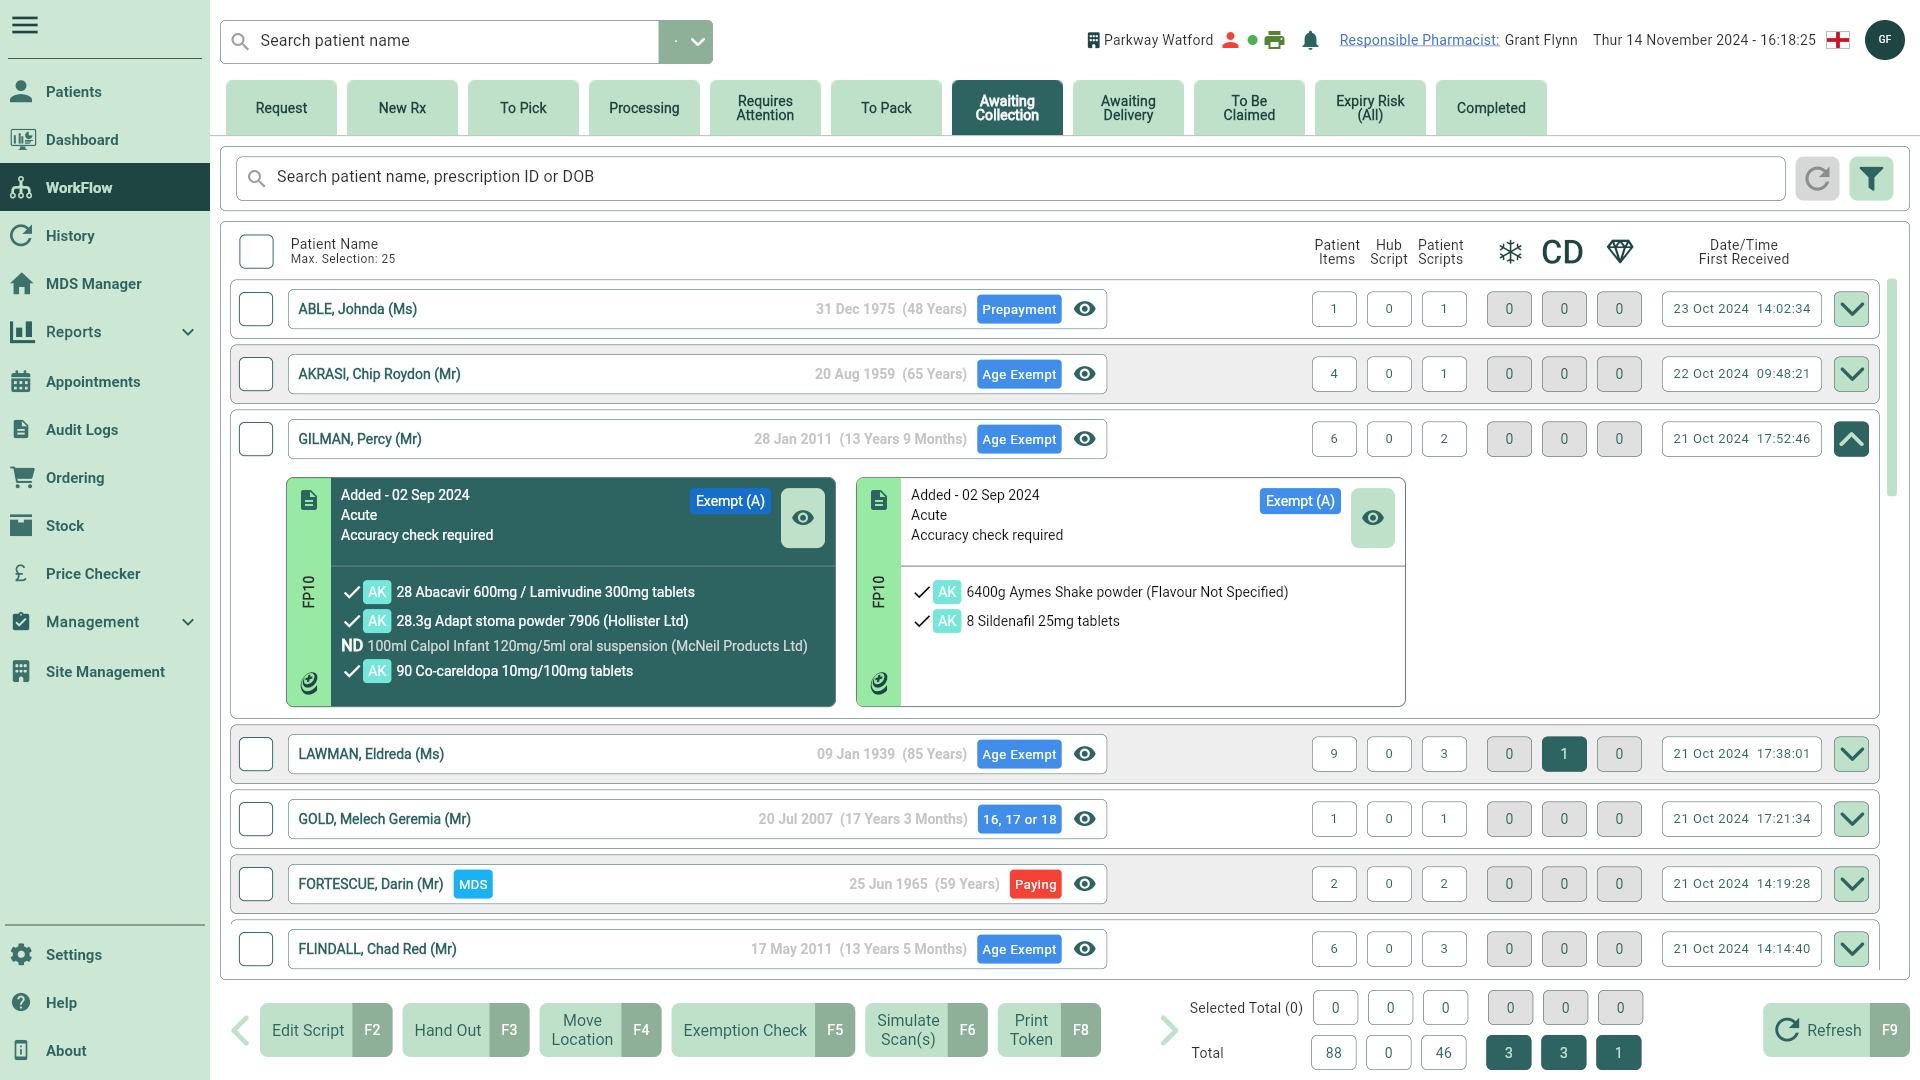
Assign bags to locations within your pharmacy ready for collection.
| Field | Description |
|---|---|
| Search field | You can use the Search box to search for patients within the grid. Search by entering the patient name, prescription ID, or date of birth. |
| Filters | Use the available filters to refine the grid. |
| Grid | By default, the grid displays all patients/prescriptions marked for collection that have moved from the To Pack tab. You can quickly view the total number of items/scripts for each patient along with the date/time the script(s) were received, including HUB scripts.You can jump to the patient PMR directly from Workflow by selecting the adjacent View icon button and any EPS logs by selecting the Note icon. |
| [Edit Script - F2] | Select the [Edit Script - F2] button to amend your prescriptions after they have been processed/saved. Prescriptions are edited from the Edit Scripts window. |
| [Hand Out - F3] | Select the [Hand Out - F3] button to update the prescription status to Completed. EPS prescriptions will move to the To Be Claimed tab in Workflow ready for you to send the dispense notification and claim. Manual prescriptions will move to the Completed Workflow tab. |
| [Move Location - F4] | Functionality coming soon. |
| [Exemption Check - F5] | Where possible, an RTEC check is performed as soon as the prescription is downloaded, and any exemption details found are displayed in an RTEC badge on the main grid and prescription widget. Should you need to perform an RTEC check manually, you can do so by selecting the [Exemption Check – F5] button. This is only applicable for EPS scripts and does not apply to manual scripts. |
| [Print Token - F8] | Print the EPS token to the configured printer. |
Awaiting Delivery
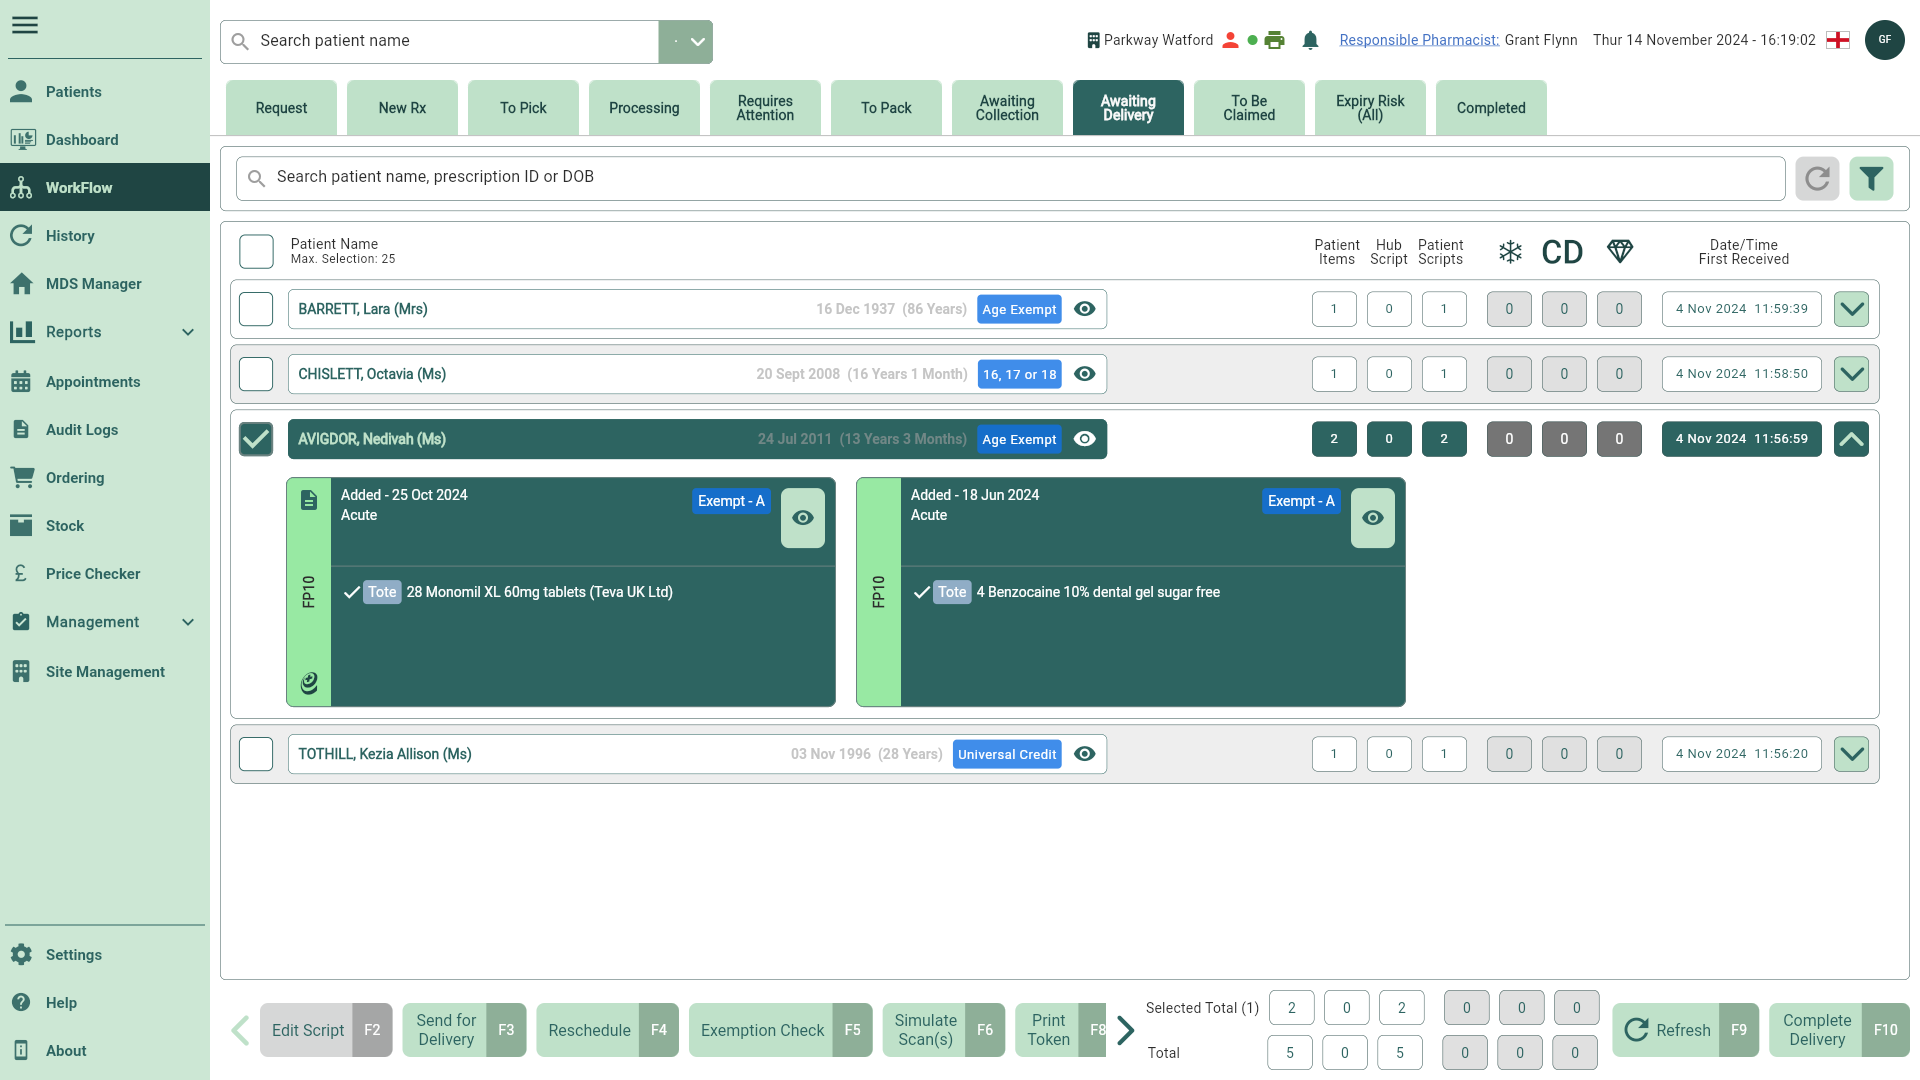
Assign bags to locations within your pharmacy ready for delivery.
| Field | Description |
|---|---|
| Search field | You can use the Search box to search for patients within the grid. Search by entering the patient name, prescription ID, or date of birth. |
| Filters | Use the available filters to refine the grid. |
| Grid | By default, the grid displays all patients/prescriptions marked for delivery that have moved from the To Pack tab. You can quickly view the total number of items/scripts for each patient along with the date/time the script(s) were received, including HUB scripts.You can jump to the patient PMR directly from Workflow by selecting the adjacent View icon button and any EPS logs by selecting the Note icon. |
| [Edit Script - F2] | Select the [Edit Script - F2] button to amend your prescriptions after they have been processed/saved. Prescriptions are edited from the Edit Scripts window. |
| [Send for Delivery - F3] | Select the [Send for Delivery - F3] button to send the selected script(s) out for delivery. On completion the script(s) move to the Completed tab. |
| [Reschedule - F4] | Functionality coming soon. |
| [Exemption Check - F5] | Where possible, an RTEC check is performed as soon as the prescription is downloaded, and any exemption details found are displayed in an RTEC badge on the main grid and prescription widget. Should you need to perform an RTEC check manually, you can do so by selecting the [Exemption Check – F5] button. This is only applicable for EPS scripts and does not apply to manual scripts. |
| [Print Token - F8] | Print the EPS token to the configured printer. |
| [Complete Delivery - F10] | After all deliveries are complete, select the [Complete Delivery] button to move the script(s) to the Completed tab. |
To Be Claimed
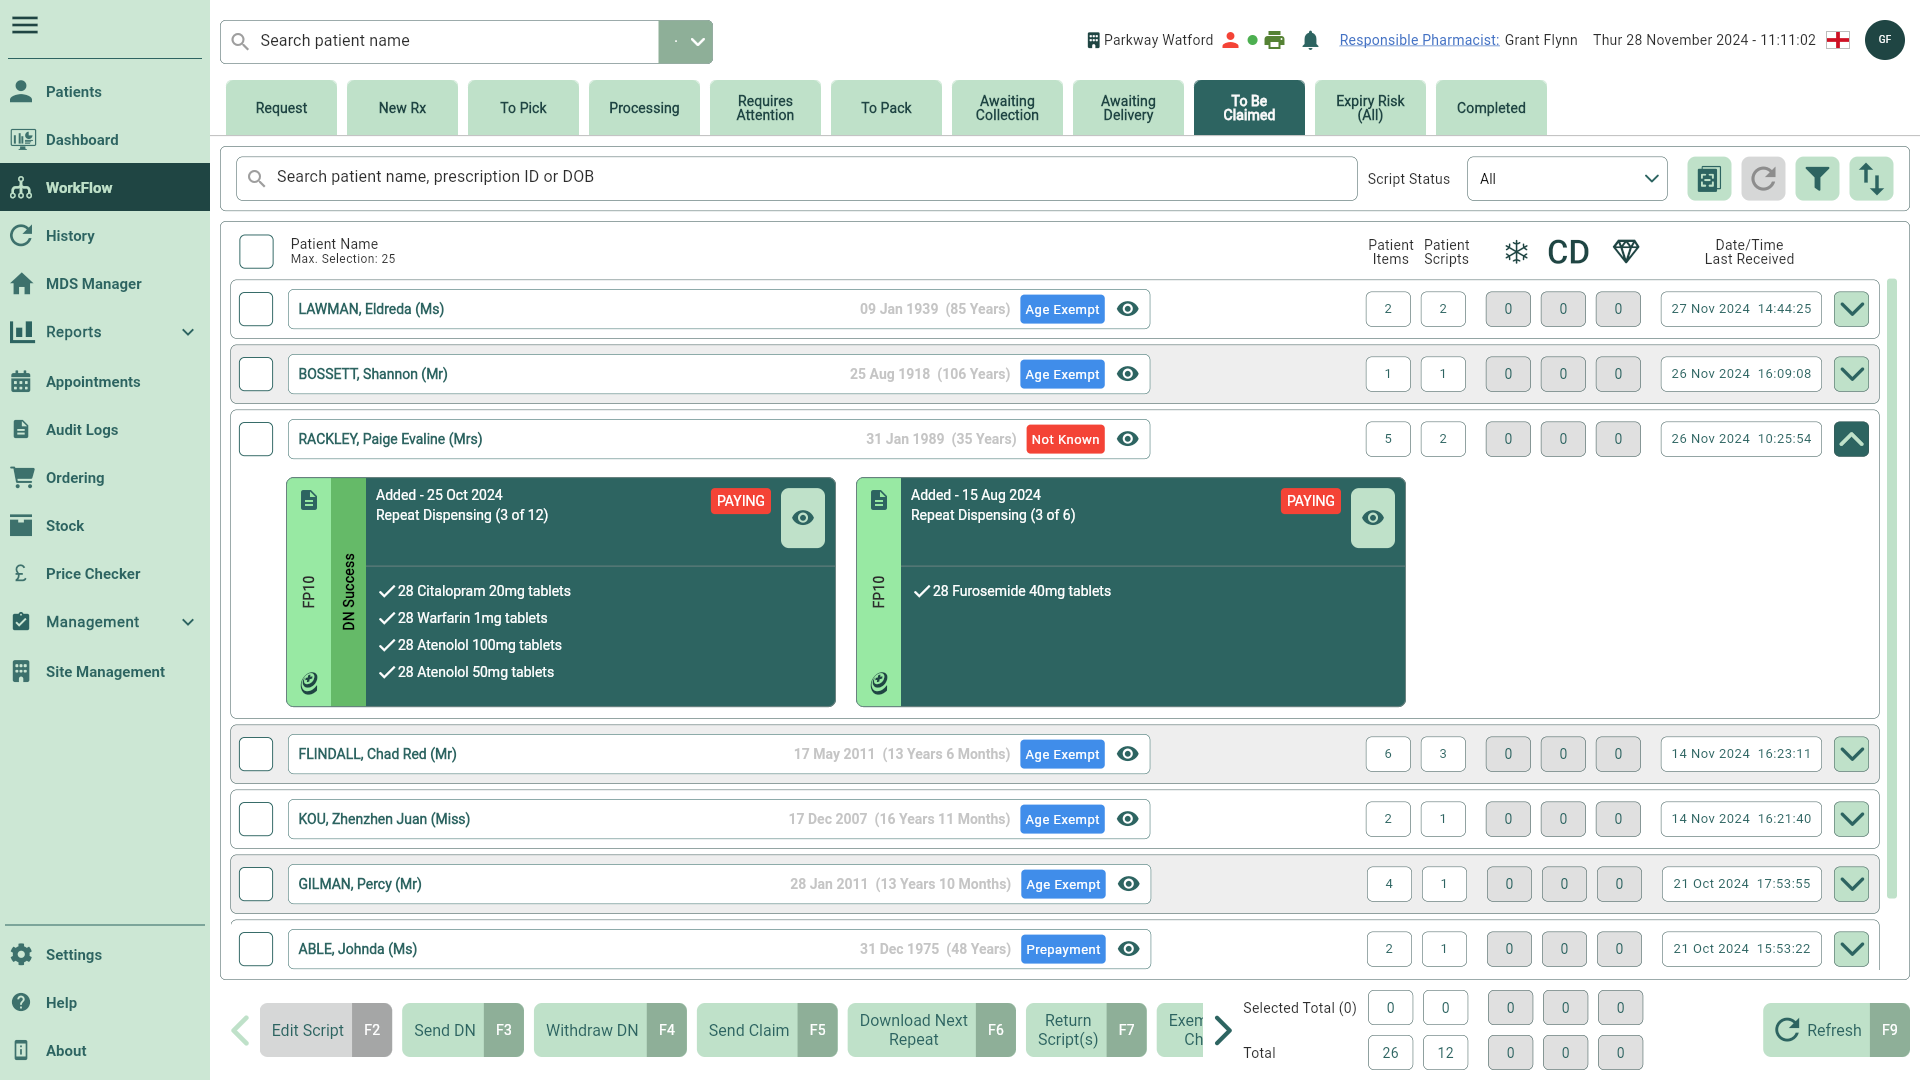
Learn how to send and withdraw dispense notifications and proceed to send claims.
| Field | Description |
|---|---|
| Search field | You can use the Search box to search for patients within the grid. Search by entering the patient name, prescription ID, or date of birth. |
| Script Status dropdown | If required, you can refine the grid by selecting a status from the Script Status dropdown box. |
| Batch Scan | Use the Batch Scan functionality to scan tokens to send DNs and claims as a batch. Batch Scan opens in a new window. |
| Filters | Use the available filters to refine the grid. |
| Sort by options | By default, the grid will sort by Newest First. You can select the Sort By button to choose a different sorting order. Your chosen order will remain until manually changed. |
| Grid | By default, the grid displays all claimable patients/prescriptions. At a glance, you can view the total number of items/scripts for each patient along with the date/time the script(s) were received. You can jump to the patient PMR directly from Workflow by selecting the adjacent View icon button and any EPS logs by selecting the Note icon. |
| [Edit Script - F2] | Select the [Edit Script - F2] button to amend your prescriptions after they have been processed/saved. Prescriptions are edited from the Edit Scripts window. |
| [Send DN - F3] | Select the [Send DN - F3] button to send your dispense notification. |
| [Withdraw DN - F4] | If required you can select the [Withdraw DN - F4] button to withdraw a prescription(s) with a DN Success status. |
| [Send Claim - F5] | Select to send your claim(s) for the selected script(s). |
| [Download Next Repeat - F6] | Manually download your patient's next repeats by selecting the [Download Next Repeat – F6] button. The next repeat is downloaded and will display on the New Rx Workflow tab and the patient's specific Dispensing Wizard ready for processing. |
| [Return Script(s) - F7] | If required, select the [Return Script(s) – F7] button and provide a Return Reason to return scripts to the NHS Spine. You will need to authenticate a valid NHS smartcard before using this feature. |
| [Exemption Check - F5] | Where possible, an RTEC check is performed as soon as the prescription is downloaded, and any exemption details found are displayed in an RTEC badge on the main grid and prescription widget. Should you need to perform an RTEC check manually, you can do so by selecting the [Exemption Check – F5] button. This is only applicable for EPS scripts and does not apply to manual scripts. |
Expiry Risk
Locate your scripts nearing expiry.
Functionality coming soon.
Completed

All your completed EPS and manually added prescriptions will display on the Completed tab in Workflow.
| Field | Description |
|---|---|
| Search field | You can use the Search box to search for patients within the grid. Search by entering the patient name, prescription ID, or date of birth. |
| Script Status dropdown | If required, you can refine the grid by selecting a status from the Script Status dropdown box. |
| Filters | Use the available filters to refine the grid. |
| Grid | By default, the grid displays all completed prescriptions. At a glance, you can view the total number of items/scripts for each patient and the date/time the script(s) were received. You can jump to the patient PMR directly from Workflow by selecting the adjacent View icon button and any EPS logs by selecting the Note icon. |
| [Edit Script - F2] | Select the [Edit Script - F2] button to amend your prescriptions after they have been processed/saved. Prescriptions are edited from the Edit Scripts window. |
| [Download Next Repeat - F6] | Manually download your patient's next repeats by selecting the [Download Next Repeat – F6] button. The next repeat is downloaded and will display on the New Rx Workflow tab and the patient's specific Dispensing Wizard ready for processing. |
| [Claims Report - F11] | Select the [Claims Report - F11] button to generate an EPS claim report to obtain an indication of the number of EPS Release 2 prescriptions that you have claimed within a given month. |