Get to know dispensing
Use this article to get familiar with all our dispensing related windows including the patient specific Dispensing Wizard and View Script window.
Patient specific Dispensing Wizard
The patient specific Dispensing Wizard is separated into easy to follow steps designed to support your dispensing flow to include picking and label printing, accuracy checks, clinical checks and more. By using the function keys, and with the ability to process multiple prescriptions at the same time, you can speed up your dispensing processes allowing you to focus more time on the other important services your pharmacy offers.
To access the patient specific Dispensing Wizard, open the patient preview or patient CRM and select the [Dispense – F4] button.
You will need to authenticate a valid NHS smartcard before you can access downloaded EPS prescriptions. You can learn how to authenticate your smartcard in our Smartcard authentication article.
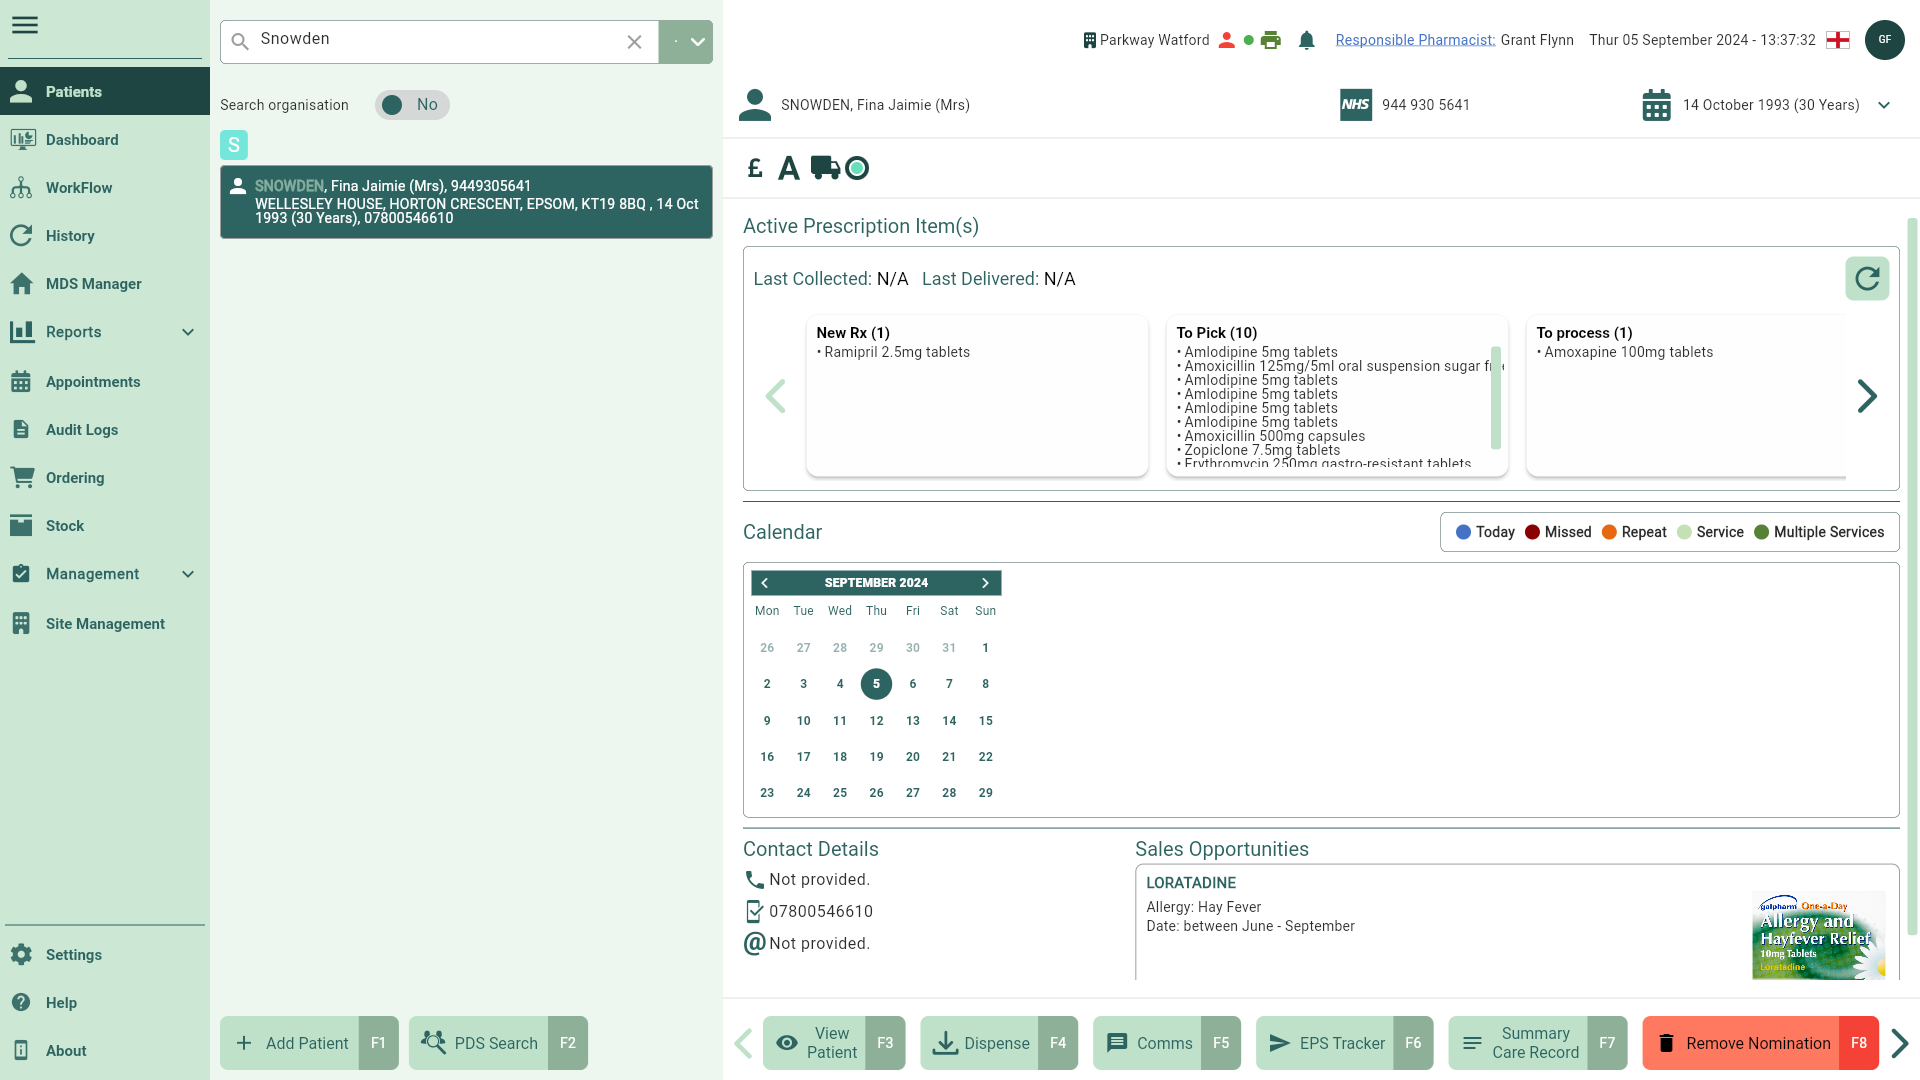
Select Script(s)
The Select Script(s) step is about selecting the prescriptions you want to dispense. You’ll need to locate the required prescriptions by selecting the prescription widget(s) in the carousel.
| Field | Description |
|---|---|
| Select Script(s) carousel | Use the left and right arrows to scroll through the carousel to locate the Prescription(s) you want to dispense. You can process multiple prescriptions at the same time by selecting the required prescription widgets. Selected prescription widgets will highlight in green and prescriptions with owings will be coloured in yellow. |
| Medication History | A tree view displays the patient’s medication history, showing a 6 month history by default. To view the full history, select the [Show All – Alt-A] button. If you are part of an organisation, hovering your cursor over an item will display the prescribed item and dosage along with the dispensing branch details in full. You can find the full details of what information is displayed in the tree view in our Patient CRM FAQs. |
| Notes | Any Warning, Bag Label, or other notes recorded in the patient details form are shown here. You can print any available notes to a label by selecting the  Print button. Print button. |
| Prescription widget | Prescription widgets are found within the Select Script(s) carousel in the Dispensing Wizard. Each prescription widget represents one prescription and displays a number of details taken from the script including the script type, date added and the item(s) it contains. You can view the prescription in full by selecting the  View icon button, and any EPS logs by selecting the View icon button, and any EPS logs by selecting the  Note icon. Note icon. |
| Prescription Charges widget | The Prescription Charges widget provides a clear breakdown of costs for any paying prescription, such as Private or Veterinary scripts. It helps track all prescription charges clearly, ensuring accuracy in pricing during the dispensing process. For each item, it includes:
The Prescription Charges widget will update automatically when you:
|
| [Download Nominated Script(s) - F2] | Use the [Download Nominated Script(s) – F2] button to pull down the prescriptions for your nominated patients from the NHS Spine. You will need to authenticate a valid NHS smartcard before using this feature. You can learn how to authenticate your smartcard in our Smartcard authentication article. |
| [Exemption Check – F3] | An RTEC check is performed as soon as the prescription is downloaded where possible, and any exemption details found are displayed in an RTEC badge on the prescription widget. Should you need to perform an RTEC check manually, you can do so by selecting the [Exemption Check – F3] button. This is only applicable for EPS scripts and does not apply to manual scripts. |
| [Select All – Ctrl-A] | Use this button to select and process all the prescriptions in the carousel. |
| [Add Manual Script – F5] | Use the [Add Manual Script – F5] button to open the Add Item(s) window where you can search for and select items to add to a manual prescription. Once added, manual prescriptions are displayed in the Select Script(s) carousel ready to be selected for processing. |
| [Process Selected – F10] | Once you have selected the required prescription(s), select the [Process Selected – F10] button to process the prescriptions and move on to the Item Validation step. |
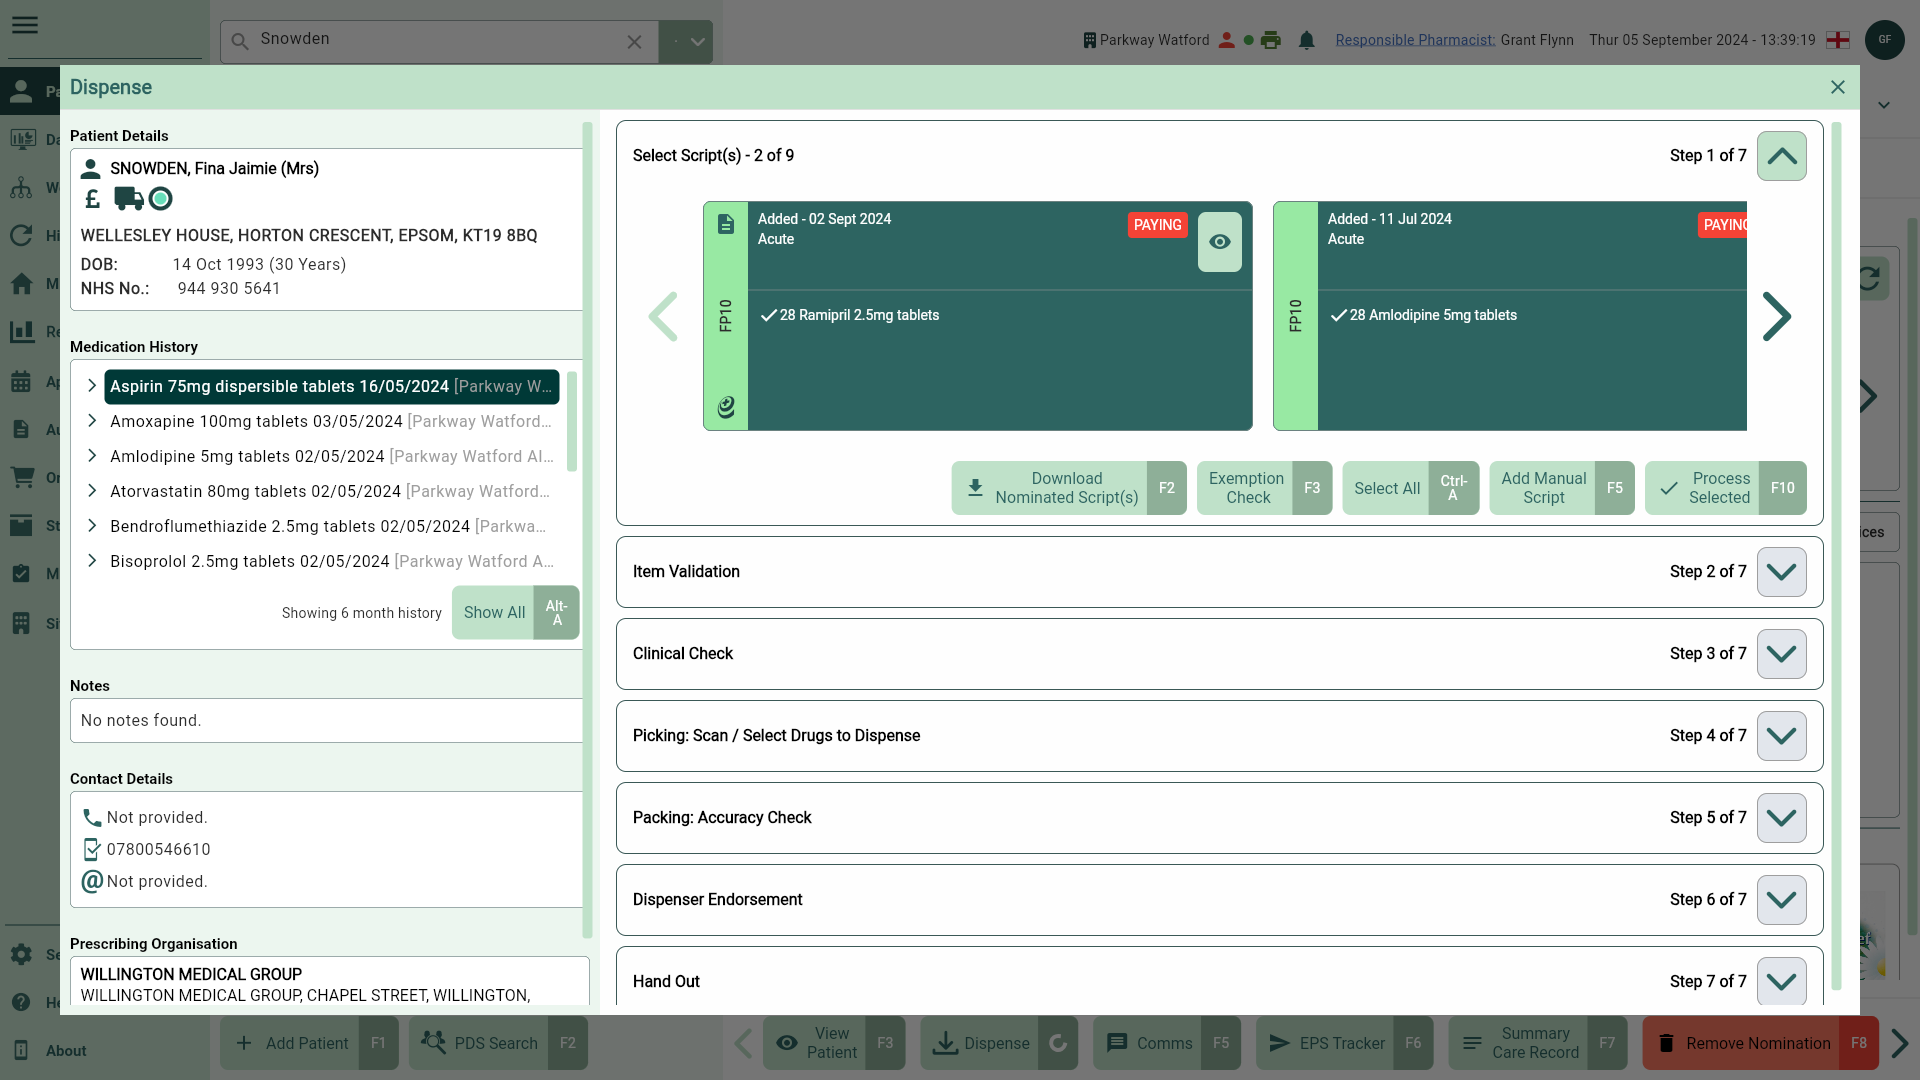
Item Validation
At the Item Validation step you'll be able to review everything incoming from the EPS prescription(s) and make amendments to each item if necessary, including marking items as Stopped.
At this stage anything marked as Item expired, Item cancelled or Discontinued will be highlighted. You will need to address these prior to moving to the next step of the Dispensing Wizard.
| Field | Description |
|---|---|
| Confirm Qty. | In this box you can alter the item quantity. It's important to keep in mind that when making amendments, you cannot increase the amount beyond what is prescribed, but you do have the option to decrease the amount. |
| Confirm Dosage dropdown | The dosage will be pre-populated based on the electronic message. If the dosage detected on the EPS script differs from the one in the PMR, it will be highlighted in yellow. If required, you can use the Confirm Dosage dropdown to select a different dosage. |
| View icon (Label) | To preview how your label will look, select the View icon in the Preview Label column. Your label will display information such as patient demographics, item quantity, dosage and any advisory warnings. |
 Stopped icon Stopped icon | Select the Stopped icon to mark the item(s) as Stopped. Marking items as Stopped will mark the item as Not Dispensed and prompt you to provide a Not Dispensed reason. Stopped items will display with a STOPPED badge in the patient's Medication History. |
| [View Dispenser Notes – F6] | Any notes included from the prescriber will be visible by selecting the [View Dispenser Notes - F6] button. This is only applicable for EPS scripts and does not apply to manual scripts. |
| [Next Step - F10] | Once you have completed the required element(s), select the [Next Step - F10] button to advance onto the Clinical Check step. |
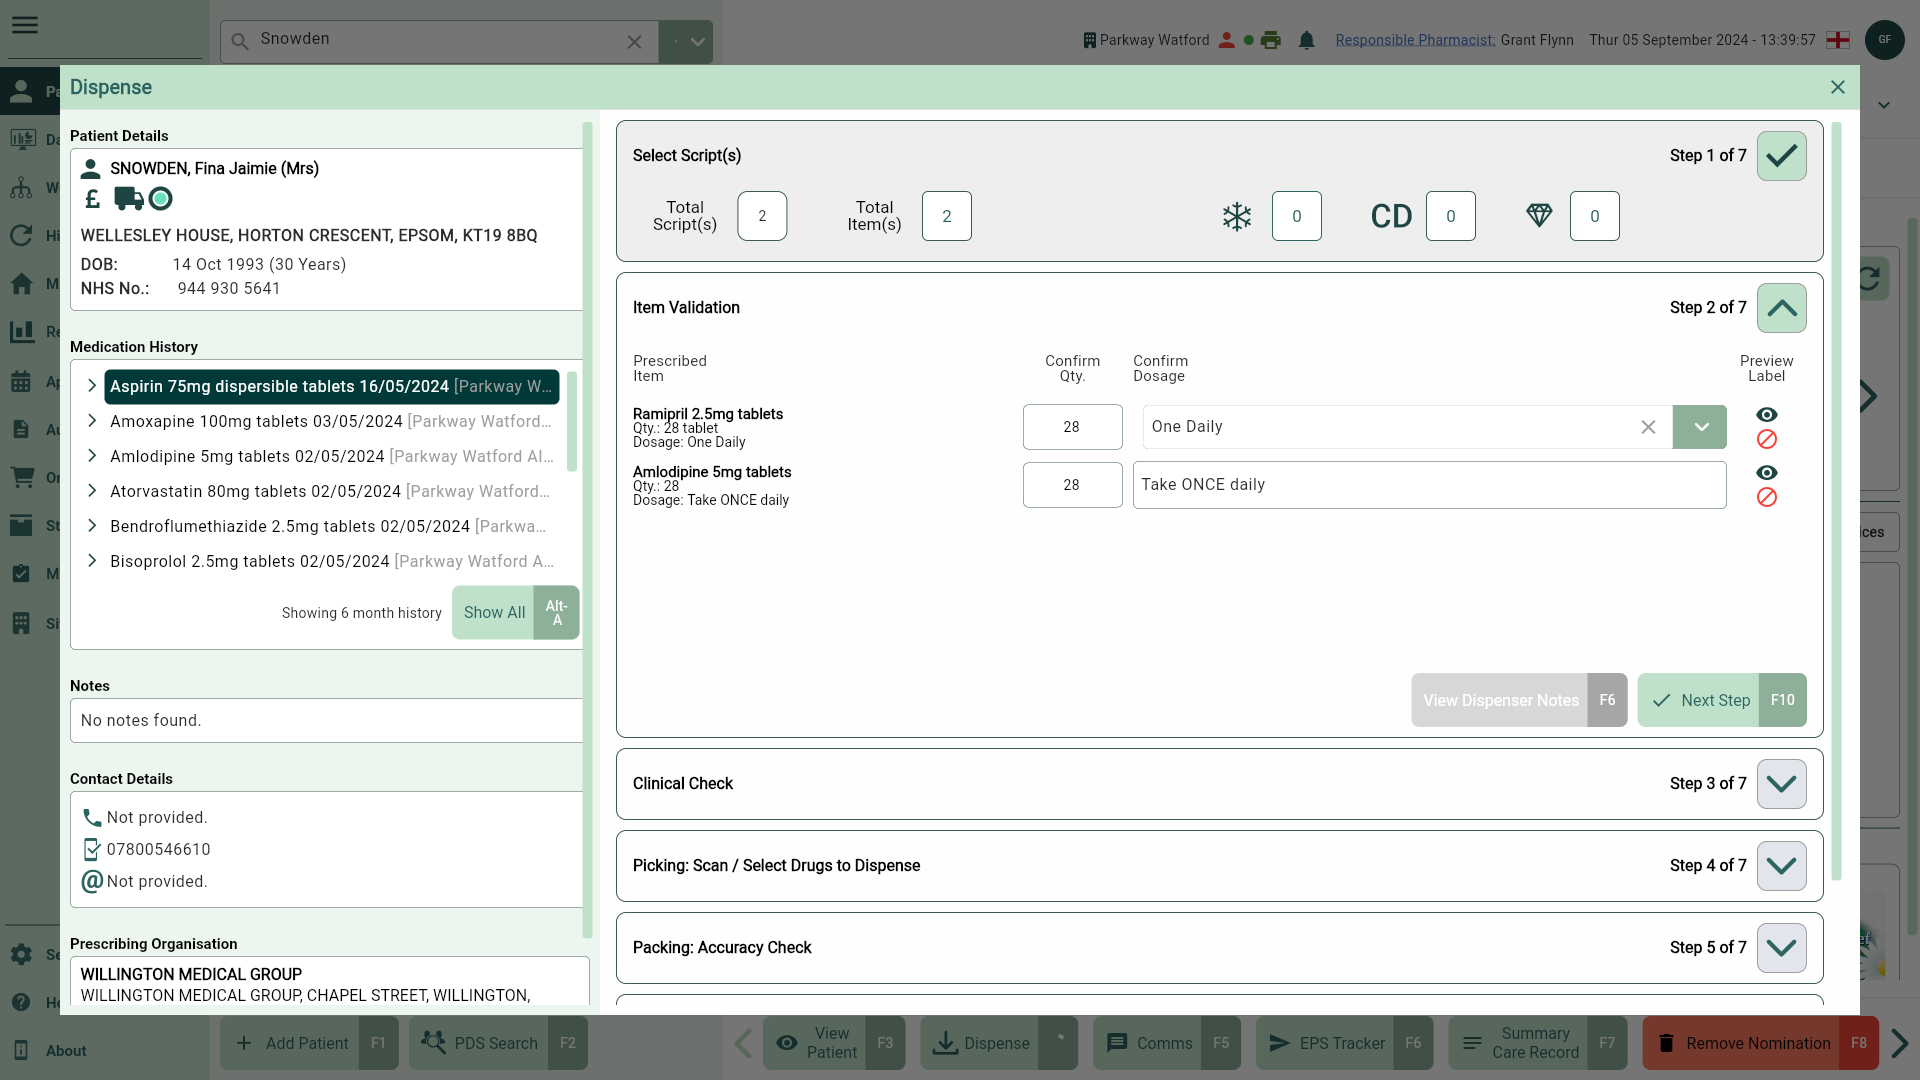
Clinical Check

The clinical check will identify any alerts that are pertinent to the patient, including drug interactions and contraindications based on factors such as age and allergies. It will also display information on the patient's past medical history and the current prescriptions being dispensed. Within this step you are also able to update the record with new conditions or clinical observations.
| Field | Description |
|---|---|
| [Park CC - F2] | At this stage, you have the option to park the check, which will flag the prescription as clinical check required. |
| [Full CC Details - F4] | Open the full Clinical Check window containing the patient widgets and all information required to support your clinical decision making including, prescriber details, contact numbers and medical history. |
| [Mark as CC - F10] | Once you're satisfied all checks are complete, select the [Mark as CC - F10] button to move on to the Picking step. Please note this button will only be visible for Pharmacist level users. |
| Field | Description |
|---|---|
| Medication History | A tree view displays the patient’s medication history, showing a 6 month history by default. To view the full history, select the [Show All – Alt-A] button. If you are part of an organisation, hovering your cursor over an item will display the prescribed item and dosage along with the dispensing branch details in full. |
| Clinical Check Actions | This box contains a list of items and an action check box to acknowledge any new items, interactions or allergies. |
| Clinical Alerts | Any alert assigned to your patient will be shown here. They will be colour-coded depending on the severity of the drug interaction. |
| Conditions & Allergies | This section will show the allergies and conditions of your patient, you can update and add further information by selecting the button in the bottom right corner. |
| [SCR - F2] | Summary Care Records (SCR) are generated from medical information that contains key patient data. Information can include care preferences, long term conditions such as diabetes or carer contact details. |
| [Clinical Monitoring - F3] | Here you can provide information about the patient's blood pressure, warfarin INR levels or any other relevant details that can contribute to building a comprehensive clinical picture. |
| [Requires Attention - F4] | In situations where you're unable to complete your clinical check, for instance, if you need to communicate with the patient prior to dispensing their items, this feature can be utilised. |
| [Additional Info.] | The Additional Info button offers a wealth of clinical content typically found in Patient Information Leaflets (PIL). It is organised based on headings such as Contraindications and Precautions. This information can be shared with patients to support your clinical checks. |
Picking
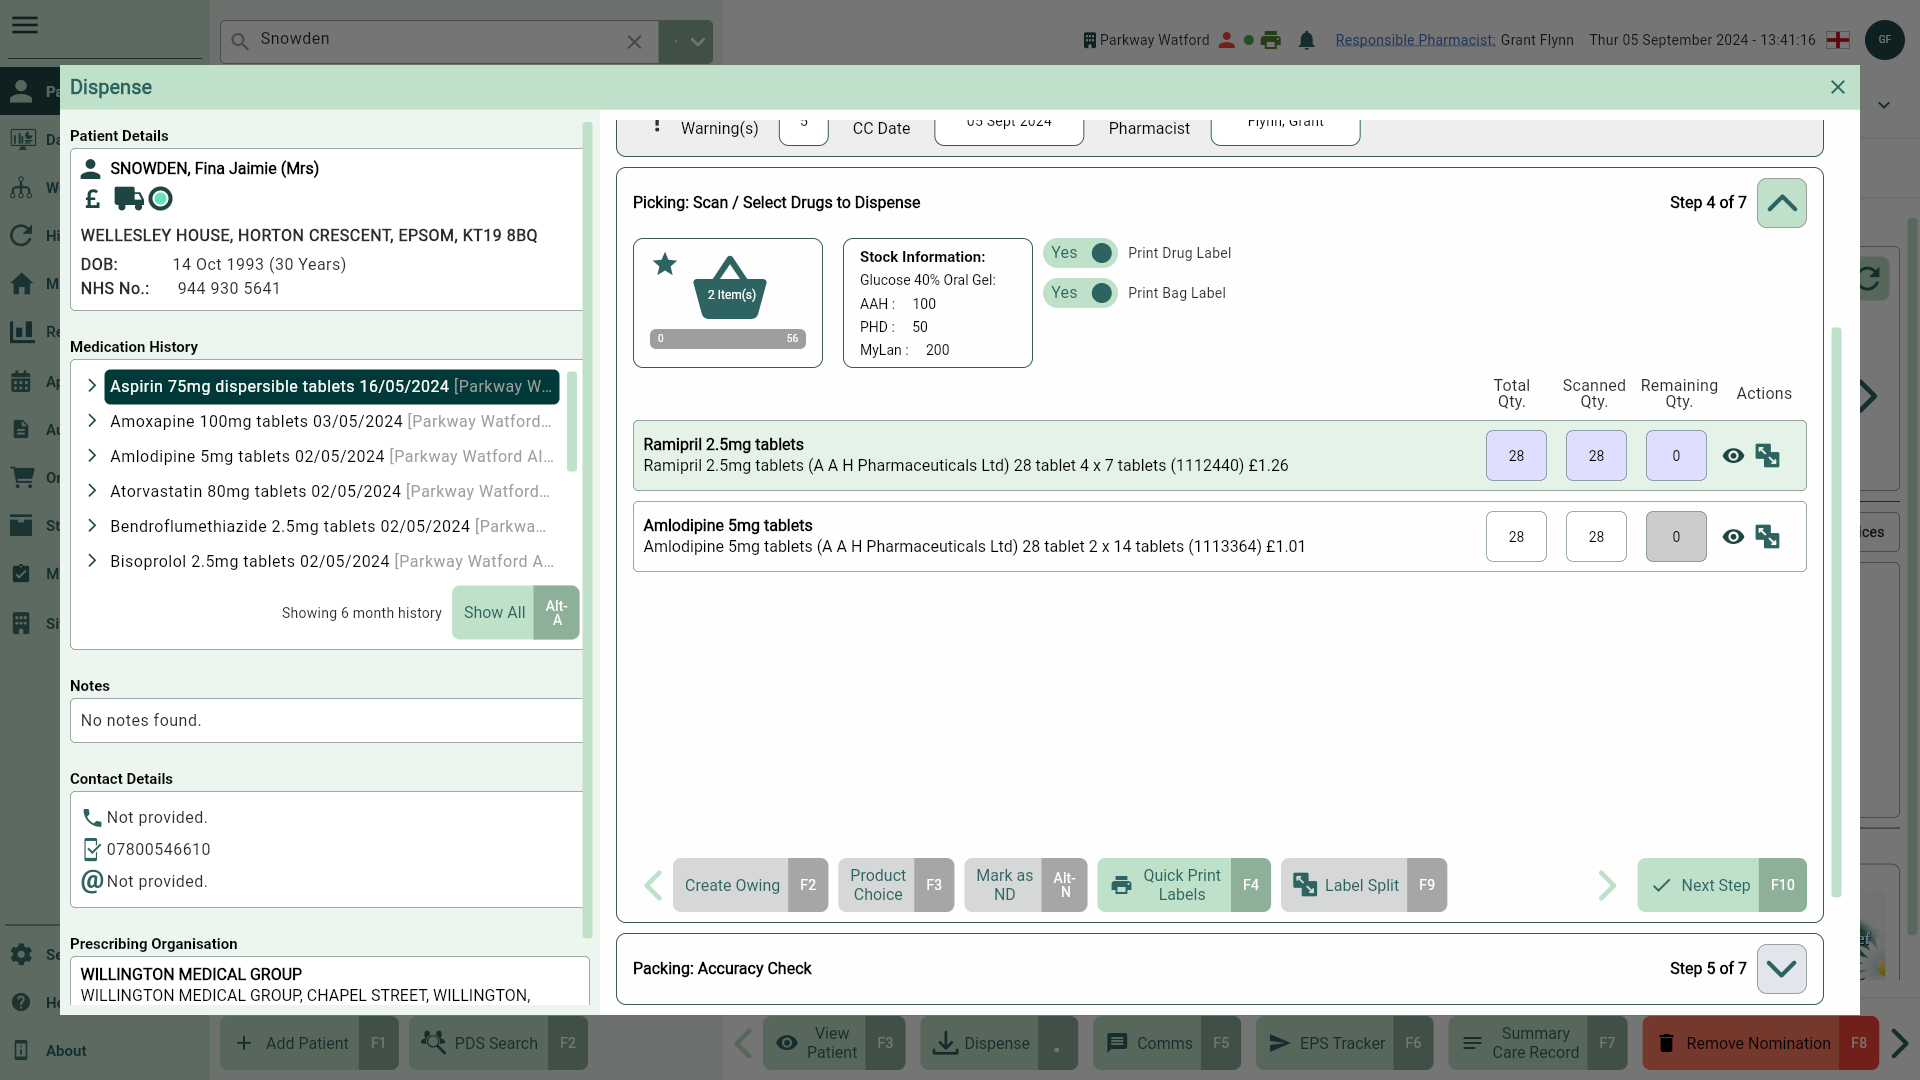
The main focus of this stage is to select the dispensable packs for each prescribed item. Apotec CRM will automatically select the last dispensed pack for the given prescribed item as the best pack and populate the Scanned Qty to match the Total Qty. If no packs have previously been dispensed, the best pack will be selected based on the prescribed quantity and the available pack sizes.
| Field | Description |
|---|---|
| Print Drug Label and Print Bag Label switches | By default, label(s) will be automatically generated once you have selected the [Next Step - F10] button on this step. You can toggle these switches to No to disable printing drug and bag labels after completing the Picking step. |
| Label preview | Select the View icon in the Actions column to access the Label Preview window. |
| [Create Owing - F2] | Select an item and use this button when you have insufficient product to fulfil the prescribed quantity of medication for the patient. The prescription will turn yellow and the Patient Medical Record (PMR) will be updated to reflect the change. |
| [Product Choice - F3] | If you need to amend the chosen pack, select the item and use this button to open the Product Choice window. This window contains a list of dispensable packs based on your restrictions. Amend the Quantity against the correct dispensable pack to amend the chosen pack. |
| [Mark as ND - Alt-N] | To mark an item as not dispensed, select the item followed by the [Mark as ND - Alt-N] button. The Mark as ND window will display allowing you to choose an ND reason from the dropdown list. All items marked as not Not Dispensed will need to be removed from the bag. |
| [Send to FlowRx - F6] | This button will only be displayed if the FlowRx setting is enabled. If enabled, items can be sent for off-site fulfilment via Centered Solutions. |
| [Quick Print Labels - F4] | Provides an option to quickly print off your labels. |
| [Label Split - F9] | Select the [Label Split - F9] button or the  Label Split icon in the Actions column if you need to change the number of labels being printed. This will open the Label Split window. You can print the total dispensed quantity on a single label, split the quantity over several labels or add extra labels if required. If different packs are selected during dispensing, a counter will display the total number. The full product details can be seen in a tooltip by hovering over this counter. This button will be disabled for any items marked as Not Dispensed. Label Split icon in the Actions column if you need to change the number of labels being printed. This will open the Label Split window. You can print the total dispensed quantity on a single label, split the quantity over several labels or add extra labels if required. If different packs are selected during dispensing, a counter will display the total number. The full product details can be seen in a tooltip by hovering over this counter. This button will be disabled for any items marked as Not Dispensed. |
| [Next Step - F10] | Once all items are processed, and no more changes need to be made you can move on to the Packing (Accuracy Check) step by selecting the [Next Step - F10] button. |
Packing (Accuracy Check)
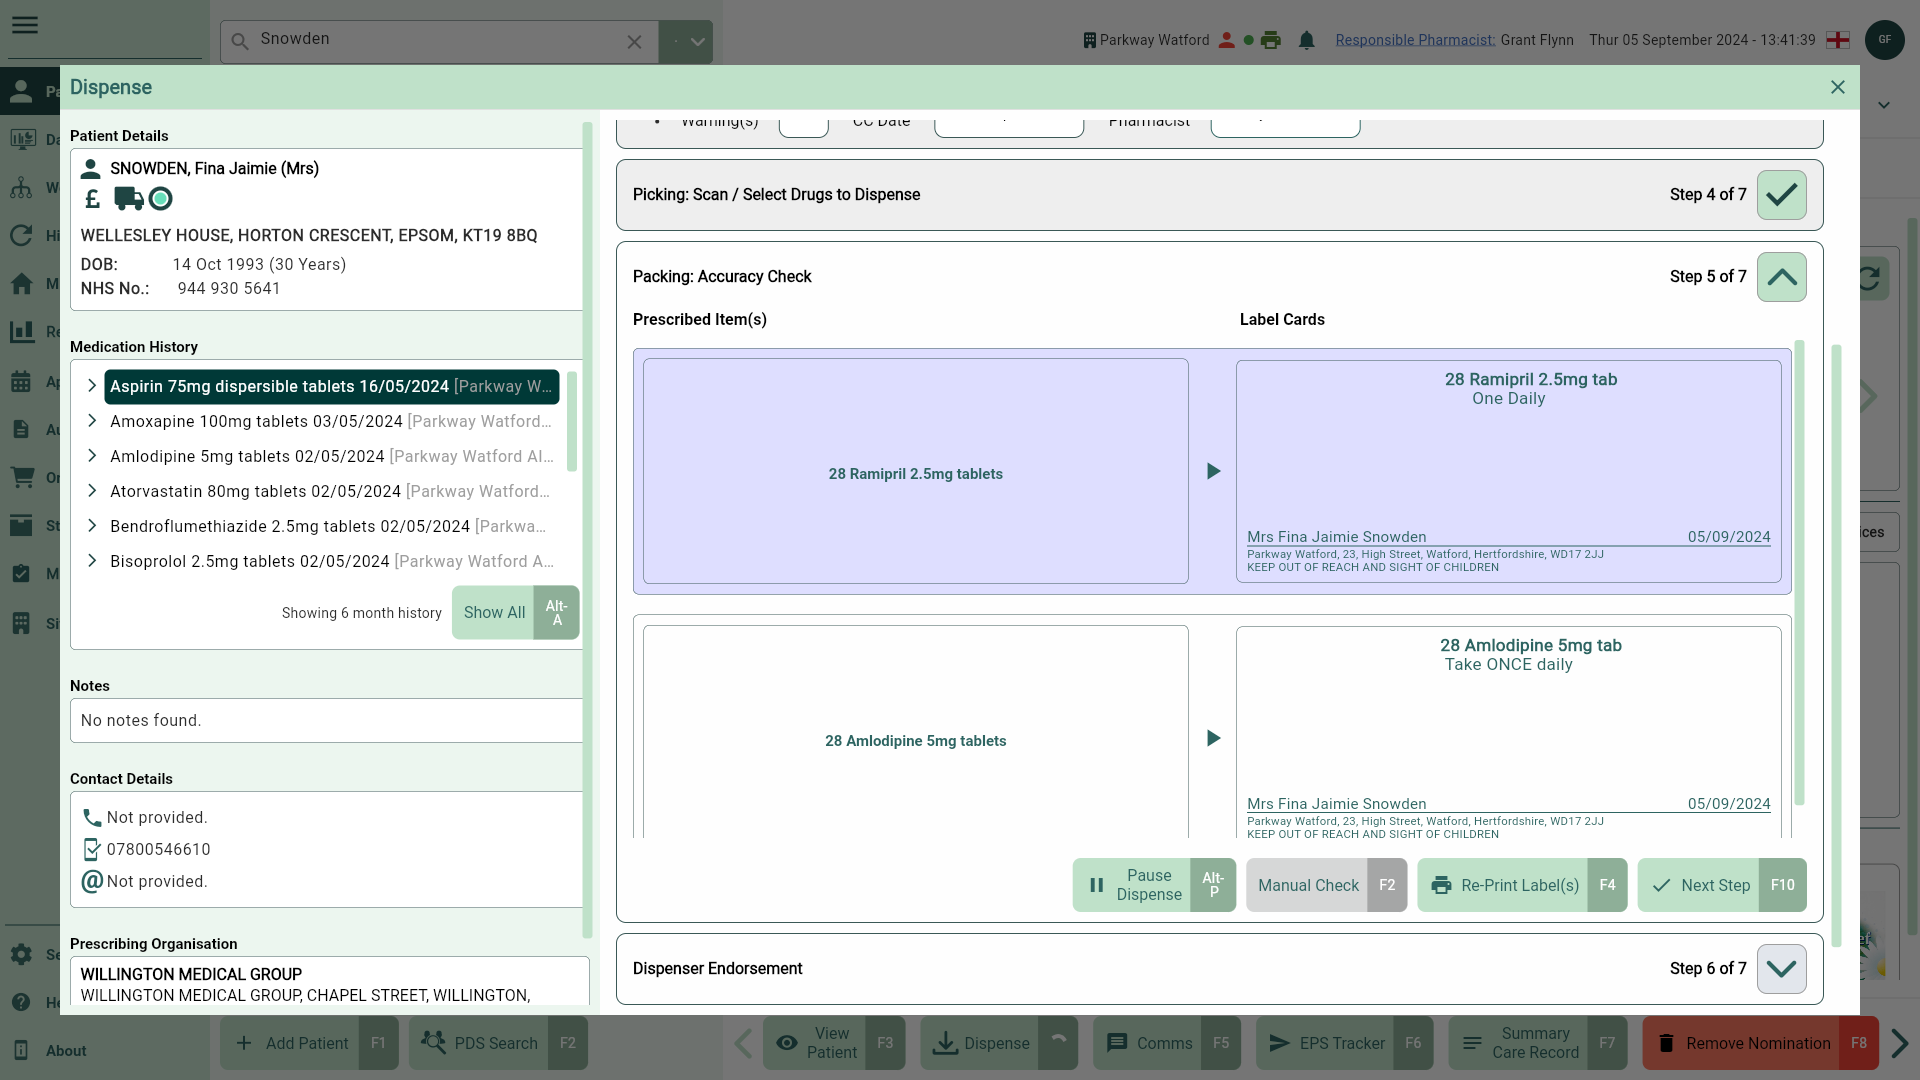
At the Packing (Accuracy Check) step it is important to carefully pack each item and perform an accuracy check to ensure that everything is accounted for and properly matched prior to dispensing to the patient. Full functionality for this step is coming soon.
| Field | Description |
|---|---|
| [Manual Check - F2] | When manually checking your items, select the [Manual Check - F2] button. Once you have matched and attached a label to each pack, you will need to select the check box to indicate that the process has been completed. |
| [Re-Print Label(s) - F4] | Provides an option to re-print your labels. |
| [Next Step - F10] | Once your item(s) are matched, scanned and labelled you can select the [Next Step - F10] button to move onto the Dispenser Endorsement step. |
Dispenser Endorsement
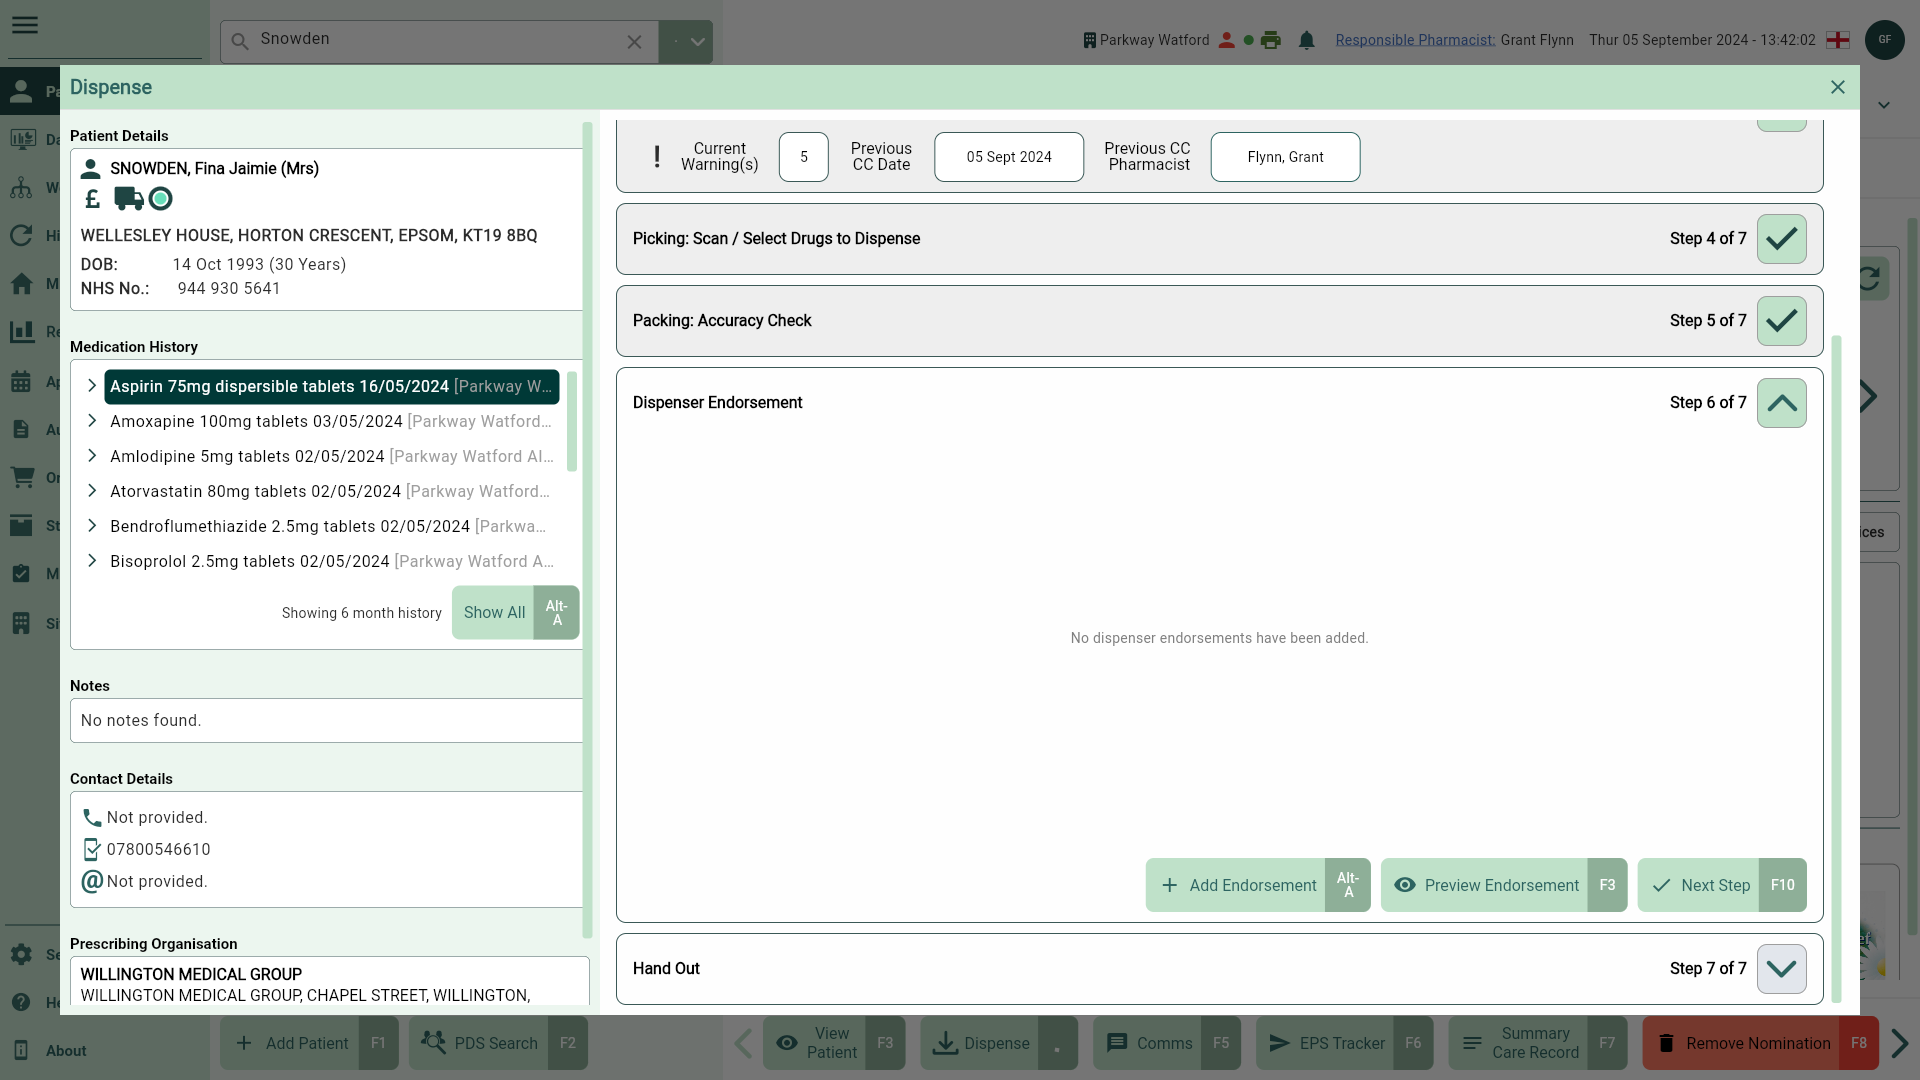
Add your dispenser endorsements at the Dispenser Endorsement step. Any suggestions will be set as an alert at the top of the window.
| Field | Description |
|---|---|
| [Add Endorsement - Alt-A] | To add or view suggested endorsements select the [Add Endorsement - Alt-A] button. A new window will appear with your list of items and a range of options to choose from. You will need to manually enter the values to complete the process. The same steps can be used to add multiple endorsements. |
| [Preview Endorsement - F3] | This shows you how your endorsement(s) will appear on the prescription. |
| [Next Step - F10] | If no endorsement(s) are required or you have completed the relevant fields, select [Next Step - F10] button to move to the Hand Out step. |
Hand Out
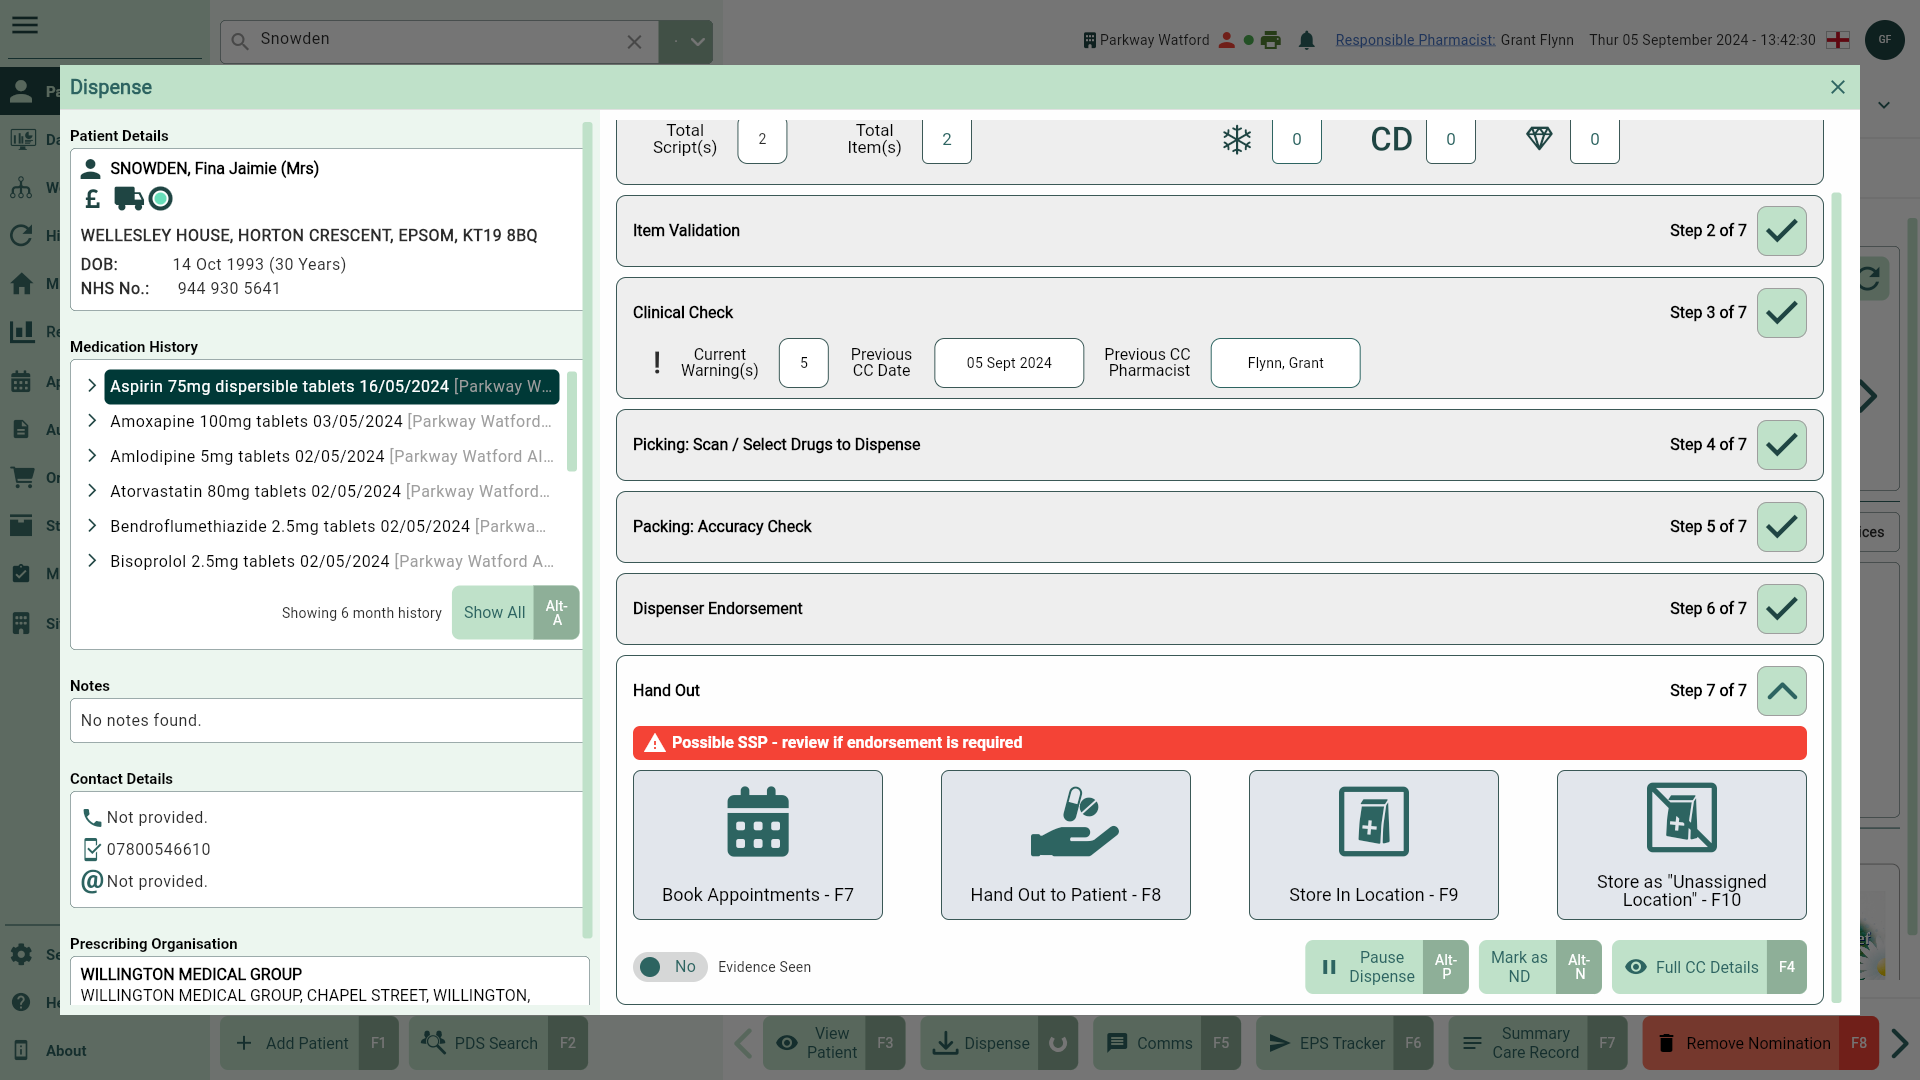
The Hand Out step is the final step in the Dispensing Wizard. You have multiple options during this stage, including to book an appointment, store the prescription in a location, or hand out the prescription to the patient.
| Field | Description |
|---|---|
| [Store as "Unassigned" Location - F10] | Use this button to move your prescription(s) to the Awaiting Collection or Awaiting Delivery tab in Workflow based on the patient's chosen fulfilment option, without assigning a location. |
| [Store in Location - F9] | Use this button to mark your prescription as stored in a location within your pharmacy to await collection. Once selected, the Select/Scan Location window displays for you to select an available location based on the locations you have created within the Location Manager. After confirming, the prescription will move to the Awaiting Collection tab in Workflow. |
| [Hand Out to Patient - F8] | Using this button will update the prescription status to Completed. EPS prescriptions will move to the To Be Claimed tab in Workflow ready for you to send the dispense notification and claim. Manual prescriptions will move to the Completed Workflow tab. |
| [Book Appointments - F7] | Functionality coming soon. |
| Evidence Seen | If a patient is exempt this switch can be moved to yes once evidence has been provided. |
| [Mark as ND - Alt-N] | To mark an item as not dispensed, select [Mark as ND - Alt-N]. The Mark as ND window will display all items for you to select and mark as not dispensed. |
| [Full CC Details - F4] | Open the full Clinical Check window containing the patient widgets and all information required to support your clinical decision making including, prescriber details, contact numbers and medical history. |
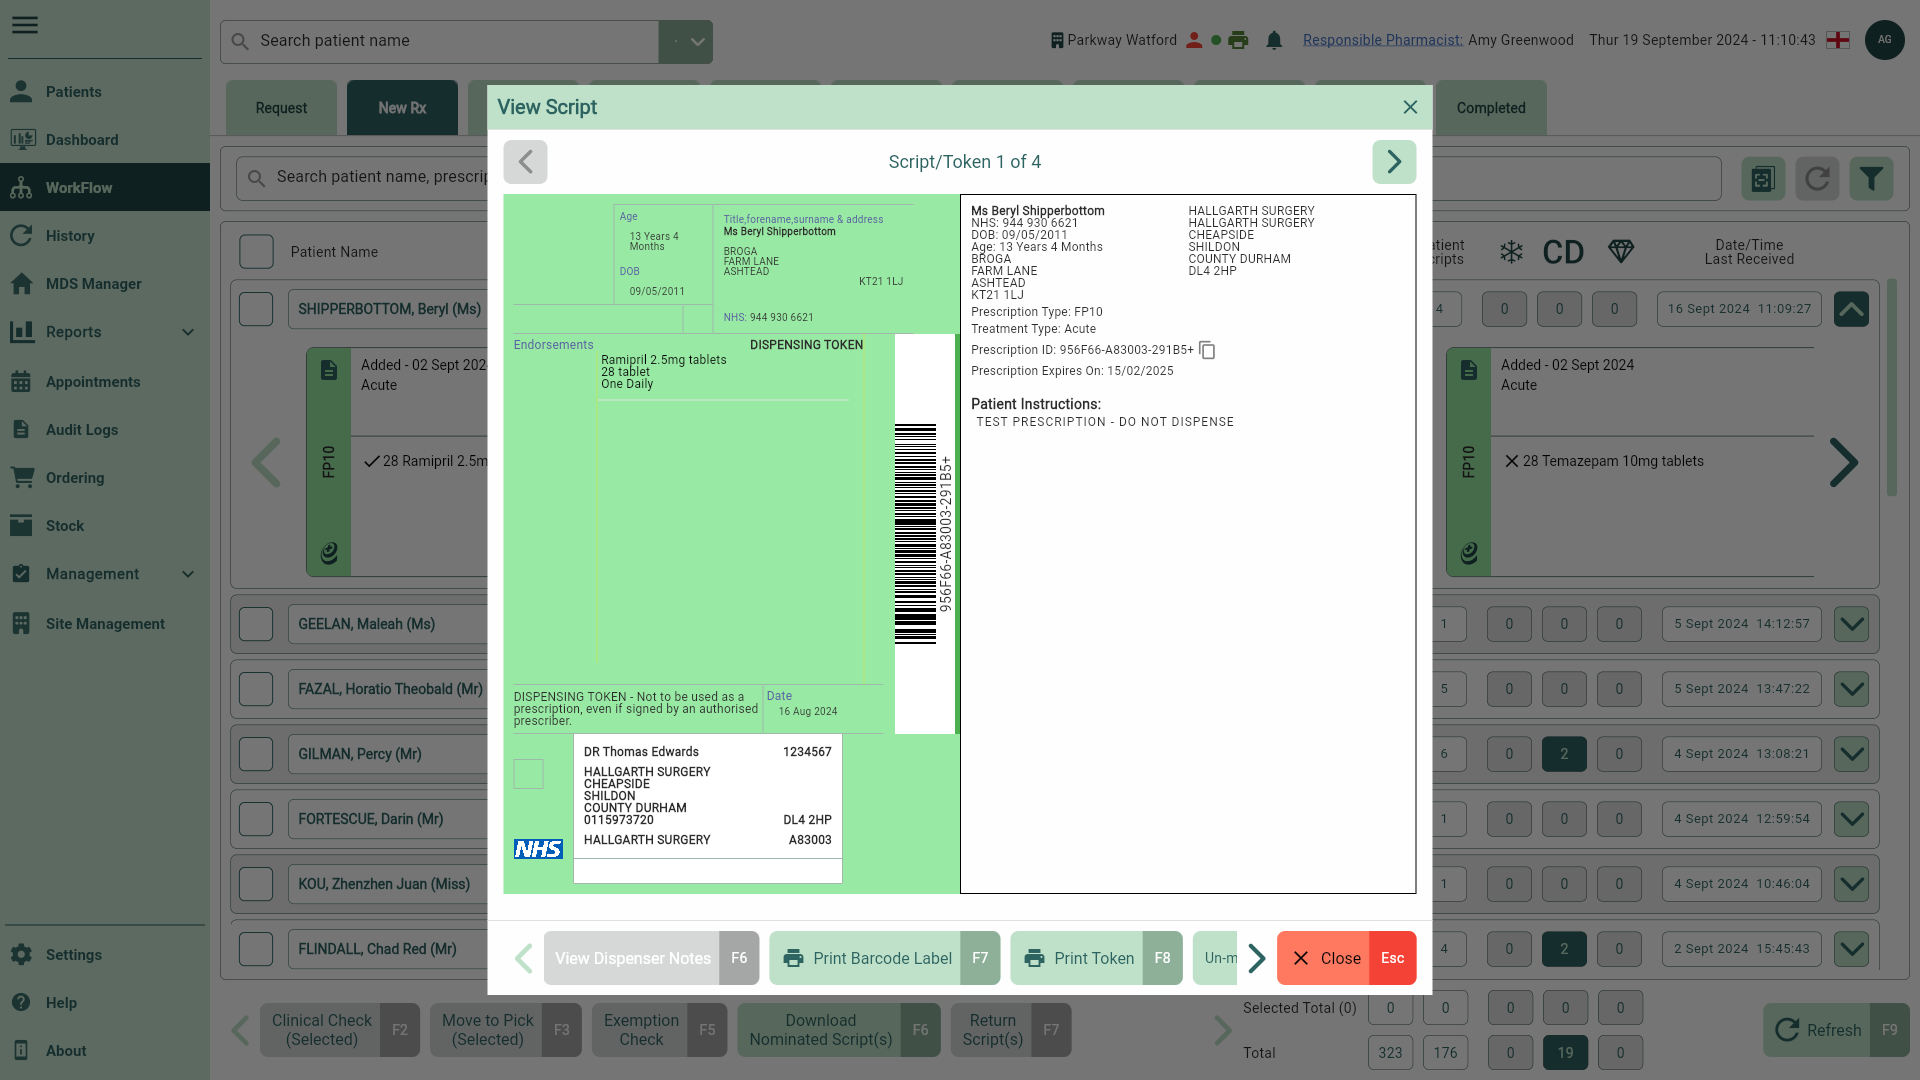
View Script
You are able to view a prescription preview on screen by accessing the View Script window using the View icon button from any prescription widget within the application.
| Field | Description |
|---|---|
 Previous and Previous and  Next icon buttons Next icon buttons | If you have selected multiple prescriptions to view, you can scroll through these using the Previous and Next icon buttons. |
| Script/Token X of X | Where multiple prescriptions have been selected to view, you will see the total selected prescriptions and the prescription number you are currently viewing at the top of the View Script window. |
| Token preview | The token preview displays all the prescription details including the patient's details, prescribed item(s), treatment type and script ID. |
| [Edit Price - F5] | Select the [Edit Price - F5] button to amend the item(s) values via the Edit Price window if required. Note: This functionality is only available for any paying prescriptions such as Private, PGD (private) or Veterinary scripts. For a full list of eligible prescriptions see our Dispensing FAQs. |
| [View Dispenser Notes - F6] | The [View Dispenser Notes - F6] button is enabled when dispenser notes have been provided on EPS prescriptions. Select this button to view any notes within the Dispenser Notes window. |
| [Print Barcode Label - F7] | Print the prescription ID for EPS prescriptions as a barcode label. Printed labels will also display the patient's name. |
| [Print Token - F8] | Print the EPS token to the configured printer. |
| [Un-map Script] | Select to un-map the prescription. A Patient Not Matched badge will be applied and the patient and script will remain in the New Rx tab on Workflow. |
| [Delete Script - F6] | Delete manually added prescriptions. |