Get to Know MDS
Use the MDS module to manage the medication of your nursing home and community patients. Once patients are added to a nursing home or as a community patient, an MDS tab will display in their patient record providing you with all the patient specific functionality you'll find in the MDS Manager.
MDS Settings
| Setting | Value/Description |
|---|---|
| Auto Select MDS Item |
|
| MDS Enabled |
|
| Medication Item Sort Order | This configuration allows users to change the display order of MDS medication items in the MDS Manager and the patient MDS tab. The available sort order options are:
|
MDS Manager
The MDS Manager is where you can manage all MDS patients and their medication.
To access the MDS Manager, select MDS Manager from the left-nav.
Report templates will need to be selected within the Nursing Home/Community patient's settings before you're able to print MAR Charts, Backing Sheets and picking lists. MAR Charts (M), Backing Sheets (B) and labels (L) will only print for items flagged as M, B and/or L.
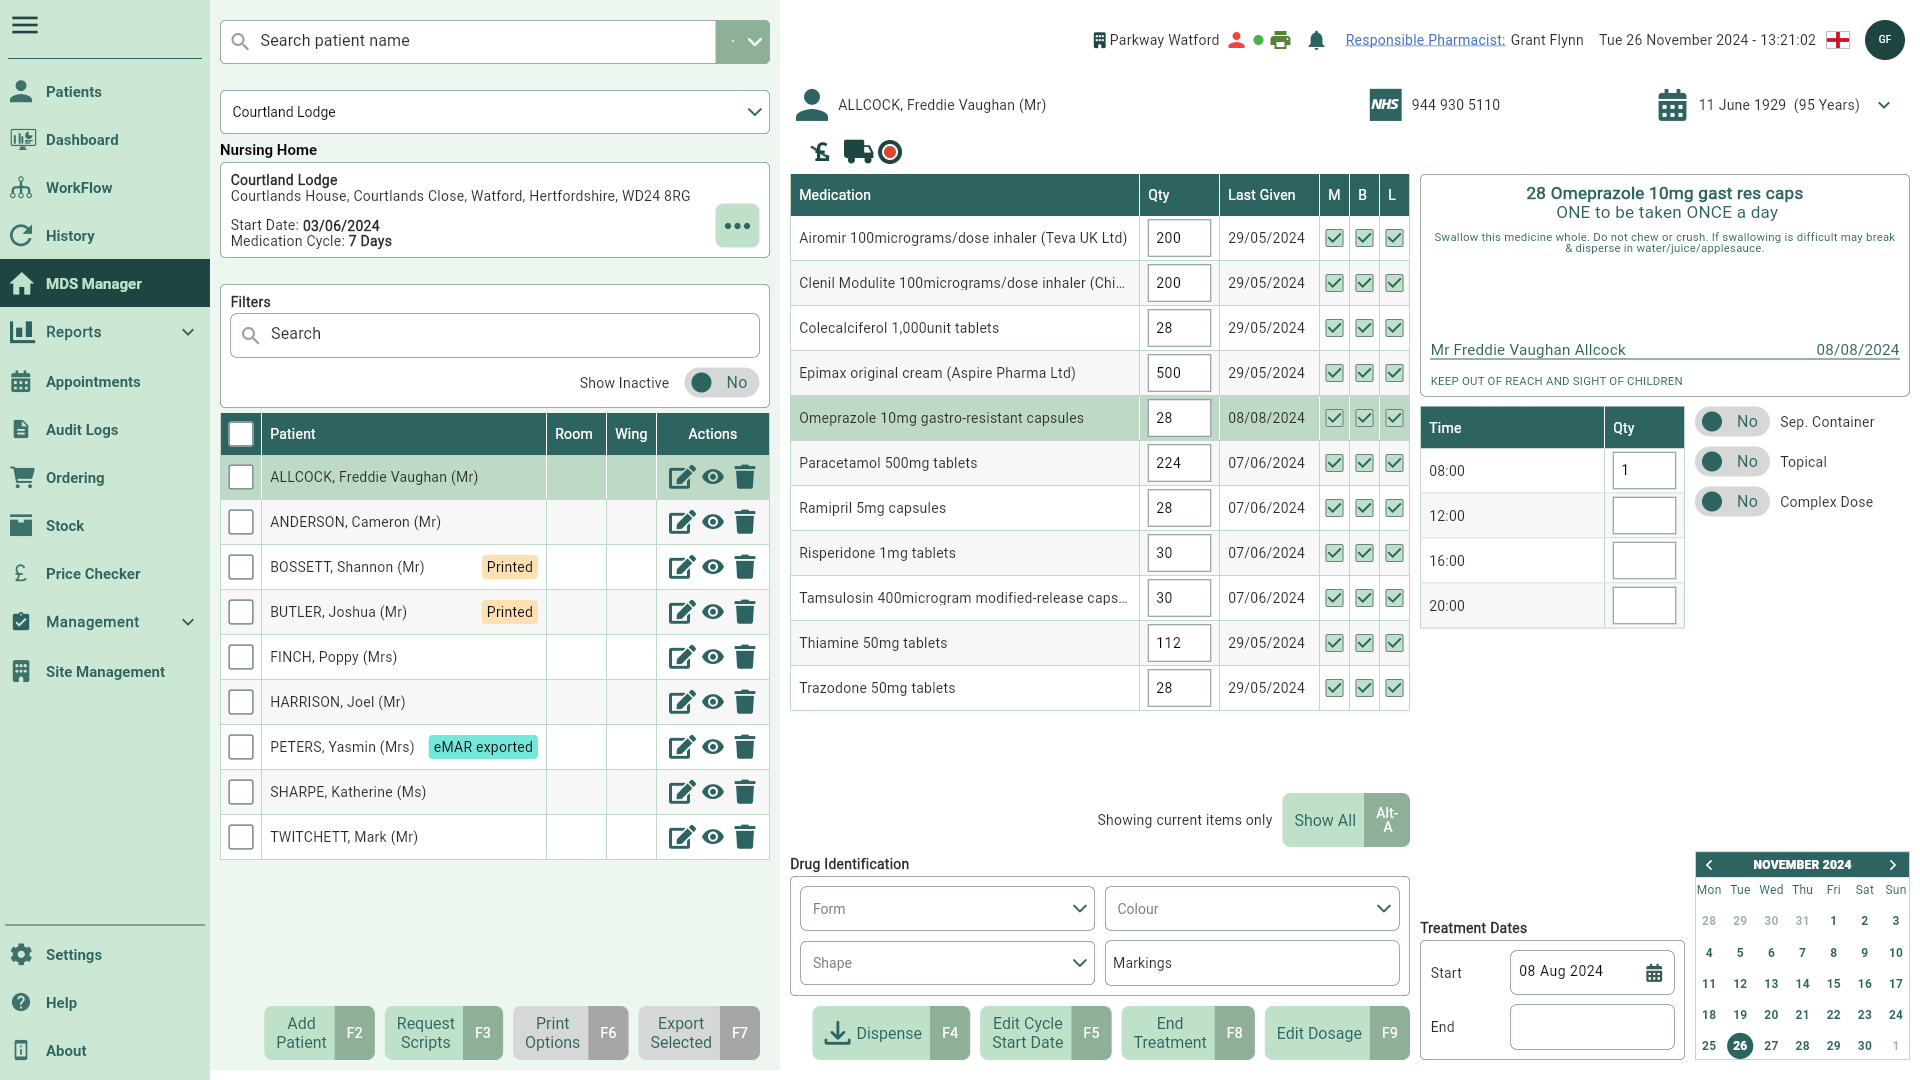
Patient panel
| Field | Description |
|---|---|
| Nursing home dropdown | By default, the last viewed nursing home/community patient will display when the MDS Manager is opened. You can use the Nursing home dropdown to select an alternative nursing home or view all community patients by selecting the Community MDS menu item. Easily select the last five (5) recently accessed nursing homes from the dropdown, or use the Select Home... menu item to open the Select Nursing Home window, where by default only nursing homes assigned to the current branch will be displayed. You can view all nursing homes within your organisation by toggling the available Show Org switch to Yes. |
| Nursing Home and Community MDS details | View the selected nursing home/community patient name, address, current cycle Start Date and Medication Cycle. |
| Patient Filters | Use the available filters to refine the Patient table. |
| Patient table | The Patient table displays all the patients in your nursing home or all community patients. You can select a patient to activate the [Print Options - F6] and/or [Export Selected - F7] buttons, and highlight a patient to view their Medication table in the central panel. Use the Actions column icons to:
|
| [Add Patient - F2] | Add a patient to your nursing home or as a community patient. |
| [Request Scripts - F3] | Open the New Request window to request repeat prescriptions for your MDS patients. |
| [Print Options - F6] | Select one or more patients to enable the [Print Options - F6] button. Select this button to display all the printing options. You can print MAR Charts (M), Backing Sheets (B) and Labels (L) for items flagged as M, B and L, and consolidated or non-consolidated picking lists (as configured in your Nursing Home/Community patient's settings) for all selected patients. |
| [Export Selected - F7] | Select one or more patients to enable the [Export Selected - F7] button. Select this button to transmit all items flagged as M for all selected patients on an electronic MAR (eMAR) chart. This button is only enabled when an eMAR Type is configured in the Nursing Home/Community patient's settings. |
Medication panel
| Field | Description |
|---|---|
| Patient demographic details | Displays the name, NHS number and date of birth for the highlighted patient. Expand the dropdown to display the full demographic details. |
| Patient icons | A horizontal stack of icons to visually display a summary of settings and consent for the patient. These include an allergies indicator, recorded consent and registered services. You can find a full description of the patient icons in our Patient CRM FAQs. |
| Medication table | Displays all the medication on the patient's MDS record including the item name, quantity, when the item was Last Given and the M, B and L checkboxes to flag items to print/export MAR Charts (M), Backing Sheets (B) and/or Labels (L) when the relevant print/export option is selected. Updates to quantities will only reflect on the MDS stationery and will not impact the patient's medication history. If configured in your application settings, you can highlight an item in the Medication panel and use the adjacent |
| [Show All - Alt-A] and [Show Current - Alt-A] | Show only current MDS items in the Medication table, or show all items (including Ended treatments). |
| Drug Identification | Add drug identification details for each of the items in the Medication table including the Form, Colour, Shape and Markings. Apotec CRM will save these settings and automatically populate these for your patient if you give further items from the same dispensed pack. |
| [Dispense - F4] | Quickly access the Dispensing Wizard for a highlighted patient. |
| [Edit Cycle Start Date - F5] | Open the Medication Cycle window where you can edit the cycle Start Date and Medication Cycle, including setting a Temporary Start Date that will refresh once you leave the MDS Manager. Reset the Dispensed quantity, Printed, eMAR exported and eMAR failed status badges for your highlighted patient or for all patients within the nursing home. If the Temporary Start Date is enabled the Resets options are disabled. |
| [End Treatment - F8] and [Restart Treatment - F8] | Use the [End Treatment - F8] button to end the treatment for the highlighted item in the Medication table. Once an item has been marked as Ended, you can restart the treatment using the [Restart Treatment - F8] button. |
| [Edit Dosage - F9] | Selecting this button will open the Edit Dosage Instruction window where you can update the dosage instruction for the highlighted item in the Medication table. It is important to note that changes made to the dosage instruction from this prompt will only update the patient's MDS record. You will need to edit the appropriate prescription to update the patient's medication history. |
| [Add Duplicate Treatment] and [Remove Duplicate Treatment] | Functionality coming soon. Highlight an item and select the [Add Duplicate Treatment] button to open the Add Duplicate Treatment window where you can duplicate the item in the Medication table with differing quantities, dosage instructions and administration times. Duplicate treatments will display with a ** DUPLICATE TREATMENT ** caption on MAR Charts and Backing Sheets. You will need to enable the Allow Duplicate Treatment application setting to see this button. Highlighting an item with the Duplicate badge will display the [Remove Duplicate Treatment] button, which you can select to remove the duplicated item from the Medication table. |
| Label preview | View a preview of the label for the highlighted item in the Medication table. |
| Administration Times table | Update administration quantities against the available Times in the table. Administration times are configured in the Nursing Home/Community patient's settings and will update for all patients in the nursing home if amended. |
| Sep. Container switch | Highlight an active item in the Medication table and toggle the Sep. Container switch to Yes to mark it as a separate container item. This switch may automatically be set to Yes if the item is stored as Topical in our drugs database. Any manual overrides to this switch will be remembered for your patient. By default the text Separate container will print on all MAR Charts and Backing Sheets below the drug name, dosage instruction and warnings for all items with this flag enabled. You can enter custom text for separate container items for all your nursing home/community patients in the Nursing Home/Community patient's settings. |
| Topical switch | Highlight an active item in the Medication table and toggle the Topical switch to Yes to mark the item as topical. A body image will print below each medication that has been marked as Topical on MAR Charts if a Body MAR Sheet has been selected as the MAR template in the Nursing Home/Community patient's settings. This switch may automatically be set to Yes if the item is stored as Topical in our drugs database. Any manual overrides to this switch will be remembered for your patient. |
| Complex Dose switch | Enable the  Edit icon button to edit complex dose times for each item in the Medication table. Edit icon button to edit complex dose times for each item in the Medication table. |
| Edit icon button (Complex Dose) | Select this button to open the Edit MDS Complex Dosage window where you can configure a complex dose schedule for non-daily or irregular doses for each item in the Medication table. |
| Add eMARX code dropdown | When the nursing home/community MDS eMAR type is set to EMarX or EMarX Local, an additional code will need to be added to each MDS item. |
| Treatment Dates | By default, the Start date is set to the first date the item was given. This can be amended if needed. The End date is only set once the treatment has been marked as Ended. When updating the start date of an item marked as Complex Dose, the calendar within the Edit MDS Complex Dosage window highlights the days within the cycle. It displays administration times only for those specific days. For example, if the start date is 1/1/2024 with a 28-day cycle, the calendar will highlight the events from 1/1/2024 to 28/01/2024. |
| Calendar | Dates in the calendar will be highlighted to indicate administration days. |
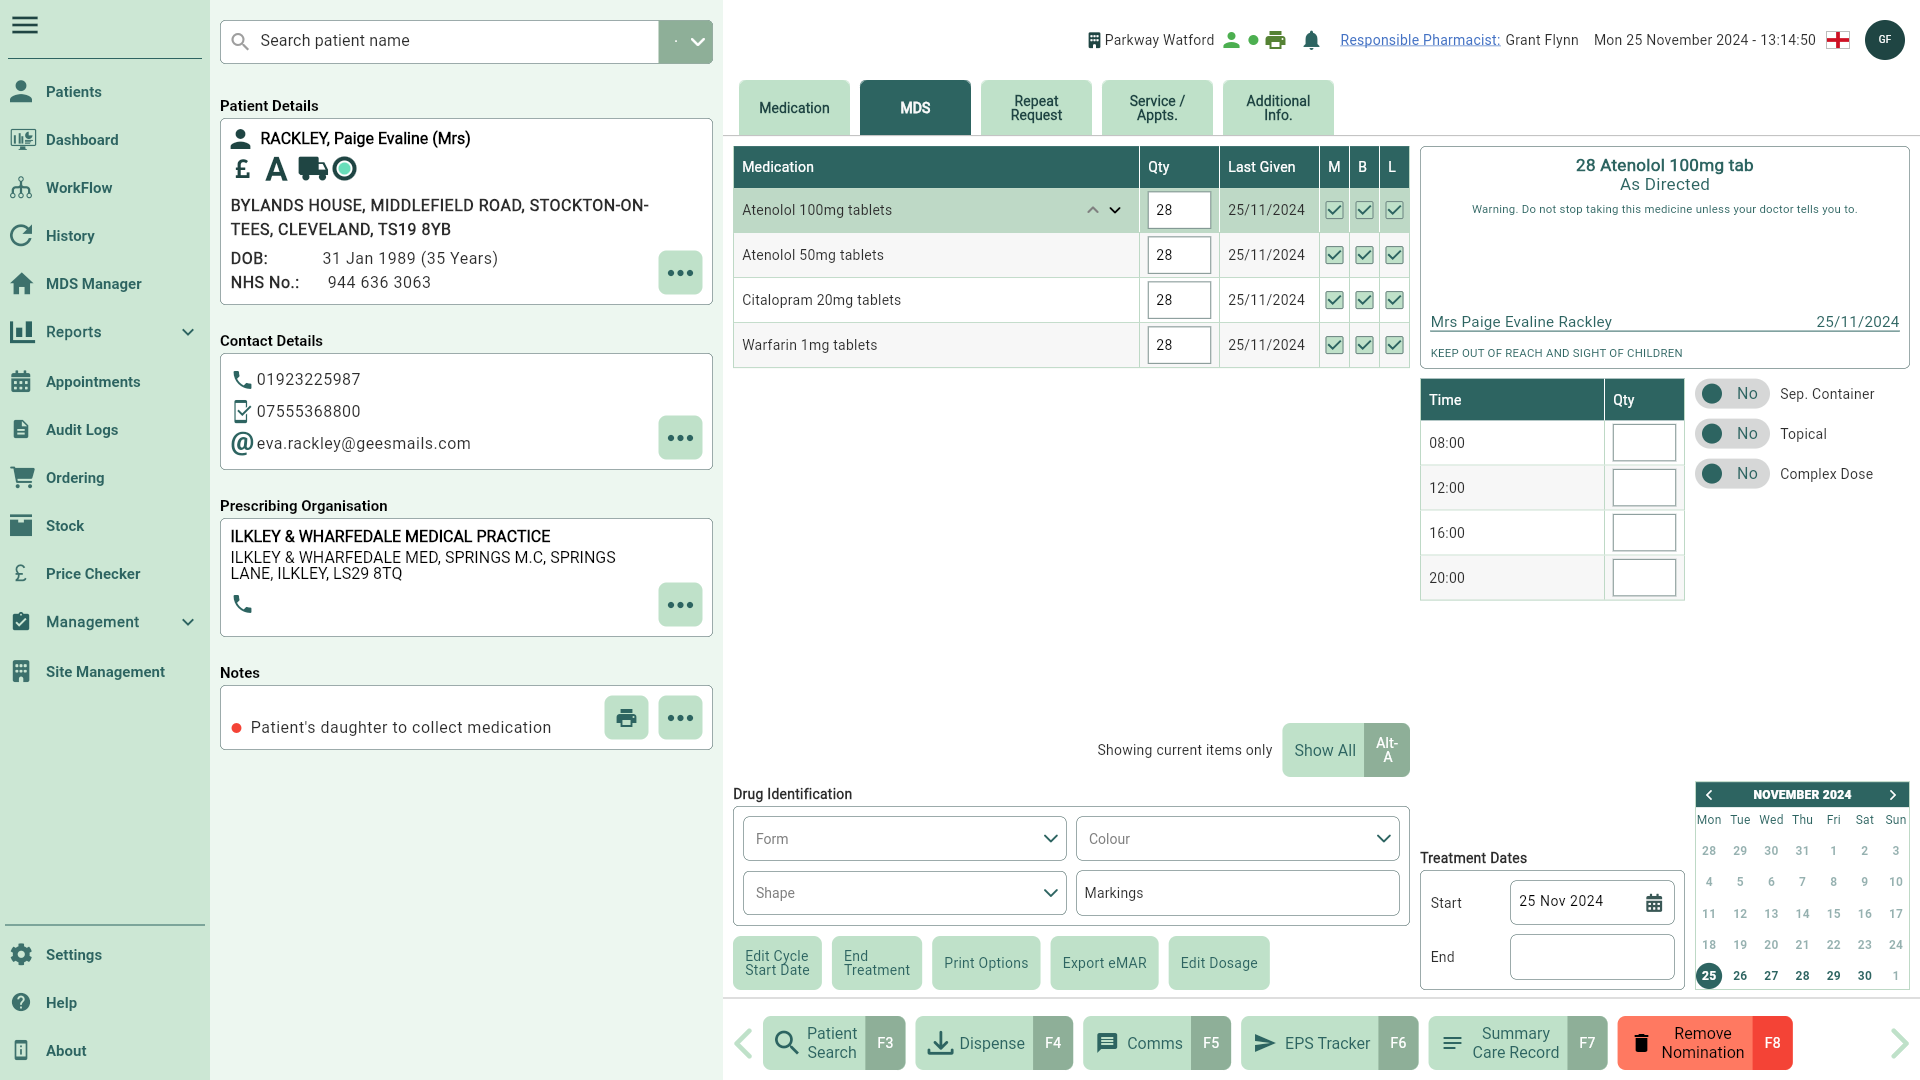
Patient MDS Tab
Once patients are added to a nursing home or as a community patient, an MDS tab will display in their patient record.
To access the MDS tab in the patient record, open the patient CRM and select the MDS tab.
Please take the utmost care when editing nursing home details as any amendments made will apply to all patients within the home.
| Field | Description |
|---|---|
| Medication table | Displays all the medication on the patient's MDS record including the item name, quantity, when the item was Last Given and the M, B and L checkboxes to flag items to print/export MAR Charts (M), Backing Sheets (B) and/or Labels (L) when the relevant print/export option is selected. You may see various badges in this table alongside your patient's medication, including Complex, Ended and Duplicate. You can find a full description of the all the medication badges in our MDS FAQs. |
| [Show All - Alt-A] and [Show Current - Alt-A] | Show only current MDS items in the Medication table, or show all items (including Ended treatments). |
| Drug Identification | Add drug identification details for each of the items in the Medication table including the Form, Colour, Shape and Markings. Apotec CRM will save these settings and automatically populate these for your patient if you give further items from the same dispensed pack. |
| [Edit Cycle Start Date] | Open the Medication Cycle window where you can edit the cycle Start Date and Medication Cycle, including setting a Temporary Start Date that will refresh once you leave the patient record. Reset the Dispensed quantity, Printed, eMAR exported and eMAR failed status badges for your highlighted patient or for all patients within the nursing home. If the Temporary Start Date is enabled the Resets options are disabled. |
| [End Treatment] and [Restart Treatment] | Use the [End Treatment] button to end the treatment for the highlighted item in the Medication table. Once an item has been marked as Ended, you can restart the treatment using the [Restart Treatment - F8] button. |
| [Edit Dosage] | Selecting this button will open the Edit Dosage Instruction window where you can update the dosage instruction for the highlighted item in the Medication table. It is important to note that changes made to the dosage instruction from this prompt will only update the patient's MDS record. You will need to edit the appropriate prescription to update the patient's medication history. |
| [Print Options] | Select this button to display all the printing options. You can print MAR Charts (M), Backing Sheets (B) and Labels (L) for items flagged as M, B and L, and consolidated or non-consolidated picking lists (as configured in your Nursing Home/Community patient's settings) for your patient. |
| [Export eMAR] | Select this button to transmit all items flagged as M for your patient on an electronic MAR (eMAR) chart. |
| [Add Duplicate Treatment] and [Remove Duplicate Treatment] | Functionality coming soon. Highlight an item and select the [Add Duplicate Treatment] button to open the Add Duplicate Treatment window where you can duplicate the item in the Medication table with differing quantities, dosage instructions and administration times. Duplicate treatments will display with a ** DUPLICATE TREATMENT ** caption on MAR Charts and Backing Sheets. You will need to enable the Allow Duplicate Treatment application setting to see this button. Highlighting an item with the Duplicate badge will display the [Remove Duplicate Treatment] button, which you can select to remove the duplicated item from the Medication table. |
| Label preview | View a preview of the label for the highlighted item in the Medication table. |
| Administration Times table | Update administration quantities against the available Times in the table. Administration times are configured in the Nursing Home/Community patient's settings and will update for all patients in the home if amended. |
| Sep. Container switch | Highlight an active item in the Medication table and toggle the Sep. Container switch to Yes to mark it as a separate container item. This switch may automatically be set to Yes if the item is stored as Topical in our drugs database. Any manual overrides to this switch will be remembered for your patient. By default the text Separate container will print on all MAR Charts and Backing Sheets below the drug name, dosage instruction and warnings for all items with this flag enabled. You can enter custom text for separate container items for all your nursing home/community patients in the Nursing Home/Community patient's settings. |
| Topical switch | Highlight an active item in the Medication table and toggle the Topical switch to Yes to mark the item as topical. A body image will print below each medication that has been marked as Topical on MAR Charts if a Body MAR Sheet has been selected as the MAR template in the Nursing Home/Community patient's settings. This switch may automatically be set to Yes if the item is stored as Topical in our drugs database. Any manual overrides to this switch will be remembered for your patient. |
| Complex Dose switch | Enable the Edit icon button to edit complex dose times for each item in the Medication table. |
| Edit icon button (Complex Dose) | Select this button to open the Edit MDS Complex Dosage window where you can configure a complex dose schedule for non-daily or irregular doses for each item in the Medication table. |
| Treatment Dates | By default, the Start date is set to the first date the item was given. This can be amended if needed. The End date is only set once the treatment has been marked as Ended. When updating the start date of an item marked as Complex Dose, the calendar within the Edit MDS Complex Dosage window highlights the days within the cycle. It displays administration times only for those specific days. For example, if the start date is 1/1/2024 with a 28-day cycle, the calendar will highlight the events from 1/1/2024 to 28/01/2024. |
| Calendar | Dates in the calendar will be highlighted to indicate administration days. |
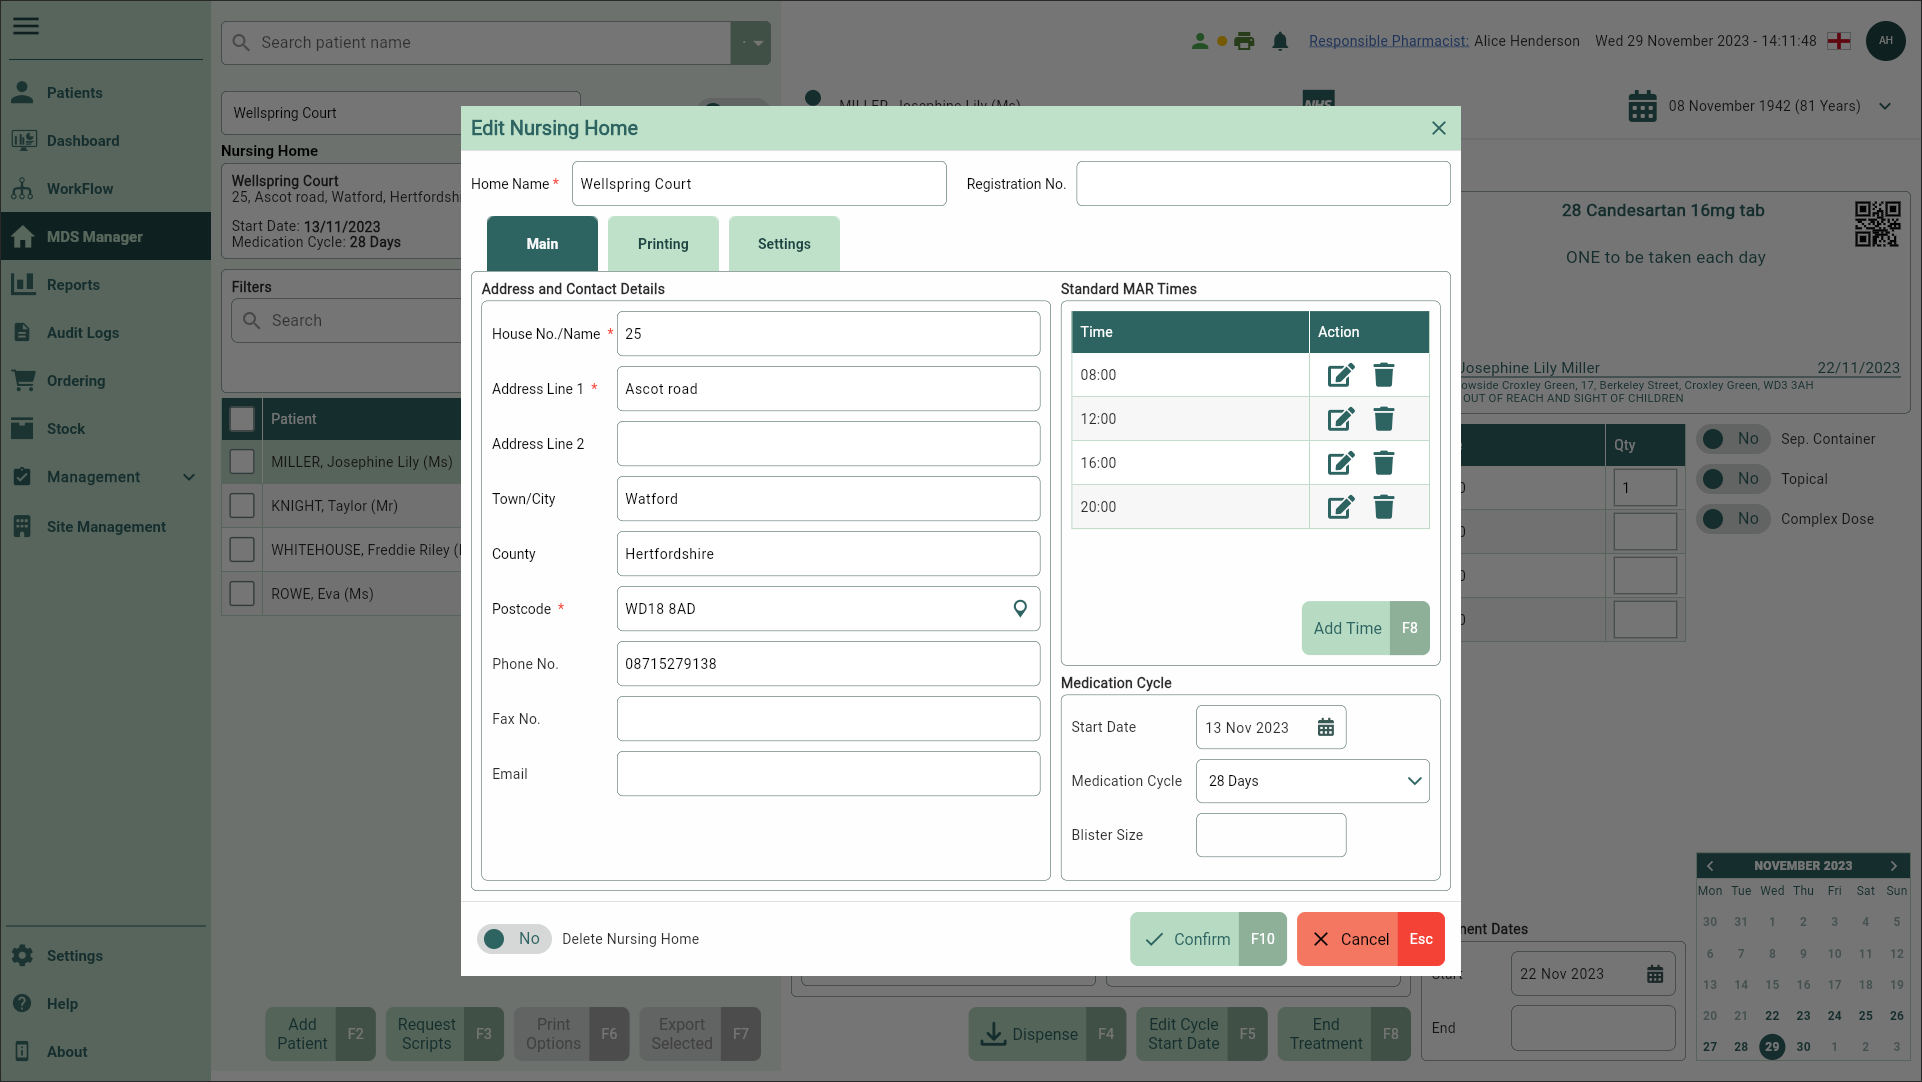
Nursing Home/Community MDS Settings
To access the settings for your nursing home or community patient, select the [...] button within the Nursing Home section in the MDS Manager or patient CRM.
Please take the utmost care when editing nursing home details as any amendments made will apply to all patients within the home.
Main
| Field | Description |
|---|---|
| Nursing Home/Community Patient Name | The nursing home or community patient's name. |
| Registration No. | [Nursing Home Settings only] You can use this field to enter an alphanumeric registration number, if required. |
| Address and Contact Details | The address and contact details for the nursing home/community patient. |
| Standard MAR Times table | Populate the standard administration times for your nursing home/community patient. These times will display during dispensing and on nursing home/community patient's MDS Charts. Using the icons in the Actions column, you can perform the following:
|
| [Add Time - F8] | Add administration times for your nursing home/community patient. You will need to save each administration time you add using the  Save icon in the Action column. Each nursing home/community patient must have at least one administration time. Save icon in the Action column. Each nursing home/community patient must have at least one administration time. |
| Medication Cycle Start Date | Enter the cycle start date for the nursing home/community patient. |
| Medication Cycle | Select the medication cycle duration using the dropdown. This can be set to 7, 10, 28 or 30 days. By default this is set to 28 Days. |
| Blister Size | Enter the blister size as a numerical, whole number. |
| Delete Nursing Home switch | [Nursing Home Settings only] Toggle the Delete Nursing Home switch to Yes to mark the nursing home as deleted. Once deleted, nursing homes will be hidden from the Nursing home dropdown but can be accessed and subsequently restored by toggling the Show Deleted switch to Yes at the top of the Patient panel in the MDS Manager. You will be asked to confirm the removal of any associated patients before the nursing home is deleted. |
| Active switch | [Community MDS Settings only] Toggle the Active switch to No to mark the community patient as Inactive. Inactive community patients will be hidden from the Patient table but can be accessed and subsequently marked as active by toggling the Show Inactive switch to Yes within the Patient panel Filters in the MDS Manager. |
 Delete icon to delete existing times.
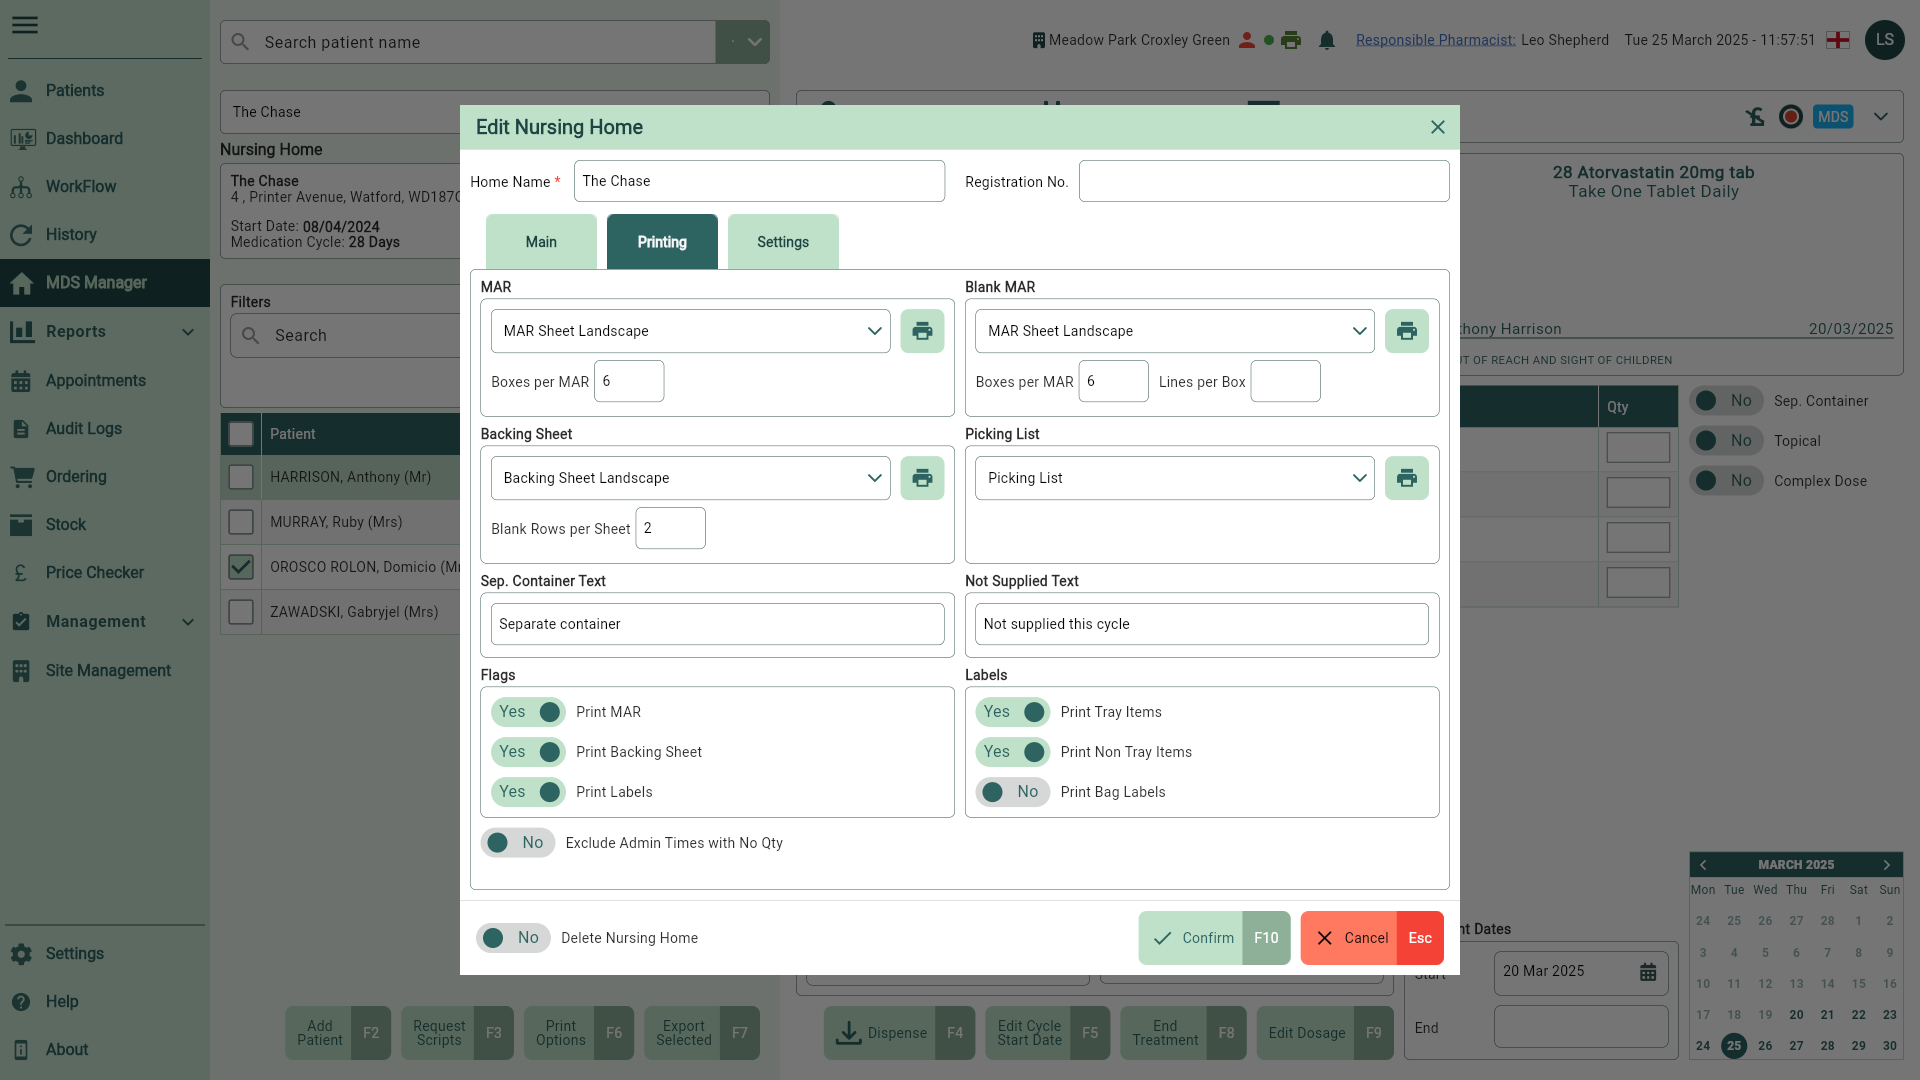
Printing
| Field | Description |
|---|---|
| MAR | Use the dropdown to select the MAR Chart report template for your nursing home/community patient. You can use the icon button to view a preview of the report. |
| Blank MAR | Use the dropdown to select the MAR Chart report template to print for blank MAR charts. You can set the Boxes per MAR to determine the number of item boxes to display on the chart, and configure the Lines per Box to set the number of administration time lines that display within each item box. Use the  Print icon button to print a blank MAR Chart to a PDF. Print icon button to print a blank MAR Chart to a PDF. |
| Backing Sheet | Use the dropdown to select the Backing Sheet report template for your nursing home/community patient. Add additional blank rows on your Backing Sheets by entering a value in the Blank Rows per Sheet field. You can use the icon button to view a preview of the report. |
| Picking List | Use the dropdown to select the Picking List report template for your nursing home/community patient. You can use the icon button to view a preview of the report. |
| Sep. Container Text | By default the text Separate container will print on all MAR Charts and Backing Sheets below the drug name, dosage instruction and warnings for all items with this flag enabled. You can override the default text by entering a new value in this field. |
| Not Supplied Text | By default the text Not supplied this cycle will print on all MAR Charts and Backing Sheets below the drug name, dosage instruction and warnings for all items enabled to print but with a dispensed quantity of 0. You can override the default text by entering a new value in this field. |
| Flags | MDS items need to be flagged as M, B and/or L in the Medication table to print MAR Charts (M), Backing Sheets (B) and Labels (L). You can set the default value for the M, B and L flags for all newly added MDS items for your community patients, or each patient in your nursing home, by toggling the Print MAR (M), Print Backing Sheet (B) and/or Print Labels (L) switches to Yes. Set these switches to No to deselect these flags by default. |
| Labels | Select the labels you require for your MDS items. These will be printed during dispensing.
|
| Exclude Admin Times with No Qty | Toggle this switch to remove any empty medication administration times (those without a dosage) from the MAR sheet, ensuring that only times with actual administrations are printed. By default, for new or unedited Nursing Homes, this switch is set to No. Note: While this feature aids in managing empty admin times, please be aware that Backing Sheets are limited to six administration times. Sites with more than six admin times on a Backing Sheet may encounter display issues. |
Settings
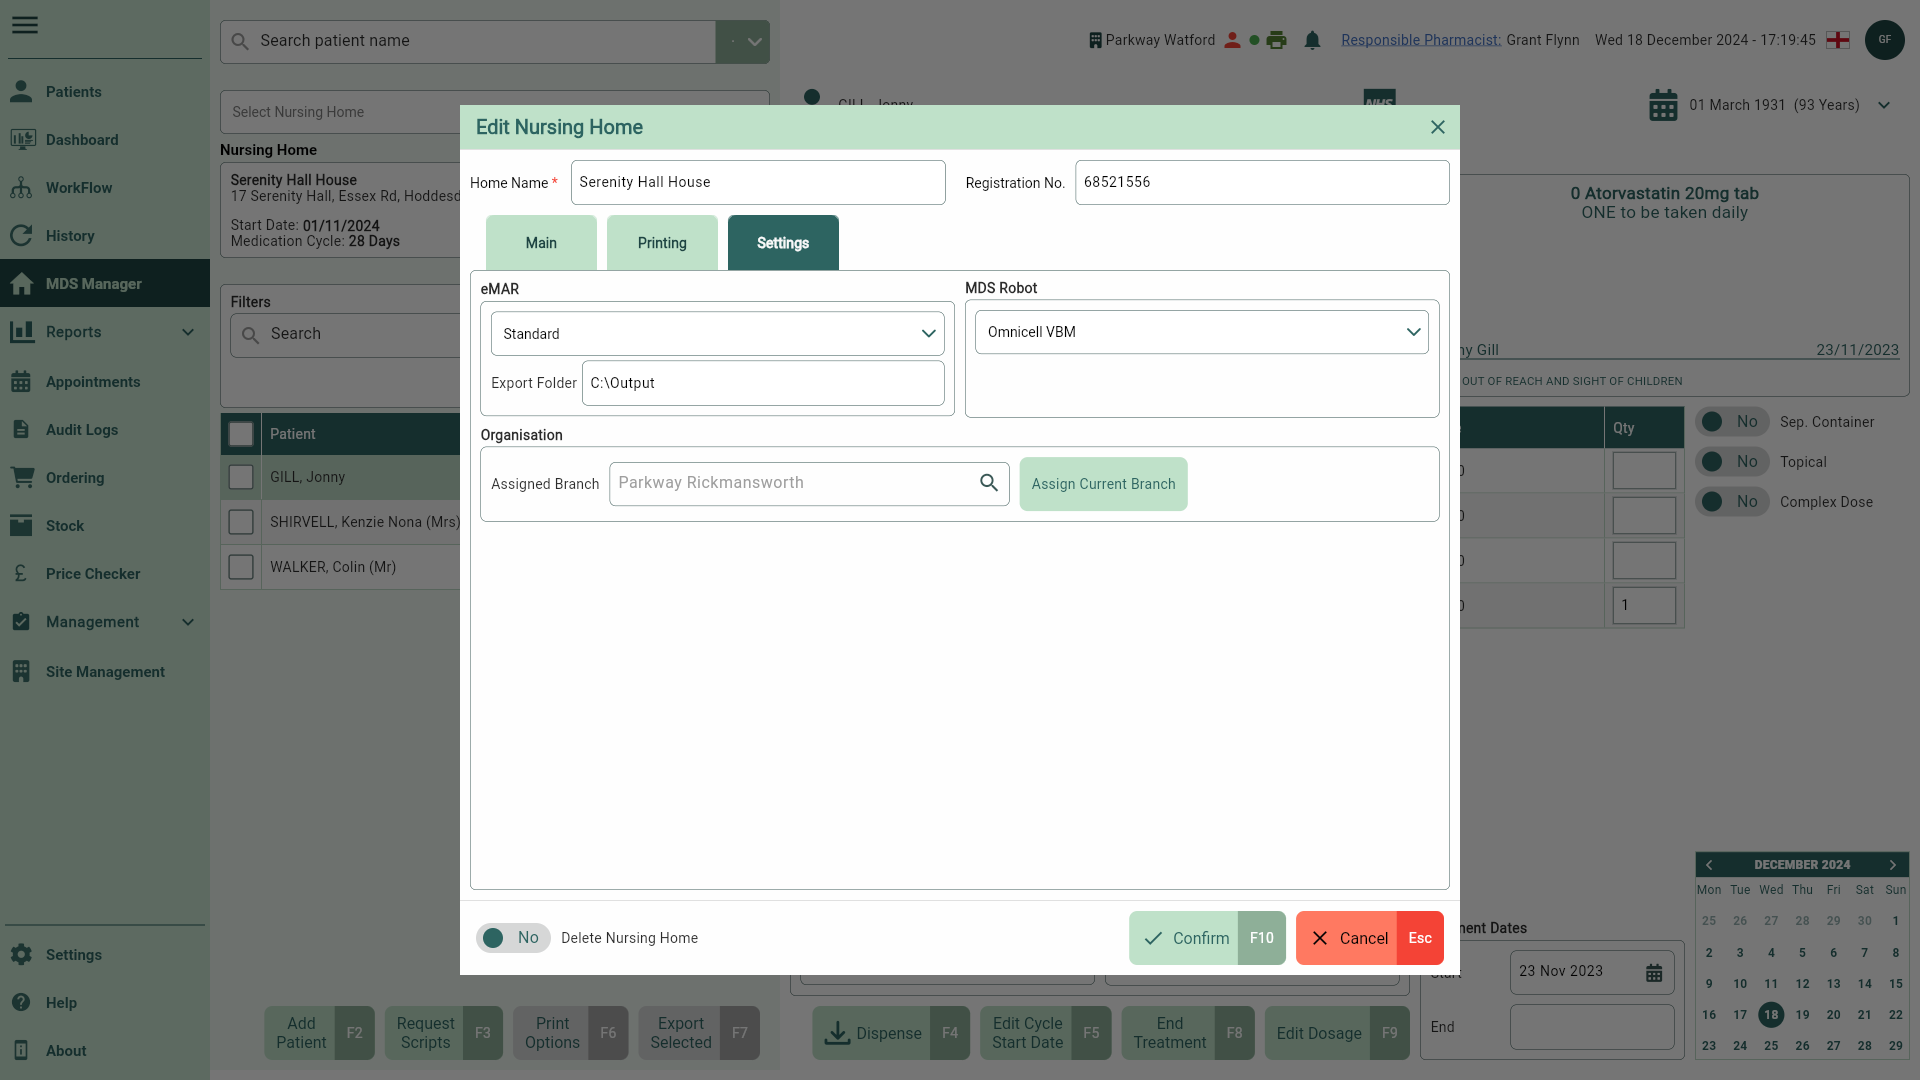
| Field | Description |
|---|---|
| eMAR | Activate eMAR transmissions for your nursing home or community patient by using the Type dropdown to select from the available eMAR outputs. An Export Folder may be required for certain eMAR types. |
| MDS Robot | Configure an MDS Robot using the Type dropdown to select from the list of supported MDS robots. |
| Organisation | Assign a branch to your nursing home. Each nursing home must be assigned a branch. When adding a nursing home, the current branch will be set by default. You can select the [Assign Current Branch] button to populate the Assigned Branch field with your branch details. |
MDS Printing Options
Before printing, you can temporarily adjust your printing settings via the MDS Printing Options window. Printing options are configured based on your settings within the Nursing Home/Community patient's settings.
You can access this window from the MDS Manager or the MDS tab in the patient's CRM.
Accessing the Printing Options window
| Module/Area | Access |
|---|---|
| MDS Manager |
|
| MDS tab in the Patient's CRM |
|
MAR
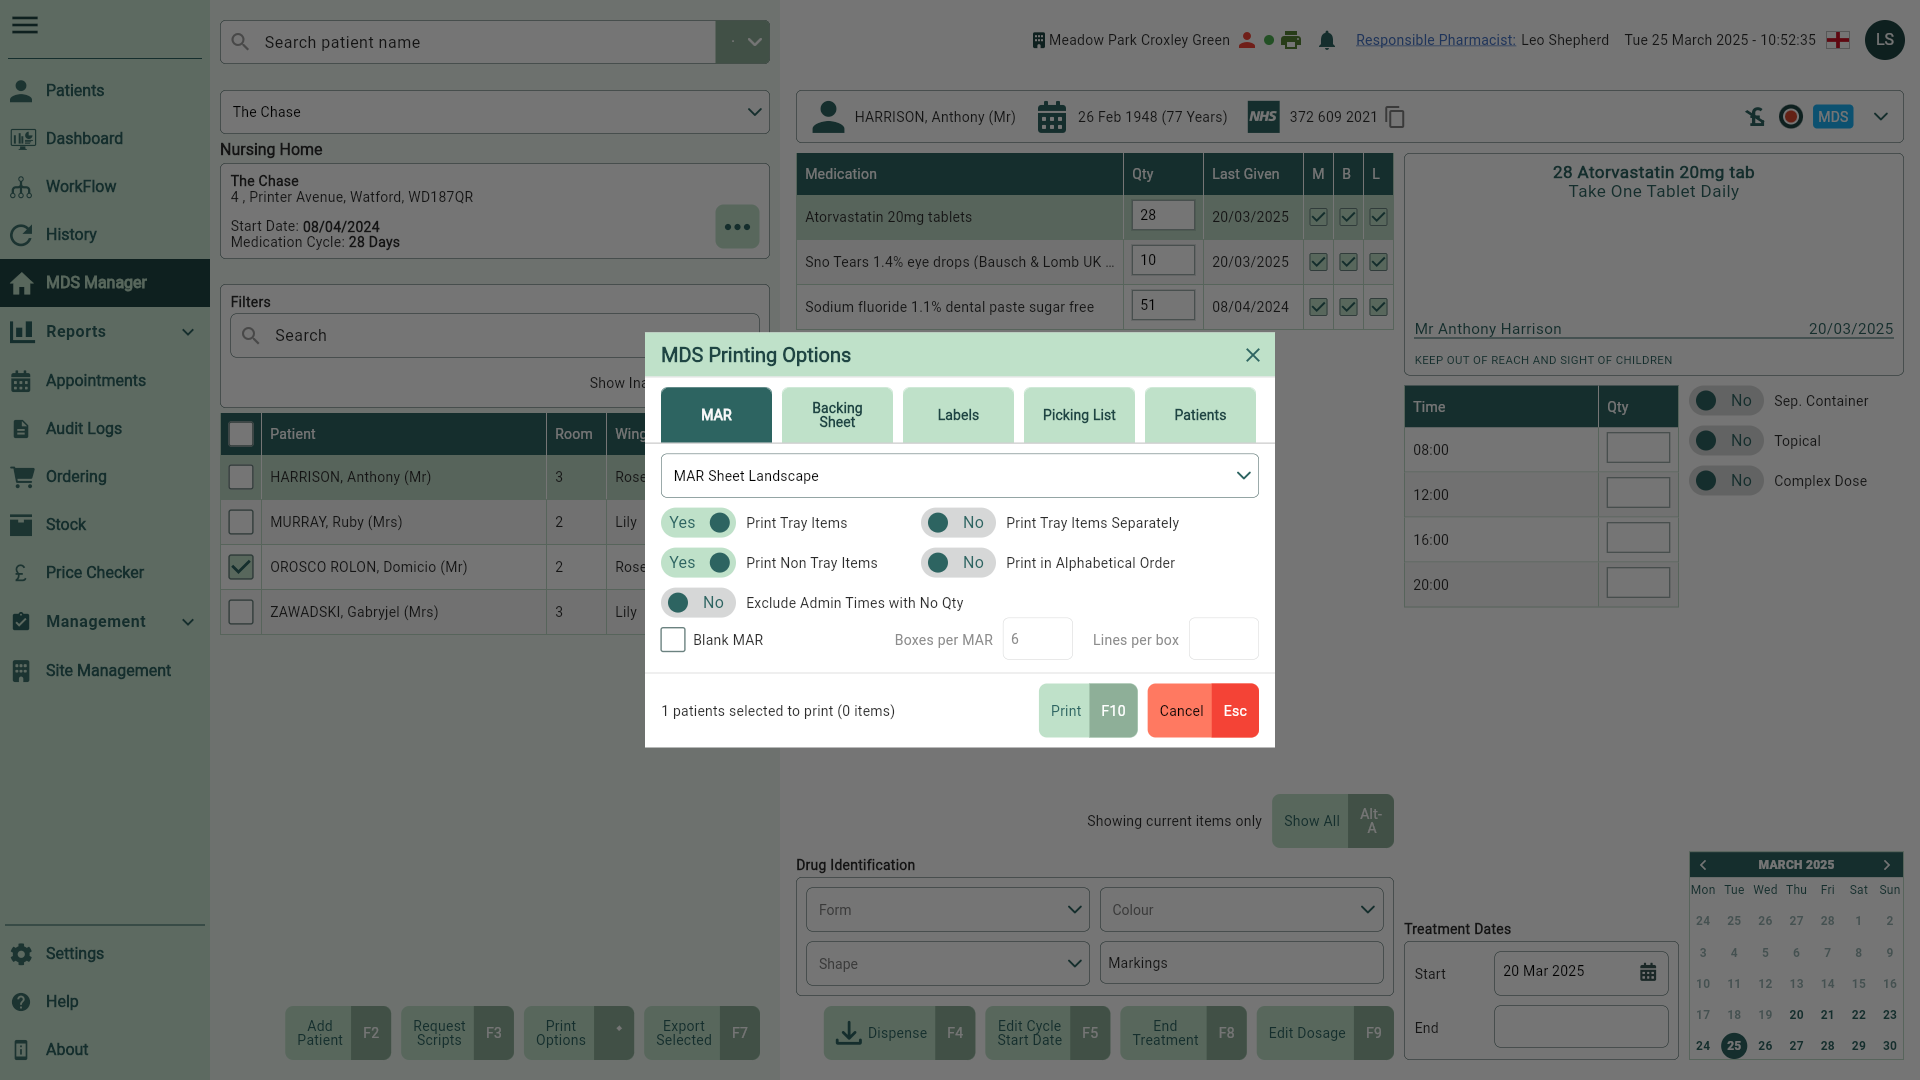
The number of patients selected will be displayed at the bottom of the window.
| Field | Description |
|---|---|
| MAR Report dropdown | Use the dropdown to select the MAR Chart report template for your nursing home/community patient. By default, the value entered during the initial nursing home setup is displayed. This can be edited via the Printing tab in the Edit Nursing Home window. |
| Print Tray Items | Toggle this switch to print items with the Sep. Container switch set to No on the MAR. |
| Print Non Tray Items | Toggle this switch to print items with the Sep. Container switch set to Yes on the MAR. |
| Exclude Admin Times with No Qty | Toggle this switch to remove any empty medication administration times (those without a dosage) from the MAR sheet, ensuring that only times with actual administrations are printed. |
| Print Tray Items Separately | Toggle this switch to print items with the Sep. Container switch set to Yes and No on separate pages of the MAR. This switch will be enabled when both Print Non Tray Items and Print Tray Items toggles are switched to Yes. |
| Print in Alphabetical Order | Toggle this switch to print medication items in alphabetical order. |
| Blank MAR checkbox | Select to print a blank MAR chart. The remaining options will be disabled. |
| Boxes per MAR | Enabled when the Blank MAR checkbox is selected. Enter the number of boxes per MAR to be printed. By default, the value entered during the initial nursing home setup is displayed. This can be edited via the Printing tab in the Edit Nursing Home window. |
| Lines per box | Enabled when the Blank MAR checkbox is selected. Enter the number of lines per box required. By default, the value entered during the initial nursing home setup is displayed. This can be edited via the Printing tab in the Edit Nursing Home window. |
Backing Sheet

| Field | Description |
|---|---|
| Backing Sheet Report dropdown | Use the dropdown to select the Backing Sheet report template for your nursing home/community patient. By default, the value entered during the initial nursing home setup is displayed. This can be edited via the Printing tab in the Edit Nursing Home window. |
| Print Tray Items | Toggle this switch to print items with the Sep. Container switch set to No on the Backing Sheet. |
| Print Non Tray Items | Toggle this switch to print items with the Sep. Container switch set to Yes on the Backing Sheet. |
| Exclude Admin Times with No Qty | Toggle this switch to remove any empty medication administration times (those without a dosage) from the MAR sheet, ensuring that only times with actual administrations are printed. By default, for new or unedited Nursing Homes, this switch is set to No. Note: While this feature aids in managing empty admin times, please be aware that Backing Sheets are limited to six administration times. Sites with more than six admin times on a Backing Sheet may encounter display issues. |
| Print Tray Items Separately | Toggle this switch to print items with the Sep. Container switch set to Yes and No on separate pages of the Backing Sheet. This switch will be enabled when both Print Non Tray Items and Print Tray Items toggles are switched to Yes. |
| Print in Alphabetical Order | Toggle this switch to print medication items in alphabetical order. |
| Week selection checkboxes | Determines which weeks are printed for each patient. By default all checkboxes will be selected. |
Labels
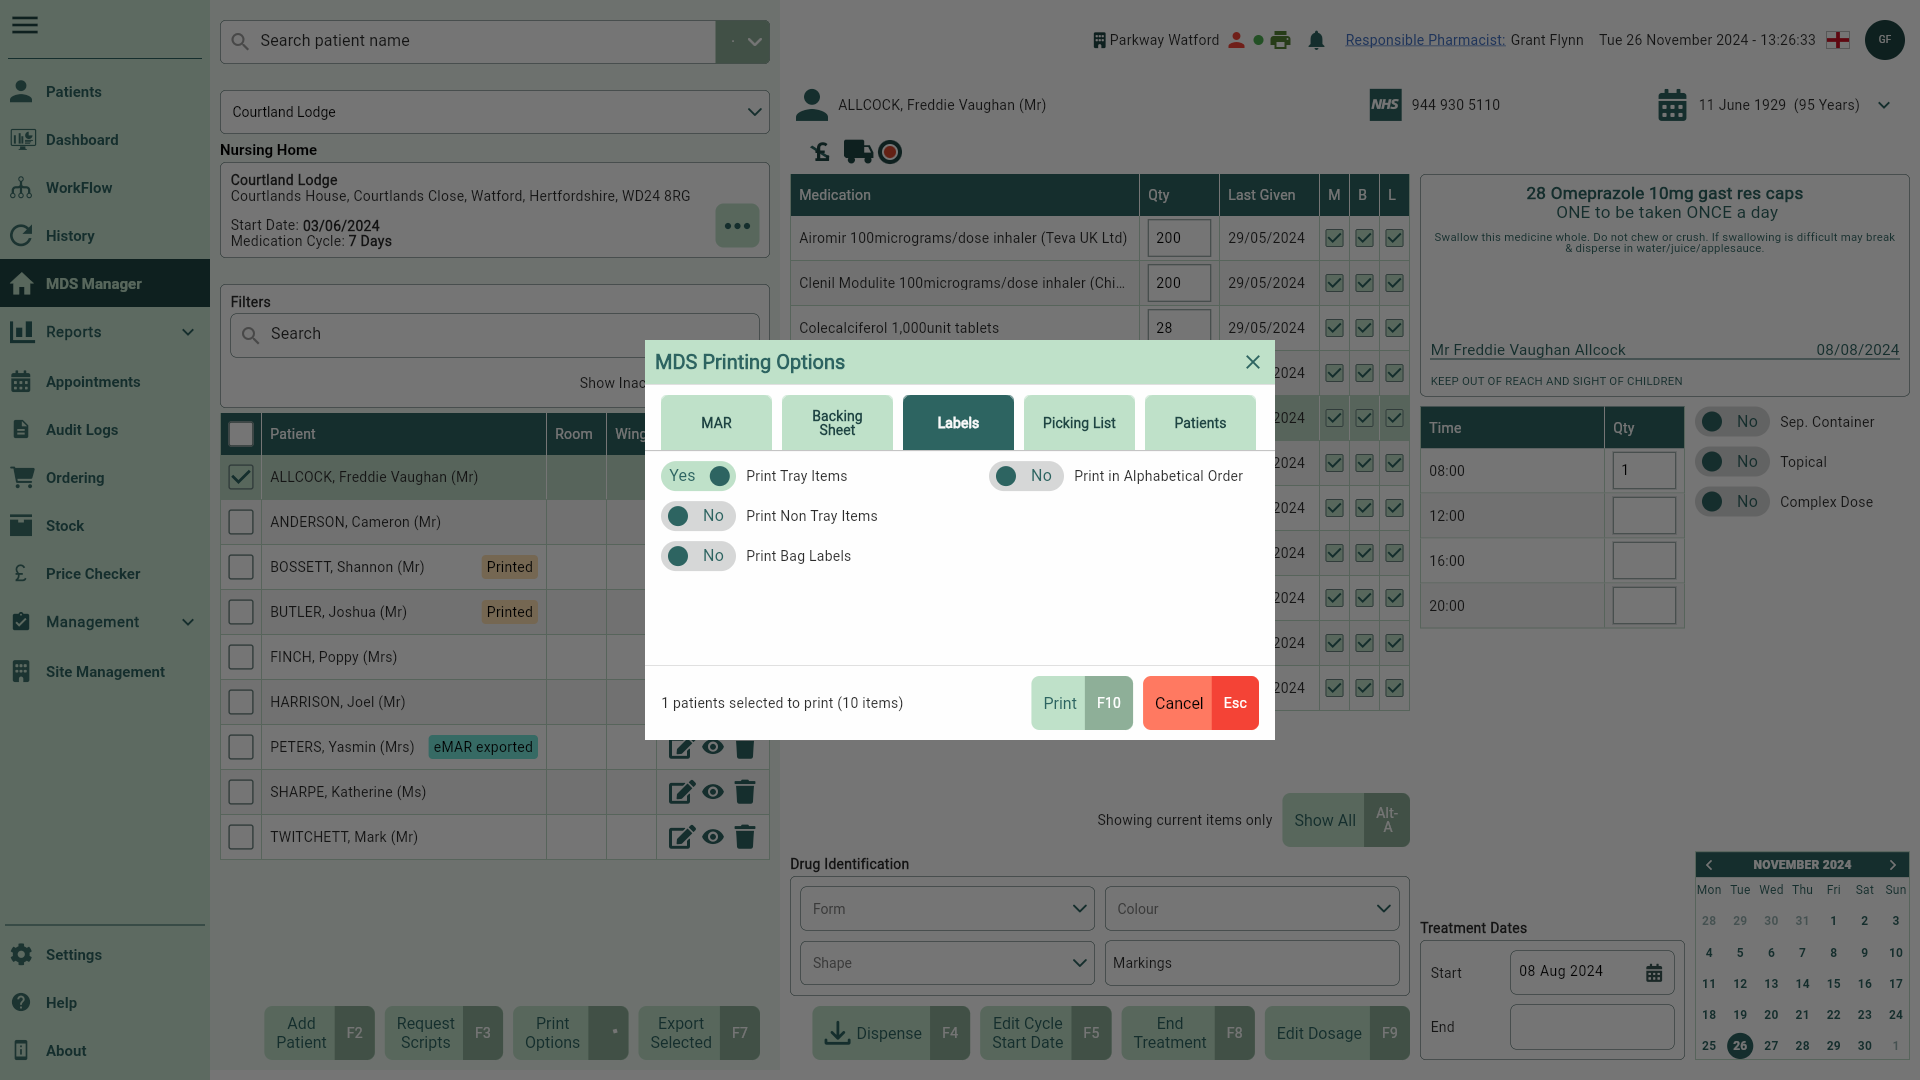
| Field | Description |
|---|---|
| Print Tray Items | Toggle this switch to print a label for items with the Sep. Container switch set to No. |
| Print Non Tray Items | Toggle this switch to print a label for items with the Sep. Container switch set to Yes. |
| Print Bag Labels | Toggle this switch to print a bag label. |
| Print in Alphabetical Order | Toggle this switch to print medication items in alphabetical order, after sorting by patient order. |
Picking List
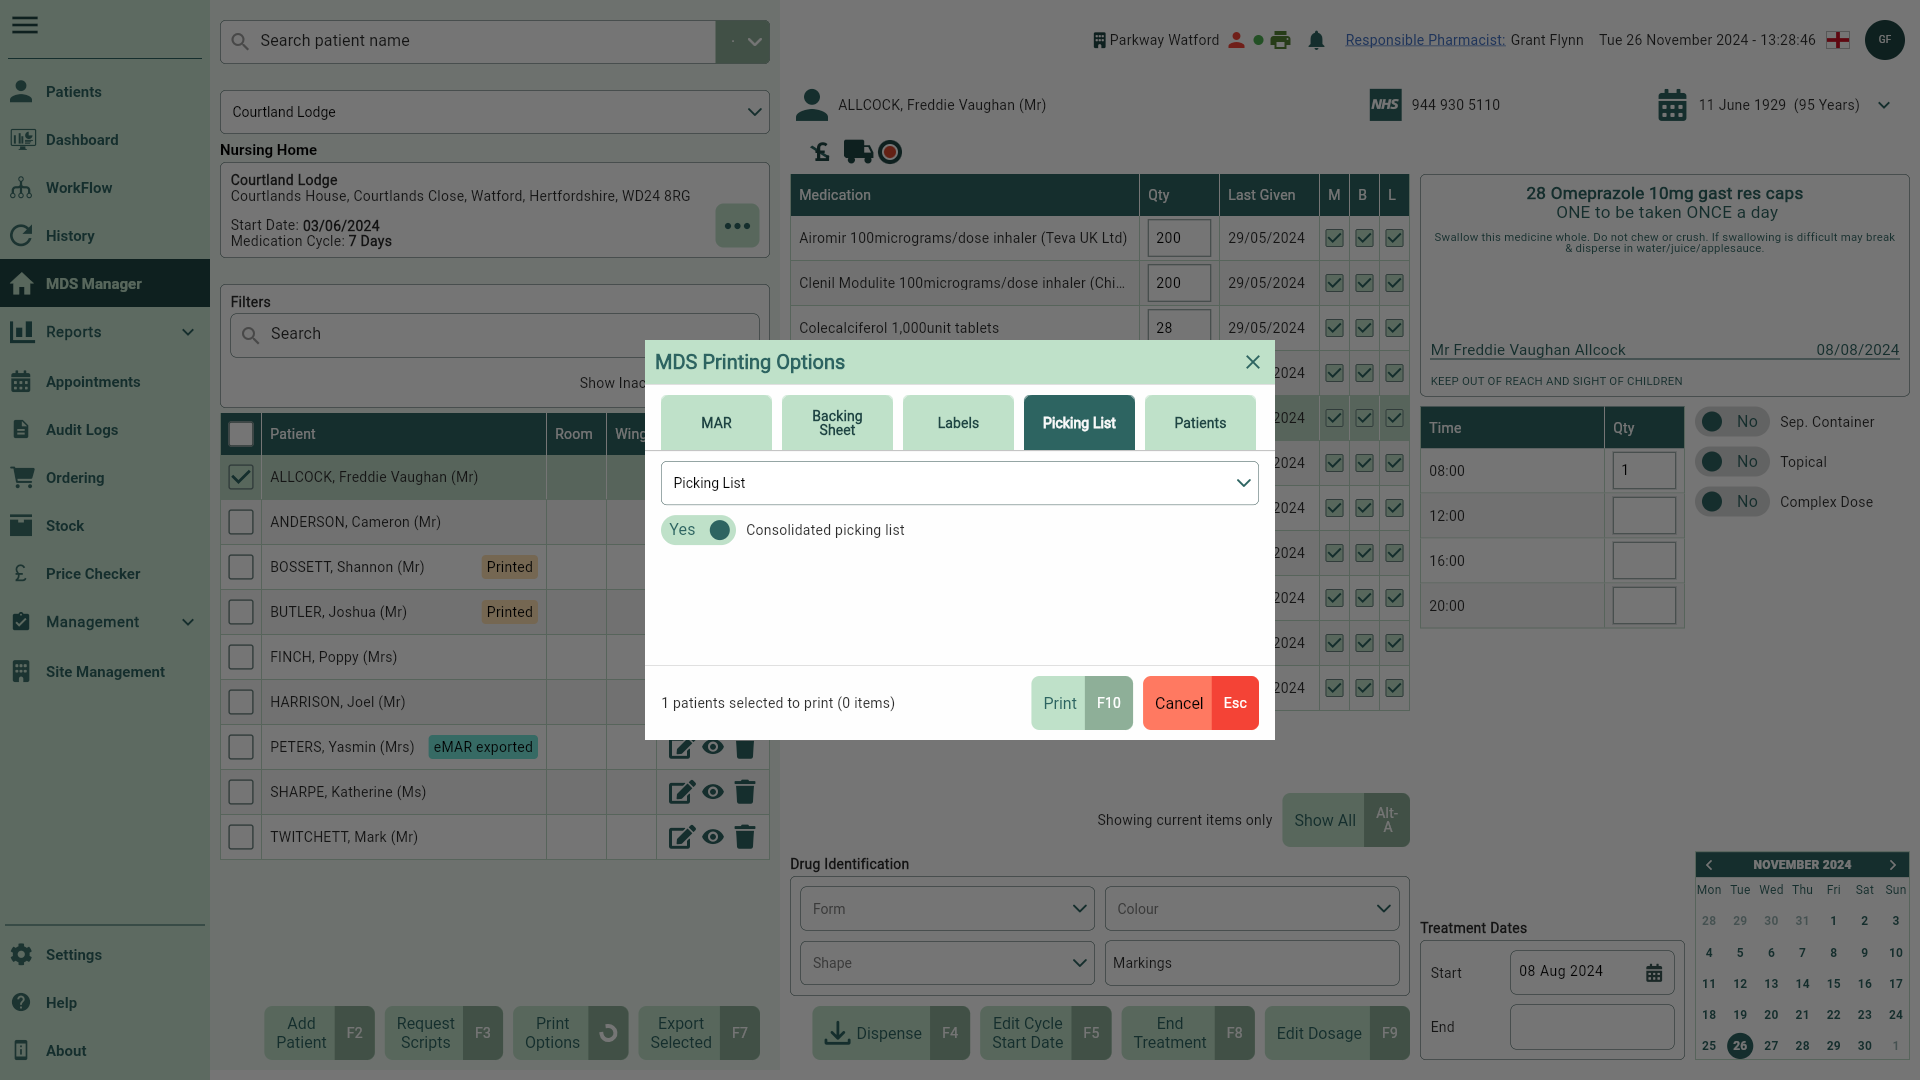
| Field | Description |
|---|---|
| Picking List dropdown | Use the dropdown to select a Picking List option for your nursing home/community patient. By default, the value entered during the initial nursing home setup is displayed. This can be edited via the Printing tab in the Edit Nursing Home window. |
| Consolidated picking list | Toggle this switch to Yes to consolidate your picking list items. The item count will be updated to reflect the changes. |
Patients
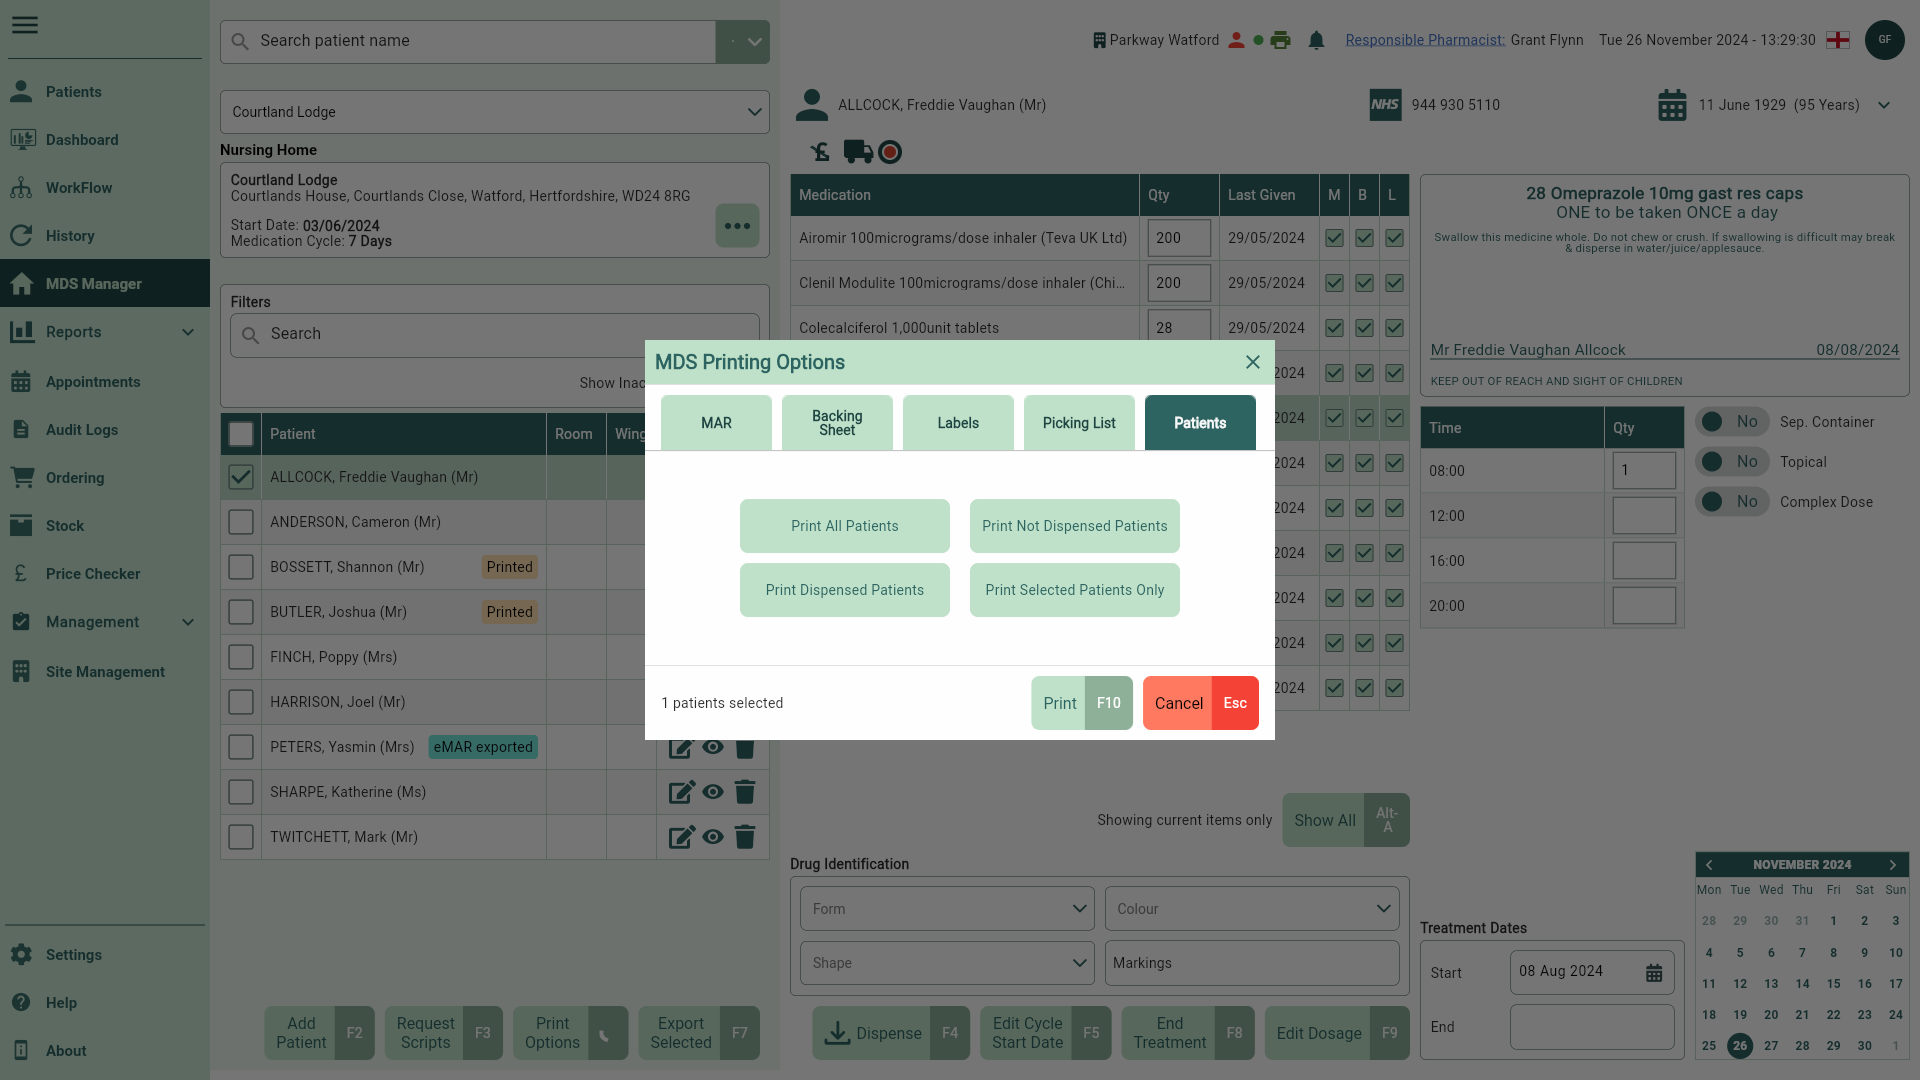
Patient lists cannot be printed directly from the patient CRM MDS tab. If required, select the [MDS Manager] button via the Patients tab to jump to the selected patient’s nursing home/community MDS in the MDS Manager and print lists as needed.
| Field | Description |
|---|---|
| [Print All Patients] | Select to print a list of all active patients within the current nursing home. |
| [Print Not Dispensed Patients] | Select to print all patients within the nursing home that have not had a prescription dispensed within the current medication cycle. |
| [Print Dispensed Patients] | Select to print all patients within the nursing home who have had a prescription dispensed within the current medication cycle. |
| [Print Selected Patients Only] | Select to print your manually selected patients. |